| Author |
 Topic Topic  |
|
Stanley
Local Historian & Old Fart


36804 Posts

|
|
 Posted -
25/11/2004
:
14:20 Posted -
25/11/2004
:
14:20
|
I've always been fascinated by the things people do in their spare time when they can do exactly what they want to do. Men and sheds are a particularly fertile field. Women tend to do their thing in the comfort of the house.
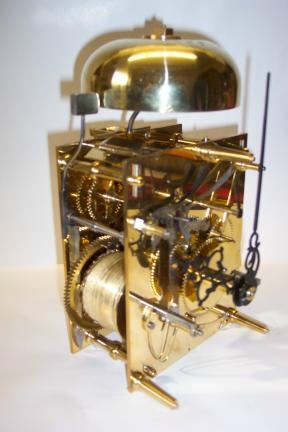
I was delighted to see Andy's picture of the clock movement he has made.
It struck me that we could perhaps start a new topic devoted to spare time skill. So Andy starts it off and my contribution is this:
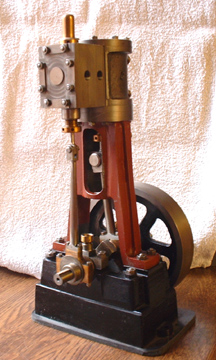
It's a small steam engine made from scratch and is based on the Stuart 5A but a longer stroke. One of these will drive a 14 foot boat with steam at 250psi. By the way, we don't like to call them models, it's exactly the same construction and materials as a full size engine, just smaller. So come on out there, let's hear about what you make in your spare time. I reckon we could be in for some surprises!
Stanley Challenger Graham

Barlick View
stanley at barnoldswick.freeserve.co.uk
|
|
| Replies |
| Author |
|
|
Stanley
Local Historian & Old Fart
36804 Posts
|
|
Posted - 20/11/2007 : 06:07
The Vernier I use all the time is calibrated for sixty fourths..... funnily enough, made in Germany by Mauser! I have one that is for 1/100 and another for 1/1000. Then there's the digi vernier but I only use that for roughing out, it isn't dead accurate. DRO is great for production and modern methods but I'm still scratching lines on bits of metal and machining to them by eye. I'd never make a toolmaker! I think one of the saddest things I have ever seen is the digital set-ups that the modern breed of ornamental turners use. Seems to me that they have lost sight of the art, they're just mathematicians and ironmongers. I know, I'm an Old Fart but I do make useful things that work!
I got mail this morning which might interest you lot, it was from Walter Brunner in Switzerland who visited me recently to suck my brains out:
Good evening Stanley, I am just ready to machine the key ways on the crank shaft for the cranks on my Corliss Cross Compound engine, when I started thinking about the positioning of the cranks. I am inclined to think, that maybe the crank on the HP side ought to lead in the direction of turning followed by the crank on the LP side offset by 90º. Is my assumption correct? By the way congratulation on the new set up of the web page. Everything works fine, just super. Kind regards Walter Walter, All the cross compounds I have seen have the LP crank leading by 90 degrees if they have been quartered. I have talked to Newton about this and he never had an explanation. My own opinion is that the engine makers preferred to have the LP pulling on the shaft after the push of the first HP stroke. If you think about it, if the HP was leading the first two strokes would be pushing the shaft the same way. I can only think that they wanted to squeeze the oil in the bearing both ways in the first two strokes to make sure that they had good oil distribution. This is my own idea and I can't really see a big advantage, I have never heard anyone offer any explanation. Newton did once tell me about an engine that was quartered using a strange angle, I've forgotten which it was and he said it was a mistake. By the way, Tandems were usually set with the left hand engine leading. Point is, do you trust my advice and explanation? The new dedicated server is costing us £850 a year....... But it's worth it. Best, S.
So there, that's my explanation. Any different ideas?
PS. Old Arthur Entwistle used to work in the toolroom and he was the only one that could get useful accuracy out of an old surface grinder that they had. He had a rubber hammer and when he wanted a final skim he knew where to hit the bed and how hard...... When he retired they scrapped the machine.
Stanley Challenger Graham
Barlick View
stanley at barnoldswick.freeserve.co.uk  |
Gugger
|
Posted - 20/11/2007 : 09:14
Stanley, did I suck your brain out?
Is that what I did store in a big tin in my workshop?
Walter
|
Stanley
Local Historian & Old Fart
36804 Posts
|
|
Posted - 20/11/2007 : 09:57
Look after it Walter, I might need it back one of these days...... By the way, the keyways on the shafts of the full size engines were only meant for a dummy key which was used to make sure the crank was properly located when they slid it on the shaft. They got them hot first and it was the shrinkage that held them in place. You could knock the key out and the crank would never move. In later years I introduced Newton to shaft grade Loctite and he never made a loc wheel a press fit again. He said they always drifted a bit when you were pressing them on. With Loctite he could make sure they were quartered properly before he left them to set. I can remember his horror when he found I had glued a wear strip on the bottom of the crosshead on the donkey engine in the taping department at Bancroft Shed. I had to assure him I'd put two countersunk screws in as well just to make sure........
Stanley Challenger Graham
Barlick View
stanley at barnoldswick.freeserve.co.uk |
softsuvner
|
Posted - 20/11/2007 : 11:06
Stanley
Shaft fits and keys, and hopefully loctite, are curently a very live "issue" with me, will post a couple of pics later.
Malcolm
|
softsuvner
|
Posted - 20/11/2007 : 14:28
I hope that Stanley will forgive me for bursting into the shed like this, but shafts and keys are a very tender subject with me at the moment.
When the British motorcycle industry changed from the chain or belt driven dynamo to the alternator, someone, I suspect Joseph Lucas (known amongst Brit bike enthusiasts as " The Prince of Darkness"!) came up with an engineering arrangement that laid a trap for future owners. It took nearly 20 years of happy belting around the roads, but eventually I fell into the trap.
On my 1953 Triumph twin the alternator rotor (the 'eavy bit with the magnets in) sits on the end of the engine mainshaft. On this bike the drive sprocket sits on splines, so there is no problem there. But for some reason, the rotor is a light press fit on a parallel section using a thin flat key. Conventional wisdom would have used a taper and "half moon" key as used on the clutch and drive sprockets of older bokes. The rotor is secured by a nut and tab washer which locates in the keyway. Eventually the tab washer shears and, the rotor moves off the key savaging the stator coils, its seat and the keyway.
If you are really unlucky, on the early rotor, the magnets are not fixed to the core and, on highly stressed bikes, it is not unknown for the rotor to explode like some steam engine flywheels did when an engine "ran away"! Never happend to me luckily.
My luck ran out one balmy summer night in 2006 when making my brisk way home from a bike club night about 40 miles from home. I didn't notice the extra vibration, well you don't on an old twin at 60 mph, until it was too late.

The photo shows the rotor still, loosely, in place, and the remains of the stator together with a new stator (which in the event turned out to be the wrong size!). Initially I was hoping for a quick fix, that idea went down the pan when I saw the seat and keyway:

About this time I hit some health problems and the job got delayed. Time passes, the engine is back home and in the frame, with a sort of "fix" that still raises a few worries. But I'll leave that for another day when Stanley forgets to lock the shed door again!
In the meantime, why did they opt for a parallel seat and shallow key for such a heavy lump as the rotor. I still suspect it was to save money on machining but, am I being unfair?
Malcolm
|
hermetic
New Member

3 Posts
|
|
Posted - 20/11/2007 : 16:11
Hi softsuvner, so, the prince of darkness strikes again eh. I think I have seen this prob before. Thing is that uncle joe designed the alternator, and all the manufacturers provided a shaft to match.. you are quite right that a taper would be better, and I have in the back of my mind that I have seen this type of alternator rotor with a taper, and indeed most crankshaft mounted alternators with the magnet rotor on the outside of the stator coils did use a taper.. The problem can be caused by the nut and tab washer coming up against the shoulder before they have tightened up onto the rotor and the chainwheel behind it. This can be caused by a bit of wear to the shoulder behind the engine sprocket, or some shims, or spacers. missing. certainly the job can be shimmed up to make it all bolt up tight again, bit how to repair the shaft? Is it a one piece crank? if it is, get it metal sprayed and turned up to size. If they are tight, the parralell shaft is no problem, but if there is any looseness at all the magnet will fret the shaft away in no time, good luck!
please excuse spelling, I am typing with an eyepatch on ! |
Big Kev
|
Posted - 20/11/2007 : 16:34
please excuse spelling, I am typing with an eyepatch on ! Are you wearing it on a finger?
Edited by - Big Kev on 20/11/2007 16:36:08
Big Kev
It doesn't matter who you vote for, you always end up with the government. |
hermetic
New Member
3 Posts
|
|
Posted - 20/11/2007 : 17:21
I just kinew I shouldn't have put that! |
softsuvner
|
Posted - 20/11/2007 : 23:24
Hi Hermetic
This problem seems to be endemic to early alternator Triumphs, I have a mate with an identical bike from the following year that has the same problem. Being a proper engineer, his rotor is held tight with shims (between rotor and shaft) and loctite! I expect you are right, Joe Lucas decided not to bother machining a taper, and Triumph and Co rejoiced in saving a few bob on machining!
New cranks are only available on a one-off basis (for racing bikes) so out of the question on cost. I farmed the job out, and went the metal spraying road but, as the next instalment may show, this was not without problems. For this bike (1953-4 season) only, the alternator is held in the outer chaincase cover. They soon ditched that idea and rigidly mounted it on a spider attached to the crankcase. This attachment method has been a problem in itself, that's what I have been on with today, making some new collars to get the correct location for the stator. keeps me off the streets as we say over here.
Malcolm
|
Stanley
Local Historian & Old Fart
36804 Posts
|
|
Posted - 21/11/2007 : 07:25
I hope you lot swept up when you left the shed...... Stop apologising Malcolm, it's nice to have a bit of a change of subject particularly as nothing was done on the engines yesterday while Doc wheeled me into Colne to get my pot gobblers welded (a fine job and only £25!). I think you are all right and on the right track. It's quite obvious that the best solution would have been a taper located on a Woodruff Key (You and your half moon, let's use the proper terminology! Get a grip!) As you all know, fitted like that the job is permanent and the only downside is you need to invest in a good set of pullers as that is the only way to get them off. I think I can guess what the problems were after metal spraying but I'll wait 'til you come back with the next sit-rep! Bad though the design is, theoratically there is no reason why a properly fitted key shouldn't hold the rotor in place. Only problem is that the more grip the key has the more risk of the rotor getting some unwanted eccentricity. I once had a similar problem and had to make a quick fix to get us running again and my problem was that in the process of working loose the rotating bit had worn both the shaft and the bore. In desperation, I tinned the shaft, made another key added a bit of shaft grade Loctite to the mix and forced the rotating bit on as a temporary fix. Never touched it again........ Hard solder, if constrained so it can't creep can be tough stuff!
Today is a normal day, we are back on the valves once I have emptied Jack!
Stanley Challenger Graham
Barlick View
stanley at barnoldswick.freeserve.co.uk |
The Demo Man
|
Posted - 21/11/2007 : 17:21
Hello all, just noticed you've clocked up a 1,000 posts, CONGRATS CHAPS!
I regularly read this to expand my education as it where and just thought I must acknowledge your stirling work.
Well done!
Titch |
Stanley
Local Historian & Old Fart
36804 Posts
|
|
Posted - 21/11/2007 : 17:54
Thanks for that Titch. Good therapy making things instead of knocking them down......
Dinnertime today. All three nuts made, fitted and numbered. Took Jack for his walk, had a sandwich and then went to bed to escape the gloom.........
Stanley Challenger Graham
Barlick View
stanley at barnoldswick.freeserve.co.uk |
softsuvner
|
Posted - 23/11/2007 : 00:39
Just popping me head round the shed door with an update on the bike alternator. Been a bit busy recently but managed to get in the shed and try a "dry run" assembly last night.
The chap who did the metal spraying claimed that he got it accurate with a run out of 3 thou (but without the key in). The keyway wasn't brillian so I had to do a bit of nervous fettling with the Swiss files.
I don't normally do "precision", but for this one I dug out the dial gauge and stand. With it all locked up (but without the stator) the total variance on the rotor (measured at front and then middle) was 4 thou. Put the outer on and the stator air gap seems O.K. certainly workable.
After a long chat on the phone with the mate with the 1955 T'Bird, decided to settle for this. Hopefully we will go for a final assembly in the next day or so. Pictures with the next update.
malcolm
|
Stanley
Local Historian & Old Fart
36804 Posts
|
|
Posted - 23/11/2007 : 07:22
You sound as though you are doing all the right things Malcolm. (Must be wonderful therapy after work......) As Newton used to say about repairs like this, all that matters is if it works! One thing that struck me constantly during my automotive fitting career was that the designers were simply concerned to make something that worked with the least production expense. Damage to the end of a c'shaft was no problem to them, you simply fitted a new shaft! repair didn't come into the calulation. The other aspect of design that often drove me crackers was access. I could give you endless examples of designs that had never taken into account that maintenance demands access. I've bent more spanners or otherwise modified them than I can count! The worst example of this was Caterpillar engines. You needed thin walled ring spanners and sockets to get into the nuts. At one time Britool made special ring and socket sets for Caterpillar fitters. Nothing done in the shed yesterday, finalising my Living Will......
Stanley Challenger Graham
Barlick View
stanley at barnoldswick.freeserve.co.uk |
Stanley
Local Historian & Old Fart
36804 Posts
|
|
Posted - 23/11/2007 : 14:53
I have to apologise to the cognoscenti…. Nothing has been done in the shed today. What with visits by wandering webmasters, itinerant tradesmen, buying almost half a cow (a small one, a Dexter), cooking Jack’s chicken and putting the finishing touches to my Living Will, my day has vanished…. Add bread-making, vacuuming and the usual small daily tasks and you have a day that has reached almost 3pm and feels wasted. Not really of course but there you are. A better record tomorrow!
Stanley Challenger Graham
Barlick View
stanley at barnoldswick.freeserve.co.uk |
|
|
|
|