| Author |
 Topic Topic  |
|
Stanley
Local Historian & Old Fart


36804 Posts

|
|
 Posted -
25/11/2004
:
14:20 Posted -
25/11/2004
:
14:20
|
I've always been fascinated by the things people do in their spare time when they can do exactly what they want to do. Men and sheds are a particularly fertile field. Women tend to do their thing in the comfort of the house.
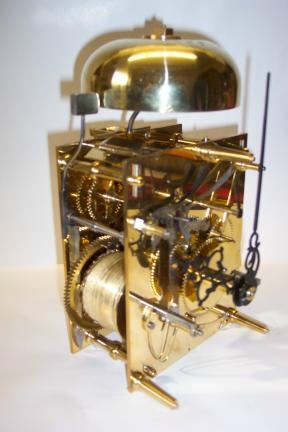
I was delighted to see Andy's picture of the clock movement he has made.
It struck me that we could perhaps start a new topic devoted to spare time skill. So Andy starts it off and my contribution is this:
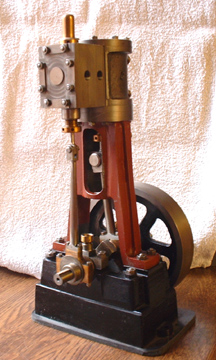
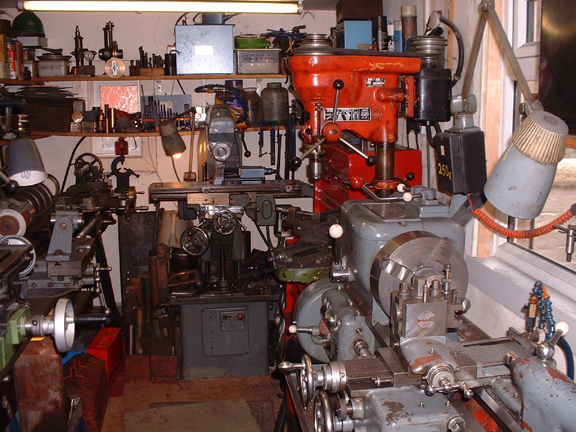
It's a small steam engine made from scratch and is based on the Stuart 5A but a longer stroke. One of these will drive a 14 foot boat with steam at 250psi. By the way, we don't like to call them models, it's exactly the same construction and materials as a full size engine, just smaller. So come on out there, let's hear about what you make in your spare time. I reckon we could be in for some surprises!
Stanley Challenger Graham

Barlick View
stanley at barnoldswick.freeserve.co.uk
|
|
| Replies |
| Author |
|
|
Steve48
New Member

19 Posts
|
|
Posted - 19/07/2007 : 12:28
They say the man who doesnt make mistakes, doesnt make anything. I think those are some very true words. I have been, off and on getting my Panther ready for the road, very off and on I might add, like three years later still no MOT. But I have made quite a few bits for her during those periods. I did a deal with someone who rebuilds magnetos, I did a heap of machining for him in exchange, that was last month and I have been tinkering ever since. I reached the point of trying to run it up, but couldnt get the tuning right, it seemed to be way too rich........
Well Wally of the Year award goes to me for getting fixated on the choke working the other way around, now I am not working backwards, it runs.........quite well.
Just thought I'd mention it, confession is good for the soul so they say.
Steve
 |
Stanley
Local Historian & Old Fart
36804 Posts
|
|
Posted - 19/07/2007 : 17:55
I think it's essential to come clean because that helps the beginners more than anything. My best one lately was making a left hand tap and then wondering why it wouldn't cut.... I was turning it the wrong way wasn't I...
Another fun-filled day in the shed. First cuts, nit centered, across the face of the cylinder to get it to dimension at this end.
First face finished. Notice that the core was 3/8 out of centre, never trust the moulder!
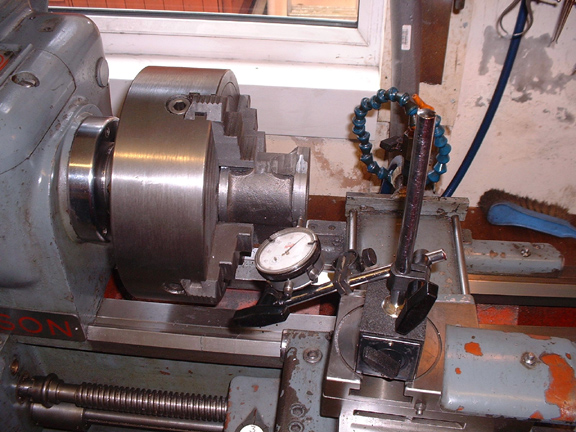
Getting serious now with this face because the same setting will be used to bore the cylinder. I got it to within 2 thou, near enough for little lads.
While the boring bar was going through on a nice slow heavy cut I went upstairs and collected some of the next candidates for shaving. Plenty to do yet!
Here's the finished bore and if you're wondering what is stuck into it, it's a piece of centrifugally cast iron that I have had about me for a while. Exactly 2 1/4" diameter and I have enough to make three pistons. So, not a lot done today in quantity but I have the method and set-up right now and so tomorrow will be plain sailing along the same lines. I never rush boring cylinders, too important, they have to be concentric, parallel, straight, the corrects size and the best finish possible. Worth a bit of care and bugger the time. Tomorrow I shall be able to machine the valve face on the VM while the cylinder is boring.
Stanley Challenger Graham
Barlick View
stanley at barnoldswick.freeserve.co.uk |
softsuvner
|
Posted - 20/07/2007 : 00:01
Hi Steve
Welcome to the site, now Stanley has someone who can interupt him at a higher engineering level that I can manage! Had a quick look at the Rivett 608 lathe on lathe co uk, looks a flash piece of tackle with all the engine-turning - not the functionalism that I associate with American engineering at all.
Three years to revive one of Cleckheaton's finest machines isn't all that long really, it is always the small detail that takes the time. I hope your mag. man isn't the same as mine. My version of Yorkshire's other favourite motorcycle toasted its magneto in May. I don't normally bother craftsman I trust but, after 5 weeks, I did ring the mag man to see how things were "going". I should explain that he works from an amazing shed in the backyard of a terraced house literally in the shadow of Hillsborough Stadium (something to do with football goes on there - not my game) - just up the road from Owlerton speedway stadium. The answer to my enquiry was : "the 3 foot of floodwater has gone, we are just finishing the new floor, it'll be about a fortnight".............always somebody worse off etc.
You are not the first to get caught out with the choke cable, people have been known to switch the throttle and choke cables as well. If in doubt, grab a handful of throttle and if you can stick a finger down the trumpet, and get a nip when you let the twist grip go, you are alright!
Malcolm
|
Stanley
Local Historian & Old Fart
36804 Posts
|
|
Posted - 20/07/2007 : 05:24
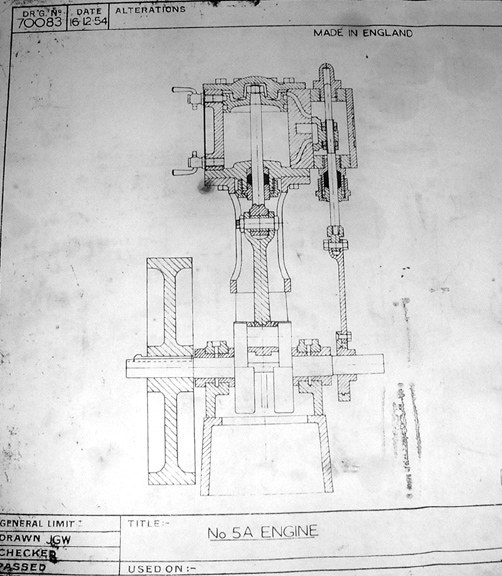
I thought I'd post this general arrangement drawing of the original 5A so you can see the changes Newton mase to the design. What triggered me was the piston. Look at Stuart's idea of a piston, over complicated and a bugger to turn. The one I make will be just like the ones we put in proper engines, a dead simple cylinder with flat ends, a recessed nut and long enough to fill the bore to get compression with flat covers at each end. I shan't bother with rings, I'll use old fashioned graphite and asbestos string, wonderful how long it lasts as a piston ring. Mind you. I might go overbard with the compound and fit rings and a junk ring......
Stanley Challenger Graham
Barlick View
stanley at barnoldswick.freeserve.co.uk |
pluggy
|
Posted - 20/07/2007 : 19:26
Argghhhh, its twenty five past seven, and I'm sweating out my next fix of Stanley's shed.......
Need computer work ?
"http://www.stsr.co.uk" 
Pluggy's Household Monitor |
Stanley
Local Historian & Old Fart
36804 Posts
|
|
Posted - 21/07/2007 : 05:27
Sorry Kids, I turned the PC off and unplugged it because it looked like thunder and I had decided to have a bull day anyway because today (Saturday) is a writing day, I have to get some articles written for BET to keep in front of them. I finished up doing two hours overtime so I could reach a straight edge with a clean lathe and miller. I was just climbing out of the shower when you wrote that Pluggy!
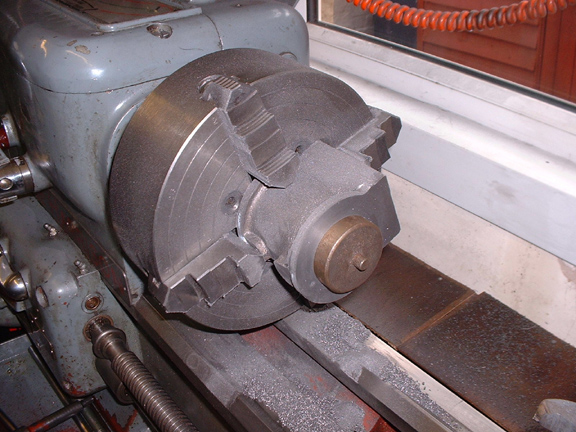
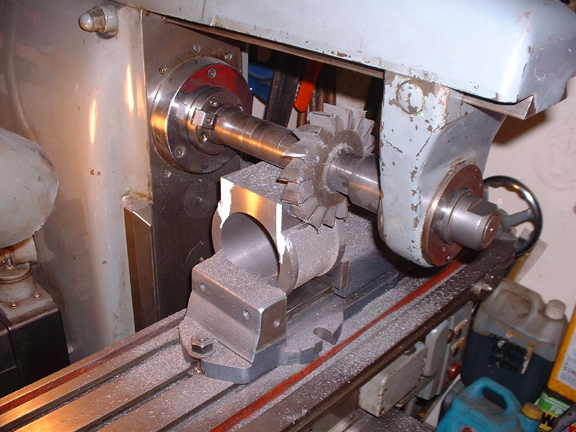
First job was to get the bored cylinder out of the four jaw and set up the next one. This is where doing batches of parts for four engines comes in handy. All the little cylinders are machined the same size externally and so putting the next one in was easy. I faced it at each end to dimension (3" overall) and then started it off boring on a slow heavy cut. While this was boring I Marked out the first cylinder for the facing cuts on the valve box and set it up in the horizontal miller. Cooking with gas now, lathe and miller on autofeed and both running together!
Clever stuff Eh?
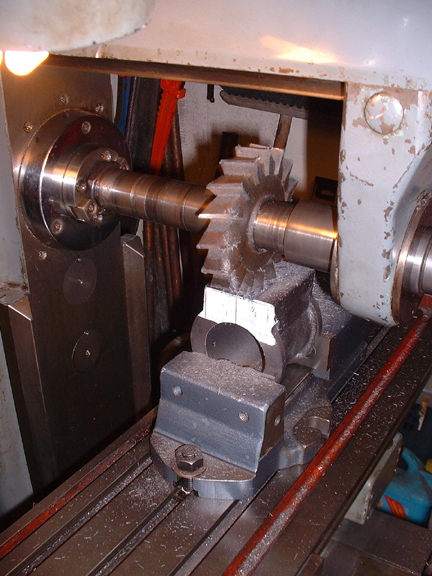
Horizontal millers are seen as old fashioned nowadays but for some jobs they are ideal, this is one of them. Three cuts across the face and one down each side, all on the same set up.
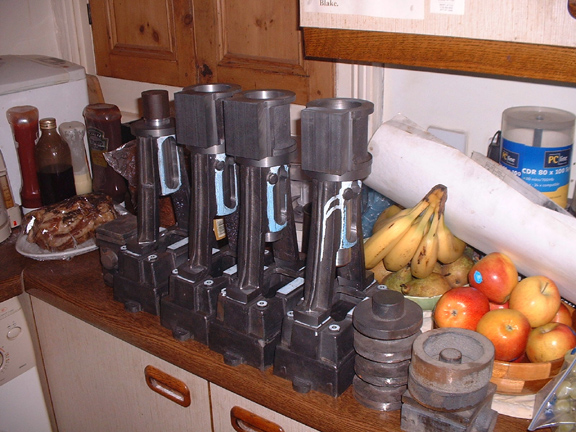
End of the day, the three small cylinders are all faced and ready for the next operations. I shall cheat and pick out the best one for the compound engine..... Next job is the big cylinder. A lot of sand in the dace of that casting, different foundry, so I shall grind the faces of the valve box off with the angle grinder before attempting anything on it. But that's for tomorrow, another hat on now and a day's writing! (Well nearly a day, you never know I might get round to some shed later......
Stanley Challenger Graham
Barlick View
stanley at barnoldswick.freeserve.co.uk |
Stanley
Local Historian & Old Fart
36804 Posts
|
|
Posted - 21/07/2007 : 07:07
It just struck me looking at the last pic, if you look carefully there is a fresh baked loaf hiding behind the end engine, a lump of roasted spare rib to keep the Old Fart going and a big bunch of fruit. All done on the same day, who says that blokes can't multi-task! Oh, and I cooked Jack's chicken for him as well......
Stanley Challenger Graham
Barlick View
stanley at barnoldswick.freeserve.co.uk |
tripps
|
Posted - 21/07/2007 : 10:36
Thank goodness at last something in one of these pictures that makes some sense to me. Bread meat and fruit. It's probably me, but these things don't look like any engine I've ever seen. A bit like Rolph Harris's paintings - 'now do you know what it is?'
|
Stanley
Local Historian & Old Fart
36804 Posts
|
|
Posted - 21/07/2007 : 15:22
Ahh David, this is genesis.... Keep watching and you'll know all about inverted vertical steam engines by the time we're finished. (Haven't done anything today apart from take five minutes to grind the sand off the big cylinder.) Oh, I've just made some apple sauce to go with the spare rib, roll on teatime.
Stanley Challenger Graham
Barlick View
stanley at barnoldswick.freeserve.co.uk |
Steve48
New Member
19 Posts
|
|
Posted - 21/07/2007 : 17:06
Nice progress Stanley, both in the kitchen and in the shed. Most of my day has been getting another Lorch LL, a bit of a wreck, but it has just about all the parts I was missing on the one I am restoring, so another step forwards
Your mention of sand in the castings makes me wonder what came first, did they discover glass when doing sand castings hundreds of years ago, one and the same thing isnt it.
Steve
|
Stanley
Local Historian & Old Fart
36804 Posts
|
|
Posted - 22/07/2007 : 05:38
Steve, I think glass came earlier.... Imagine someone lighting a fire in the desert and wondering what the fused sand was when it went out...... Am refreshed after a day off yesterday and have written one article..... Pluggy will get his fix later today.
Stanley Challenger Graham
Barlick View
stanley at barnoldswick.freeserve.co.uk |
Stanley
Local Historian & Old Fart
36804 Posts
|
|
Posted - 23/07/2007 : 06:01
Alright, I lied and never posted last night.....
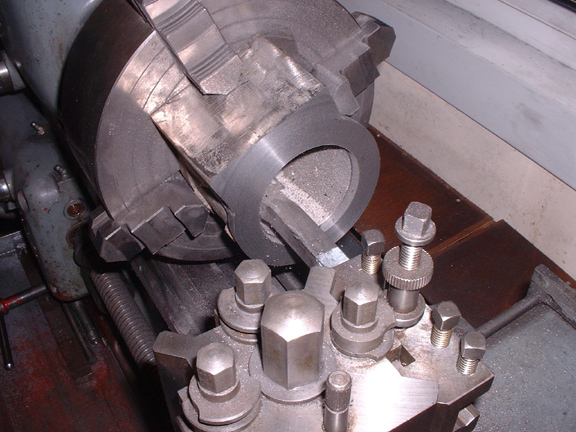
Remember that song.... 'First Cut is the Deepest'? Here's where it becomes very true. This is the first cut through the bore of the big cylinder. You can see the sandy surface of the casting and the tool is set to take a 50 thou cut underneath the skin, even allowing for the core being slightly out of true. It cleaned up first time and the tool wasn't damaged at all, I did all the remaining cuts without re-sharpening. By the time I got it to 3 1/4" diameter it looked like the Mersey Tunnel compared to the others.
Last cut on the H miller. The valve chest was slightly out of centre but all that means is a slightly larger ledge on the far face. I ignore the drawings for the valve chest. As a general rule the side faces should coincide with the diameter of the bore.

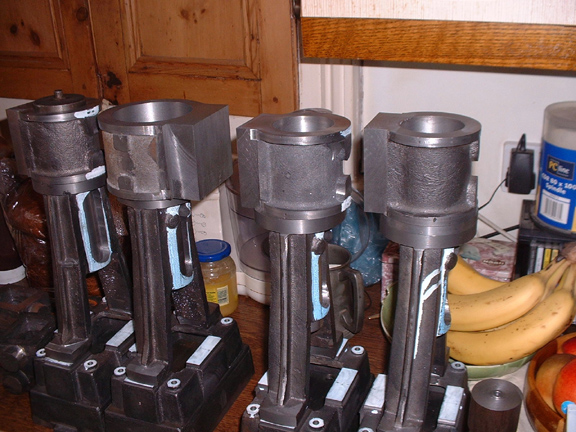
See what I mean about the bigger cylinder not looking out of place? If you look at the bore it looks far bigger but whan it's sat on the standard it looks fine, if anything, better than the standard cylinder. The two left hand engines will get fixed together and will become the compound. The bigger cylinder is slightly longer than the others. I shall have a think about pistons before I reduce it to 3" to match the others...... Next job is the foundation rings which go in netaeen the cylinder and the top of the standards. This carries the piston rod gland and it affects the length of the piston rod.
Stanley Challenger Graham
Barlick View
stanley at barnoldswick.freeserve.co.uk |
Steve48
New Member
19 Posts
|
|
Posted - 23/07/2007 : 08:00
I'm not so sure Stanley, to make glass you need around 2,000 degrees that is one hot camp fire, and mostly the Bedouins only had dried camel dung and brush to play with.
My day was taken up with cleaning up step chuck collets, the female ones I managed okay, but the male ones are a different story, someone at some time had severly strained these, so I turned up a former that fits inside the hollow at the head, with this in place and a spindle in the central hole, and the collet drawn up with a nut, I have managed to prove truth, trouble right now is the spring in the steel is my enemy, it has corrected the situation, but not sufficiently as upon relase some of the spring and mis-shape returns. In truth if they wernt so rare they would be scrap, but I have time on my side. It might prove necessary to cook them, but with five to do and one former, it might take a while. I shall have another go today.
Must figure out how to post photos, but been a bit busy this weekend, new toys etc....
Steve
|
Stanley
Local Historian & Old Fart
36804 Posts
|
|
Posted - 23/07/2007 : 17:35
POSTING PICS
posting pics..... Make sure the pic is JPEG. Adjust size to 7" maximum dimension at 72dpi for colour and 9" max dimension for B&W. Save the adjusted pic in a folder dedicated to OG pics on your hard drive. Pick a time when the web is quiet and our server isn't under pressure, early in the morning, late at night or weekend. On Photos menu at top of page > Main Directory>submit pic. (long way round but most reliable way). Fill in the submit form and when you click on 'browse' to find your pic, go to your OGFB pics folder. Click on the pic you want to upload and then click submit on the form. If you've done everything right and you have a good connection to the server you will get a dialogue box that tells you your pic has been accepted. If you want to post that pic in a topic, highlight and copy the top URL by clicking on it and dragging cursor across it and right clicking for copy. Navigate back to the topic and in the edit box click on the 'submit image' icon, paste in the site URL and click submit. Your pic will appear in the edit box. Hit return until the cursor is below the pic and carry on. Keywords are just a way of helping the search engine to find the pics. I never bother but give a descriptive title as the search engine scans that as well. Once you have cracked it posting pics is easy. Time out error means the server is busy, wait 'til later or try again. Most common user error is wrong format or wrong size. It’s not a good idea to link pics in from another site, this can cause problems. Have the file physically present on your hard drive, that way you can be sure of access.
Stanley Challenger Graham
Barlick View
stanley at barnoldswick.freeserve.co.uk |
Stanley
Local Historian & Old Fart
36804 Posts
|
|
Posted - 23/07/2007 : 17:53
Started the day by reducing the Mersey Tunnel to 3" overall like the other cylinders, it looks better that way and it means that all the piston rods will be the same length with 3/4" thick pistons.
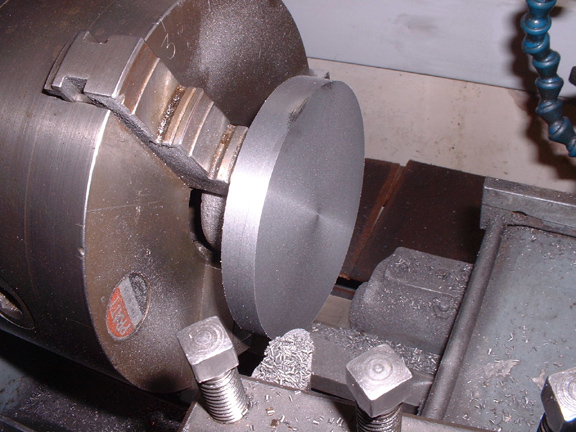
The other job I have done is to start on the bottom lids of the cylinders which contain the gland for the piston rod. First thing to do was grab the castings in the old Pratt 3 jaw and get a face and a diameter to work from in a more accurate chuck. This pic shows one of the problems you hit occasionally with castings. Can you see the shiny bit on the periphery? This was the old turner's nightmare in the days of carbon steel tools. It's a hard shop in the casting. These are usually caused by rapid chilling and they are an area of metal that has not followed the usual route of crystalline change from Austenite to pearlite structure, it goes straight into an entirely different structure called Martensite after the bloke who discovered it. It is almost as hard as glass and will take the edge off even high speed steel. Luckily we have carbide tipped tools nowadays that can deal with the hard stuff. So, no big problem, just a change of tool to cut it.
It would take an observant bloke to see the progress.... The Mesey Tunnel is now the same height as the small cylinders. The No. 1 engine at this end has a new shiny bit between the cylinder and the standard. This is the bottom cover complete with a register either side to centre on the standard and the cylinder, a scribed circle on the PCD of the holding down bolts and bored for the piston rod and the stuffing box for the gland which seals the rod. The stuffing box is bored and threaded ready for the gland nut which will tighten the packing. So a lot of work done but not much to show for it. I have faced the other two covers ready for finishing and I've found a piece of cast iron big enough to get the cover for the Mersey Tunnel out of it.
Stanley Challenger Graham
Barlick View
stanley at barnoldswick.freeserve.co.uk |
|
|
|
|