| Author |
 Topic Topic  |
|
Stanley
Local Historian & Old Fart


36804 Posts

|
|
 Posted -
25/11/2004
:
14:20 Posted -
25/11/2004
:
14:20
|
I've always been fascinated by the things people do in their spare time when they can do exactly what they want to do. Men and sheds are a particularly fertile field. Women tend to do their thing in the comfort of the house.
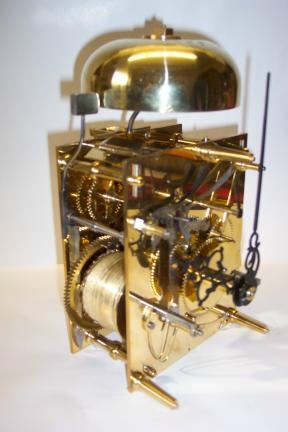
I was delighted to see Andy's picture of the clock movement he has made.
It struck me that we could perhaps start a new topic devoted to spare time skill. So Andy starts it off and my contribution is this:
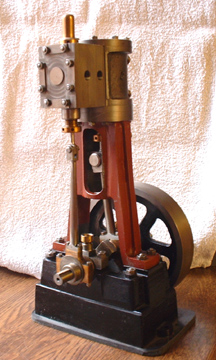
It's a small steam engine made from scratch and is based on the Stuart 5A but a longer stroke. One of these will drive a 14 foot boat with steam at 250psi. By the way, we don't like to call them models, it's exactly the same construction and materials as a full size engine, just smaller. So come on out there, let's hear about what you make in your spare time. I reckon we could be in for some surprises!
Stanley Challenger Graham

Barlick View
stanley at barnoldswick.freeserve.co.uk
|
|
| Replies |
| Author |
|
|
Stanley
Local Historian & Old Fart
36804 Posts
|
|
Posted - 21/06/2007 : 17:55
Found this pic of an old one on the web...

The castings are still available and a set costs £240! They reckon finished weight is 16lbs.
Stanley Challenger Graham
Barlick View
stanley at barnoldswick.freeserve.co.uk  |
Stanley
Local Historian & Old Fart
36804 Posts
|
|
Posted - 21/06/2007 : 18:03
I have just discovered I am a man of wealth and substance..... I think I've mentioned before that I have four sets of castings for Newton's version of the Stuart 5A. I've just looked the castings up on the web and a set costs £800! And that's just for the castings and the drawings, no other materials! How much is one worth built and steaming? It's the biggest engine they made and will do over one and a half horsepower at 800rpm with 100psi. My mate Paul used his, made by Newton, to drive a 14ft launch on the canal......
Stanley Challenger Graham
Barlick View
stanley at barnoldswick.freeserve.co.uk |
Stanley
Local Historian & Old Fart
36804 Posts
|
|
Posted - 22/06/2007 : 17:58
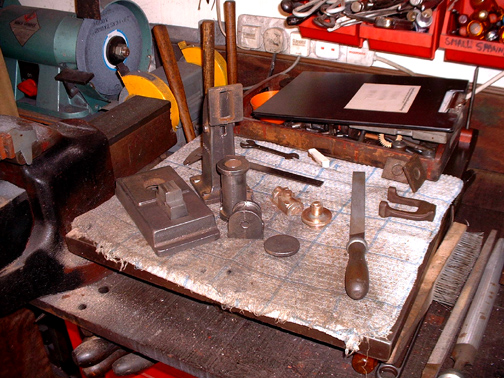
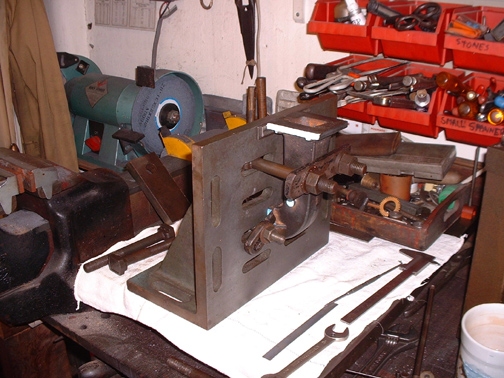
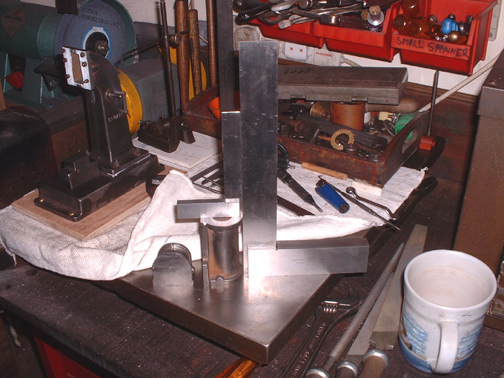
We started the day by having a good clean-up with the 5" angle grinder loaded with a wire brush. Plenty of muck flying round in the yard but it did the job. The rest of the day has been spent finishing the faces on the anvil and base and machining them to dimension. All they meed now is drilling for studs and holding down bolts. Then I attacked the awkward one, the standard. Apart from the fact it is a funny shape involving some fairly imaginative setting up, the faces, apart from needing to be square, are dimensionally quite critical. Slow work and up to now all done on the vertical miller. I did the face that holds the cylinder forst and I'm working from that. I'm erecting it just as you would do it if it was full size. As soon as I have the standard faced all round I shall mount the anvil and base on a temporary base block and fit the mouthpiece and the cylinder after I have machined them, then follow with the piston and rod and finish with the valve block and gear.
Stanley Challenger Graham
Barlick View
stanley at barnoldswick.freeserve.co.uk |
Stanley
Local Historian & Old Fart
36804 Posts
|
|
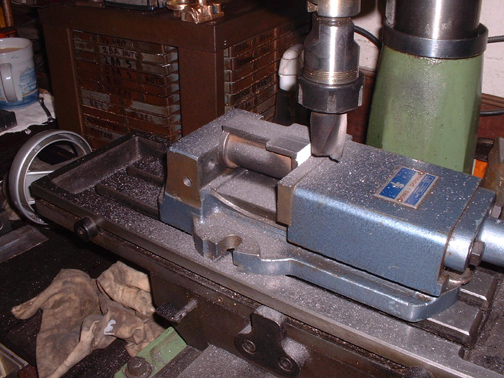
Posted - 23/06/2007 : 17:19
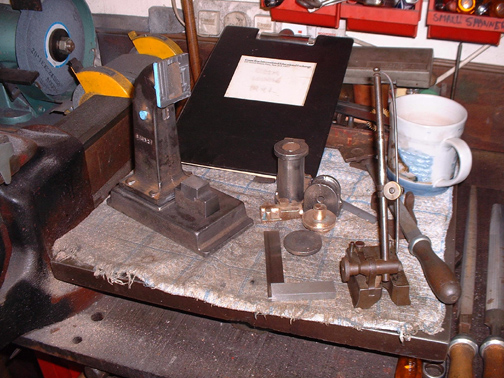
Alright, we're going over the top a bit here. Not often this little lad gets dragged out from under the bench but I couldn't for the life of me think of any other way to hold the standard while I machined the base.
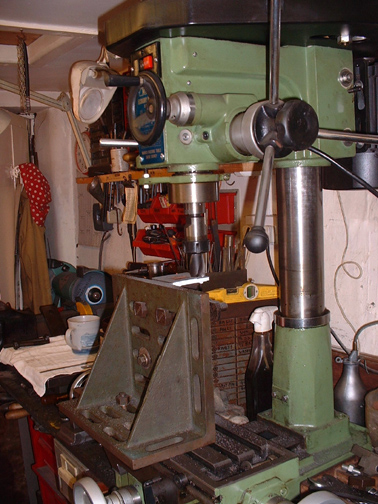
I just got away with it and my El Cheapo Chinese milling machine coped well even thou everything was exrended to the limit. An old engineer once told me how much he admired blokes in sheds because they often had to work well beyond the limits of their equipment. I think he may have had a point.
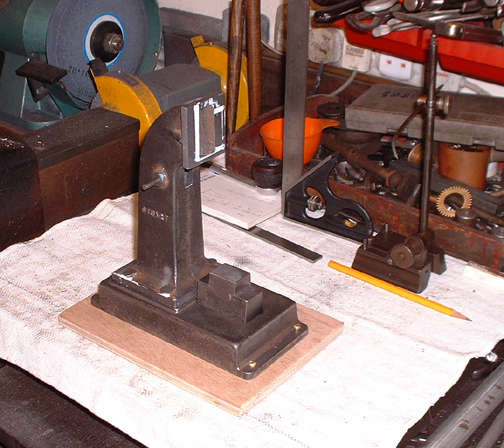
Don't panic lads, this isn't the final baseplate, just a temporary base that I can erect from. All the filing and surfacing is done on the standard, first job tomorrow is to install the holding down bolts and then I can start thinking about the other bits. One thing that struck me yet again is the high quality of the iron Stuarts used to use. I doubt if there latest castings will be any better. In case anyone was wondering, yes we have a new tablecloth..... I like working on a soft surface, far kinder to the tackle and it protects the surface plate underneath which of course is always there if I need a datum. It's all going nicely up to now, quite pleased with progress.
Stanley Challenger Graham
Barlick View
stanley at barnoldswick.freeserve.co.uk |
Stanley
Local Historian & Old Fart
36804 Posts
|
|
Posted - 24/06/2007 : 16:53
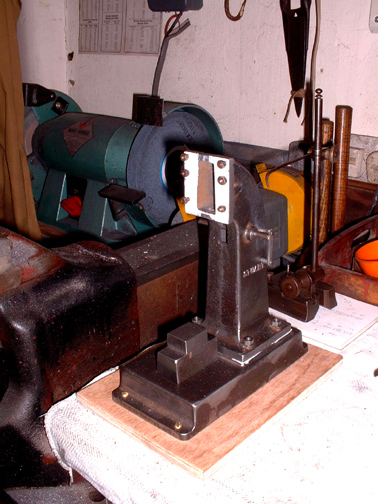
Lots done today..... all the drilling, tapping and fitting done on the standard and I've taken the first two facing cuts on the mouthpiece that supports the cylinder. I know I've said this before but it's worth repeating. If you want to really understand a piece of machinery, make one. All the jobs I have done today had to be done on the full size hammer. The only difference is the size.....
Stanley Challenger Graham
Barlick View
stanley at barnoldswick.freeserve.co.uk |
panbiker
|
Posted - 24/06/2007 : 21:31
WANTED : FRIENDLY ENGINEERING EXPERT TO HELP WITH FOLLOWING PROBLEM
I am trying to fit a new set of rear brake pads to my Honda ST1100 Pan European in preparation for it's MOT. The brake pads are secured into the caliper with a pad retaining pin through the top of the caliper assembly. The pad retaining pin is about 2" long and passes through the top of the brake pads and has a short outer screw thread with allen head that screws into the cast alloy caliper assembly. The fitted screw is recessesed in the caliper. A pad retaining pin plug is screwed on top of this to protect the threads of the pad pin from corrosion, road salt, grit etc. The pad pin plug is replaced each time the brake pads are changed.
The new pad retaining pin plug is shown below. It is a mild steel 10mm diameter grub screw with a slotted head. Problem is, I can't shift it. Copper grease was applied to the plug when I last replaced the brake pads. I have tried locally heating the caliper in an effort to release the screw, successive efforts have widened the slot in the head so I can no longer get any purchase with succesively larger flat bladed drivers.

I have drilled a 4.8mm hole through the centre of the pad pin plug. What I need is a small, short ,left hand thread, self tapping screw or bolt that could be screwed into the hole, preferably with a hex head so that I could get a socket onto it. The plug is about 5mm deep.
Am I going the right way Stanley? and the crux of the matter, do you have anything that could help me resolve this problem? I have a Haynes service manual for the bike which shows an exploded diagram of the brake caliper and pad assembly if you can't understand what I'm after from my description. Any advice (or a left hand thread screw as above) would be welcome.
Ian |
Stanley
Local Historian & Old Fart
36804 Posts
|
|
Posted - 25/06/2007 : 07:23
Don't bother about trying to unscrew it. I have stud extractors and left hand taps but they will all fail. Drill successive holes in it until there is only a thin wall left and than burst it away from the treaded hole with a suitable punch. That will loosen it and you can fish the remains out. It's the quickest and safest way and the only one guaranteed to work. Don't bother about catching the thread in the hole, you can always run a tap down afterwards. By the time you get it really thin almost anything will burst it away, a small screwdriver will do it.
Stanley Challenger Graham
Barlick View
stanley at barnoldswick.freeserve.co.uk |
panbiker
|
Posted - 25/06/2007 : 09:14
Thanks for that Stanley, I'll give it a go, it won't be easy as I cant get the caliper off the bike to work on it, (you have to remove the pads to clear the brake disc and create room to remove from the mounting bracket). When I eventually get this thing out have you any tips on how I can minimise future seizure of the threads when I replace the plug?
I use copper grease on all threads when I install them, is there something better? I suppose the mixture of the steel screw into alluminium alloy threads is not an ideal mixture.
Ian |
marilyn
|
Posted - 25/06/2007 : 11:18
Stanley....I have a 1938 sewing machine, which came with several tins of bobbins and interchangeable feet etc. How can I clean these metal bobbins and feet? Some are slightly rusty.....but mostly just dull and discoloured. (kind of blackened) Would Brasso do the trick?
get your people to phone my people and we will do lunch...MAZ |
Stanley
Local Historian & Old Fart
36804 Posts
|
|
Posted - 26/06/2007 : 06:16
Ian, Dissimilar metals in contact always cause trouble. Copper grease may not be the best thing because you are introducing another metal. What happens is that in the presence of moisture the alloy acts as a sacrificial anode, forms corrosion cells and as the product of corrosion forms it swells in the joint and seizes. Better to assmble dry or with a bit of graphite powder. No easy answer to a bad design situation. Maz, I've replied to your mail. Garriflex blocks are good, they are like a big india-rubber eraser filled with fine abrasive.
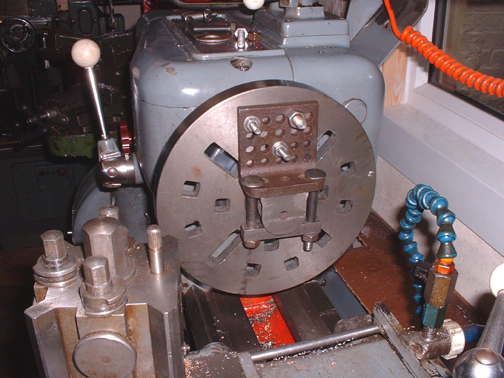
I've found the faces on the cylinder and mouthpiece and milled them square and to dimension on the vertical miller. The pic of the cylinder in the vice shows that cheating pays..... it was a bit too long for the vice so I took a jaw out temporarily. The last pic is the mouthpiece set up on the faceplate for boring. I did this side OK and then turned it over and bored the larger hole for the gland. I made my first mistake and got slightly out of line but I van retrieve that this morning with a bit of cheating, no big problem. I've marked out all the fixing holes on the flat faces and punched them. I shall do the flange bolt drilling last of all on the 1927 lathe using the dividing gear. Going well.......
Stanley Challenger Graham
Barlick View
stanley at barnoldswick.freeserve.co.uk |
marilyn
|
Posted - 26/06/2007 : 10:51
Thanks Stanley. Have everything you mentioned in the shed...except the elbow grease!
get your people to phone my people and we will do lunch...MAZ |
belle
|
Posted - 26/06/2007 : 12:50
Term of the week has to be "sacrificial anode!" don't fully understand it but it was a magnificent term that turned an already interesting post into a little gem. Not enough that you turn rusty lumps of old metal into gleaming machines but you come out with terms like a poet...no wonder you're hanging round his shed Maz!
Life is what you make it |
panbiker
|
Posted - 26/06/2007 : 13:43
Thanks for that Stanley, when I first read it I immediately thought back to my early electronics training in valve theory, now if you could just work a cathode and screen grid into the equation I could probably get my rear brake caliper to act like a wireless set and have radio on the move. Pity it's not on the front twin disks. I could have stereo!
Ian |
Callunna
Revolving Grey Blob


3044 Posts

|
|
Posted - 26/06/2007 : 14:45
I'm quite well up on the concept of sacrificial anodes. They put them into steel hulls on canal boats. Hmm. Should I have posted that comment in "Canal Boat Corner"? |
Stanley
Local Historian & Old Fart
36804 Posts
|
|
Posted - 26/06/2007 : 19:17
Belle, we engineers have quite an extensive vocabulary, H is quite right, sacrificial anodes are used on all steel hulled boats. The principle is that certain metals if paired with other metals in a corrosive environment will sacrifice themselves to corrosion and the other metal is unaffected. There's a bit more to it than that but that describes the affect. More on the hammer later, Im a bit late so I'll post in the morning.
Stanley Challenger Graham
Barlick View
stanley at barnoldswick.freeserve.co.uk |


