| Author |
 Topic Topic  |
|
Doc
Keeper of the Scrolls


2010 Posts

|
|
 Posted -
12/03/2005
:
04:40 Posted -
12/03/2005
:
04:40
|
Having hit a three week slack period in my work just after Christmas it was decided that further renovations to our farmhouse was called for (The wife don't like to see me idle). The project this time was to be the kitchen, which was untouched, since we moved in over six yours ago and was drastically in need of a serious makeover. We set a budget of £3,000 to cover all of the works including a new cooker. With the opportunity at hand and my love of cooking I decided to splash out a bit on a decent cooker, We eventually chose a Rangemaster Duel Fuel 6 Burner cooker - Gas Hobs with Electric Ovens, This was to be the most costly item to be purchased during the refurbishment.
To keep costs to a minimum I planned on doing all of the work myself, re-using the original unit carcasses and repainting the cupboard doors & drawers, Purchase a new cooker to replace the old worn out one, remove two cupboards to make room for the new cooker, cover the original wall tiles with tile paint and fit new worktops, then give the whole room a lick of paint to brighten it up and bobs your uncle...Job Done!!!
With the plan of action set, I gathered my tools and commenced the required refurbishment work.
Click on the images to view the larger picture
This was the original Kitchen which was dark and dated, but the room was quite large for a kitchen 17' x 12'
[url="http://www.oneguyfrombarlick.co.uk/images/kitchen/original.jpg"]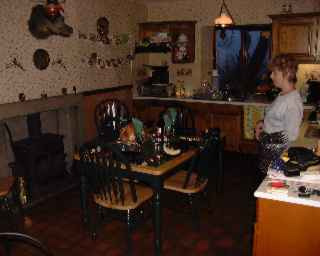 [/url] [/url]
The first task after emptying all of the drawers and cupboards was to remove the cupboard doors and the drawers ready for painting. On removing the worktops I found that the wall tiles were sitting tight down on the surface of the worktop, so it was going to be impossible not to disturb them when it came to removal. Once the worktops had been removed more than 20 tiles were either cracked or off the wall completely so I decided there and then that it would be easier to remove all of the tiles and replace them with new rather than patching them up. An unseen additional expense but one that I thought could be accommodated within the budget.
Once the worktops and the tiles were removed I then set about removing the base units, They all needed mouse-proofing to keep the little critters at bay, The original carcasses had backs on them that only went 2/3rds up the height of the unit giving Mickey and his friends ample room to manoeuvre in and out of the cupboards and drawers at will. I solved this by tacking on full height hardboard backs, cutting ventilation holes in them and then covering these holes with mesh.
Wall tiles off and the Base Units removed.
[url="http://www.oneguyfrombarlick.co.uk/images/kitchen/dscf0171.jpg"]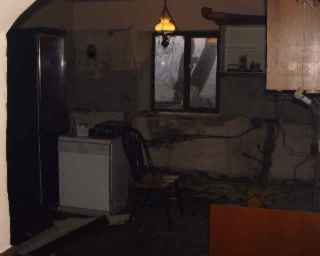 [/url][url="http://www.oneguyfrombarlick.co.uk/images/kitchen/dscf0170.jpg"] [/url][url="http://www.oneguyfrombarlick.co.uk/images/kitchen/dscf0170.jpg"]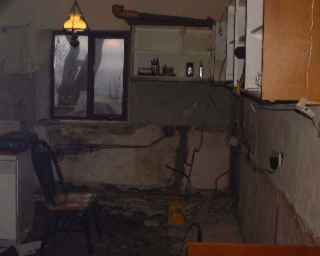 [/url] [/url]
[url="http://www.oneguyfrombarlick.co.uk/images/kitchen/dscf0172.jpg"]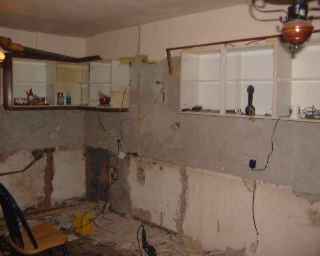 [/url][url="http://www.oneguyfrombarlick.co.uk/images/kitchen/dscf0173.jpg"] [/url][url="http://www.oneguyfrombarlick.co.uk/images/kitchen/dscf0173.jpg"]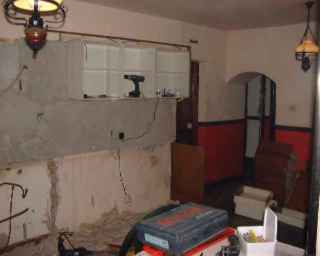 [/url] [/url]
Once the room was in this state I then found out the reason why the the old cooker's grill was never much use was because that the gas pipe feeding the cooker was 10mm copper micro-bore, it just didn't have enough through-put capacity to feed the grills gas needs, so a larger bore gas pipe would be required from the wash-house where the gas pipe was the standard 15mm bore. At this stage the room resembled a building site, however on standing back I realised that this was an opportunity to stretch ones design ideas to the full. Being an original old farm house but having been "Modernised" sometime in the 70's/80's the kitchen had lost some of its original features like beams and the existing plain fireplace just had to go. So wouldn't it be a good idea to put the beams back in and make a rustic looking fireplace.
First the beams went in then the fireplace was started using rough stone from a fallen down dry stone wall outside.
[url="http://www.oneguyfrombarlick.co.uk/images/kitchen/dscf0174.jpg"]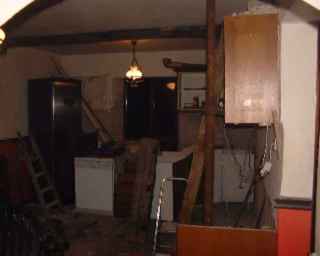 [/url][url="http://www.oneguyfrombarlick.co.uk/images/kitchen/dscf0175.jpg"] [/url][url="http://www.oneguyfrombarlick.co.uk/images/kitchen/dscf0175.jpg"]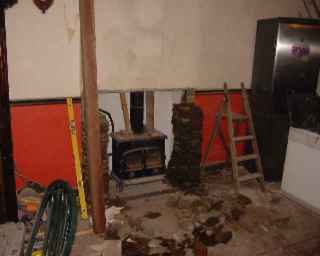 [/url] [/url]
[url="http://www.oneguyfrombarlick.co.uk/images/kitchen/dscf0176.jpg"]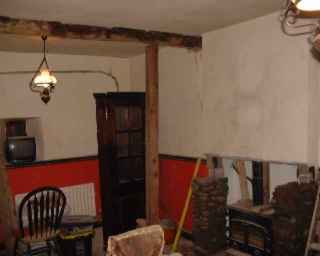 [/url][url="http://www.oneguyfrombarlick.co.uk/images/kitchen/dscf0177.jpg"] [/url][url="http://www.oneguyfrombarlick.co.uk/images/kitchen/dscf0177.jpg"]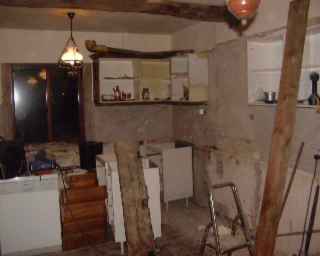 [/url] [/url]
After some remedial plaster work and routing the new larger gas pipe, along with a bit of rewiring for new sockets, it was time to bring back in the old base units in readiness to align them along with the newly delivered cooker.
[url="http://www.oneguyfrombarlick.co.uk/images/kitchen/dscf0178.jpg"]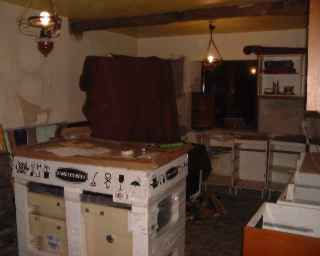 [/url][url="http://www.oneguyfrombarlick.co.uk/images/kitchen/dscf0179.jpg"] [/url][url="http://www.oneguyfrombarlick.co.uk/images/kitchen/dscf0179.jpg"]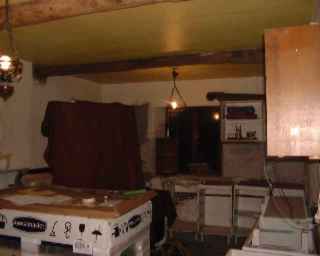 [/url] [/url]
Once the units were aligned and fixed into place I then fitted the new worktops and began putting up the wall tiles along with a splash back over where the new cooker will sit (Tip - To avoid future breakages don't lay the new tiles directly on the worktop, lay them about 5mm above it).
[url="http://www.oneguyfrombarlick.co.uk/images/kitchen/dscf0180.jpg"]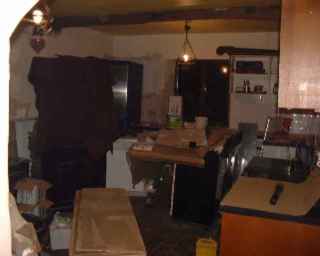 [/url][url="http://www.oneguyfrombarlick.co.uk/images/kitchen/dscf0181.jpg"] [/url][url="http://www.oneguyfrombarlick.co.uk/images/kitchen/dscf0181.jpg"]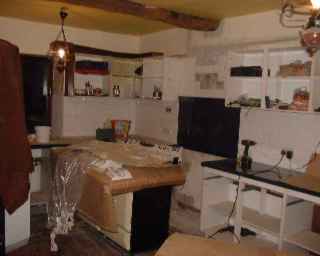 [/url] [/url]
Once all the wall tiles, splash back and plaster work was complete, together with the finishing of the new fireplace, it was time to paint the walls a nice warm terracotta to go with the cream colour that will be used for the lower wall, cupboards and drawers.
[url="http://www.oneguyfrombarlick.co.uk/images/kitchen/dscf0182.jpg"]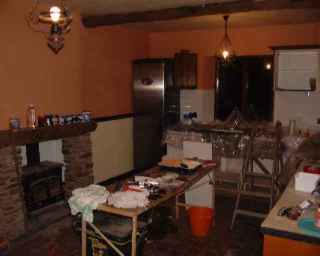 [/url][url="http://www.oneguyfrombarlick.co.uk/images/kitchen/dscf0183.jpg"] [/url][url="http://www.oneguyfrombarlick.co.uk/images/kitchen/dscf0183.jpg"]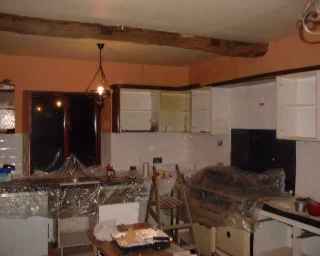 [/url] [/url]
[url="http://www.oneguyfrombarlick.co.uk/images/kitchen/dscf0184.jpg"]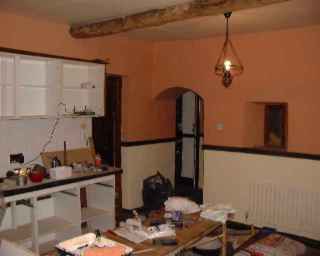 [/url][url="http://www.oneguyfrombarlick.co.uk/images/kitchen/dscf0185.jpg"] [/url][url="http://www.oneguyfrombarlick.co.uk/images/kitchen/dscf0185.jpg"]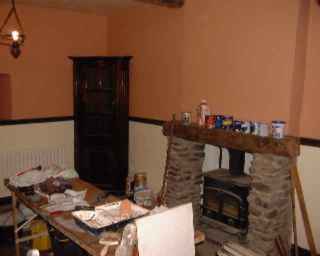 [/url] [/url]
Once the walls had been completed I then painted all the cupboard doors and drawers with two coats of primer then two coats of cream eggshell. Once they were re-fitted back onto the units the room started to take shape, I then fitted new chrome wall sockets for the power, the extractor hood for the cooker and brought in an old display cabinet that was on its last legs but would look nice painted up.
[url="http://www.oneguyfrombarlick.co.uk/images/kitchen/dscf0186.jpg"]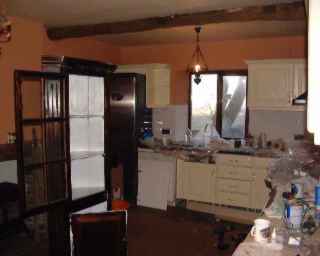 [/url][url="http://www.oneguyfrombarlick.co.uk/images/kitchen/dscf0187.jpg"] [/url][url="http://www.oneguyfrombarlick.co.uk/images/kitchen/dscf0187.jpg"]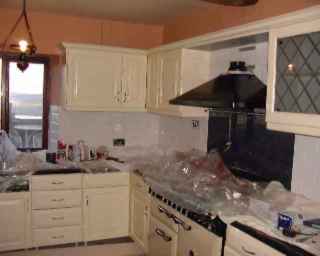 [/url] [/url]
After finishing all the painting, I revamped the old kitchen table to match. Then the big clean-up operation commenced and then it was the time to start dressing the room out using some pictures and ornaments we have, bringing back in all the kitchen stuff, packing it all away.
At last the project was coming to an end.
[url="http://www.oneguyfrombarlick.co.uk/images/kitchen/dscf0188.jpg"]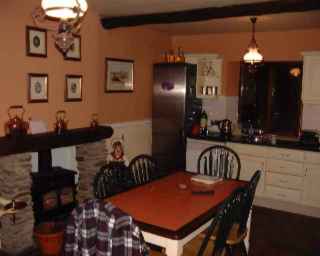 [/url][url="http://www.oneguyfrombarlick.co.uk/images/kitchen/dscf0189.jpg"] [/url][url="http://www.oneguyfrombarlick.co.uk/images/kitchen/dscf0189.jpg"]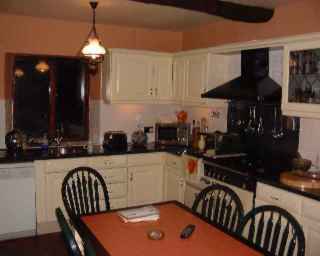 [/url] [/url]
[url="http://www.oneguyfrombarlick.co.uk/images/kitchen/dscf0190.jpg"]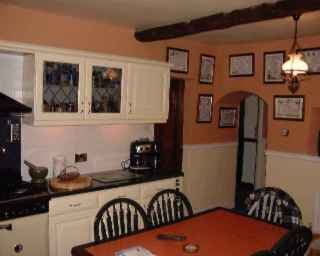 [/url][url="http://www.oneguyfrombarlick.co.uk/images/kitchen/dscf0191.jpg"] [/url][url="http://www.oneguyfrombarlick.co.uk/images/kitchen/dscf0191.jpg"]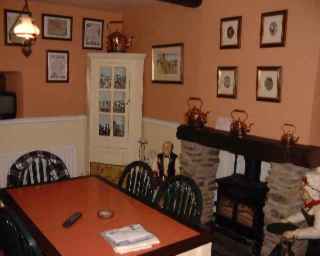 [/url] [/url]
The kitchen is now 99.9% complete and fully operational again. I just have the kitchen chairs to paint (When I have the time) and a few more frilly bits to add which I am sure my other half will complete with relish.
The sad thing is, since it got to this stage I have been working down in London during the last few weeks and I have had very little time to enjoy it so far.
I think I did a good job even though I do say so myself, The finished result is more than we originally anticipated or planned for however, because I did all the work myself apart from having the gas connection and the electrics checked out, I can happily say that we actually came in on budget.
£1,800 - Cooker, Hood & Splash Back - Independent Gas Company Nelson
£ 180 - Oak Beams - Reclamation yard in Salterforth
£ 300 - Plumbing, Sink, Taps & Handles- B&Q Nelson
£ 150 - Worktops - Red Rose Plastics Burnley
£ 175 - Wall Tiles - The Tile Shop Nelson
£ 150 - Paints - B&Q Nelson
£ 200 - Electrics - City Electrical Factors Nelson
£ 50 - Building Materials, Plaster Cement etc - Timber Centre Earby
Grand Total of £3,005
Time taken to complete 15 Working Days
|
|
| Replies |
| Author |
|
|
Stevie
Mad Woman of Thornton


834 Posts
|
|
Posted - 17/03/2005 : 00:26
Love the pictures Maz, wonderful choice of colour 
I must make an effort to get some pictures onto the site, most were lost when the computer last crashed but Doc tells me has plenty taken here on his computer and will put them onto a disc for me!
quote:
I'll have you know I'm the sites gardening correspondent
Mmmm ....... me thinks it might be time to perhaps reconsider the suitability of appointing a 'concrete' lover to this particular position?   |
Stanley
Local Historian & Old Fart

36804 Posts

|
|
Posted - 17/03/2005 : 04:18
Say what you like, it's low maintenance and tidy.
Stanley Challenger Graham

Barlick View
stanley at barnoldswick.freeserve.co.uk |
Cathy
|
Posted - 17/03/2005 : 06:19
And dull, colourless and boring......
Surely you have a few things growing in pots Stanley? Haven't you a 'favourite flower or plant' at least?
All thru the fields and meadows gay .... Enjoy
Take Care...Cathy |
mporter
|
Posted - 17/03/2005 : 06:37
NO he doesn't have a thing growing in pots not even mould......
Margaret Porter
|
Cathy
|
Posted - 17/03/2005 : 06:44
Stanley...how about a nice Tiered Stand that you could grow Herbs on for your cooking? Do you have plants inside?
All thru the fields and meadows gay .... Enjoy
Take Care...Cathy |
Marcia
|
Posted - 17/03/2005 : 11:25
Last year I grew fresh herbs in my yard, and also managed to cultivate a tomato plant from which we got a surprisingly good crop considering it was a runt plant that cost 50p.
I also grow runner beans in a tub each year, and all the above are easy to maintain. Keep them watered, sling a bit of Tomorite in their general direction every so often. and Bob's your uncle.
This year we'll be diversifying into mushrooms now that we've cleared out the outhouse and have room to move. I'm also debating trying some spring onions out there one day.
- Marcia Allass
(http://www.sequentialtart.com) |
Stanley
Local Historian & Old Fart
36804 Posts
|
|
Posted - 17/03/2005 : 15:46
No, nothing growing in the house. I used to garden a bit and enjoyed it but it is so low on my priorities you wouldn't believe it. I do not feel deprived......
Stanley Challenger Graham
Barlick View
stanley at barnoldswick.freeserve.co.uk |
melteaser
|
Posted - 17/03/2005 : 20:21
I don't blame you Stanley. I'm sure looking at the wilderness during a walk with Jack gives you farf more pleasure.
Well, the builders have finished. Yippppeeeeeeeee.
They are calling tomorrow to collect their tools & money but that's it ..we are rid of them.
imindoors has to get some wiring in and then the plasterer should appear in about a couple of weeks.
There is light at the end of the tunnel
Mel
http://www.briercliffesociety.co.uk |
melteaser
|
Posted - 17/03/2005 : 20:22
quote:
I don't blame you Stanley. I'm sure looking at the view during a walk with Jack gives you far more pleasure.
Well, the builders have finished. Yippppeeeeeeeee.
They are calling tomorrow to collect their tools & money but that's it ..we are rid of them.
imindoors has to get some wiring in and then the plasterer should appear in about a couple of weeks.
There is light at the end of the tunnel
Mel
http://www.briercliffesociety.co.uk |
Stanley
Local Historian & Old Fart
36804 Posts
|
|
Posted - 18/03/2005 : 04:14
You're right. Give me a forest, a moor or a beach anyday. Chuck in a big storm or a whale and I'm in pig heaven.
Stanley Challenger Graham
Barlick View
stanley at barnoldswick.freeserve.co.uk |
Callunna
Revolving Grey Blob


3044 Posts
|
|
Posted - 07/08/2011 : 23:45
So there I was, besplattered (is that a word?) with Mongolia matt emulsion over my shapeless, shabby trackie bottoms and well worn t-shirt, standing in front of the counter in the Majestic Discount Store with a fully loaded paint roller pointing at the bemused sales assistant.
I'd hot-footed it from the house we just bought (tenant moving in next day) because I needed to paint the kitchen wall fast and the roller set bought only a few hours earlier was clearly faulty - the furry sleeve kept flirting off with every sweep.
I was rather hoping that nobody I knew would see me in this less-than-glam state but no - this is Barlick after all.
There behind me in the queue, with a wary look in his eye, stood time-served decorator and OG stalwart Thomo.
Sometimes one wishes for the anonymity of a big city...
=================== www.sheldrickrose.co.ukwww.bernulf.co.ukwww.bernulfsplace.co.uk |
thomo
Barlick Born Old Salt

2021 Posts
|
|
Posted - 08/08/2011 : 17:32
Cally, I've seen a lot worse, believe me. In decorating there is no substitute for good quality tools, a 9" lambswool roller and a roller bucket will repay time and again the extra cost, mine is nearly 20 years old now and still as good as new regardless of having many miles on the clock. But it does get looked after.
thomo |