| Author |
 Topic Topic  |
|
Doc
Keeper of the Scrolls


2010 Posts

|
|
 Posted -
12/03/2005
:
04:40 Posted -
12/03/2005
:
04:40
|
Having hit a three week slack period in my work just after Christmas it was decided that further renovations to our farmhouse was called for (The wife don't like to see me idle). The project this time was to be the kitchen, which was untouched, since we moved in over six yours ago and was drastically in need of a serious makeover. We set a budget of £3,000 to cover all of the works including a new cooker. With the opportunity at hand and my love of cooking I decided to splash out a bit on a decent cooker, We eventually chose a Rangemaster Duel Fuel 6 Burner cooker - Gas Hobs with Electric Ovens, This was to be the most costly item to be purchased during the refurbishment.
To keep costs to a minimum I planned on doing all of the work myself, re-using the original unit carcasses and repainting the cupboard doors & drawers, Purchase a new cooker to replace the old worn out one, remove two cupboards to make room for the new cooker, cover the original wall tiles with tile paint and fit new worktops, then give the whole room a lick of paint to brighten it up and bobs your uncle...Job Done!!!
With the plan of action set, I gathered my tools and commenced the required refurbishment work.
Click on the images to view the larger picture
This was the original Kitchen which was dark and dated, but the room was quite large for a kitchen 17' x 12'
[url="http://www.oneguyfrombarlick.co.uk/images/kitchen/original.jpg"]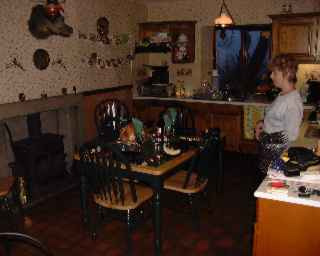 [/url] [/url]
The first task after emptying all of the drawers and cupboards was to remove the cupboard doors and the drawers ready for painting. On removing the worktops I found that the wall tiles were sitting tight down on the surface of the worktop, so it was going to be impossible not to disturb them when it came to removal. Once the worktops had been removed more than 20 tiles were either cracked or off the wall completely so I decided there and then that it would be easier to remove all of the tiles and replace them with new rather than patching them up. An unseen additional expense but one that I thought could be accommodated within the budget.
Once the worktops and the tiles were removed I then set about removing the base units, They all needed mouse-proofing to keep the little critters at bay, The original carcasses had backs on them that only went 2/3rds up the height of the unit giving Mickey and his friends ample room to manoeuvre in and out of the cupboards and drawers at will. I solved this by tacking on full height hardboard backs, cutting ventilation holes in them and then covering these holes with mesh.
Wall tiles off and the Base Units removed.
[url="http://www.oneguyfrombarlick.co.uk/images/kitchen/dscf0171.jpg"]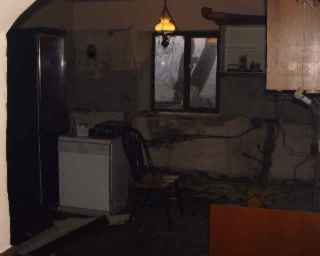 [/url][url="http://www.oneguyfrombarlick.co.uk/images/kitchen/dscf0170.jpg"] [/url][url="http://www.oneguyfrombarlick.co.uk/images/kitchen/dscf0170.jpg"]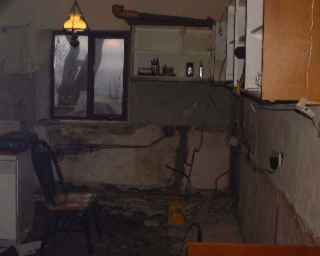 [/url] [/url]
[url="http://www.oneguyfrombarlick.co.uk/images/kitchen/dscf0172.jpg"]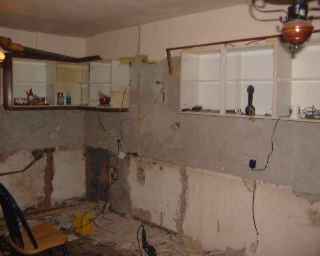 [/url][url="http://www.oneguyfrombarlick.co.uk/images/kitchen/dscf0173.jpg"] [/url][url="http://www.oneguyfrombarlick.co.uk/images/kitchen/dscf0173.jpg"]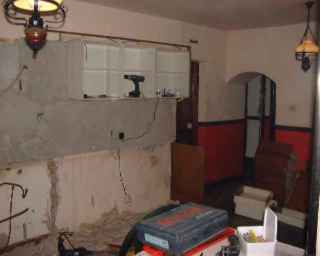 [/url] [/url]
Once the room was in this state I then found out the reason why the the old cooker's grill was never much use was because that the gas pipe feeding the cooker was 10mm copper micro-bore, it just didn't have enough through-put capacity to feed the grills gas needs, so a larger bore gas pipe would be required from the wash-house where the gas pipe was the standard 15mm bore. At this stage the room resembled a building site, however on standing back I realised that this was an opportunity to stretch ones design ideas to the full. Being an original old farm house but having been "Modernised" sometime in the 70's/80's the kitchen had lost some of its original features like beams and the existing plain fireplace just had to go. So wouldn't it be a good idea to put the beams back in and make a rustic looking fireplace.
First the beams went in then the fireplace was started using rough stone from a fallen down dry stone wall outside.
[url="http://www.oneguyfrombarlick.co.uk/images/kitchen/dscf0174.jpg"]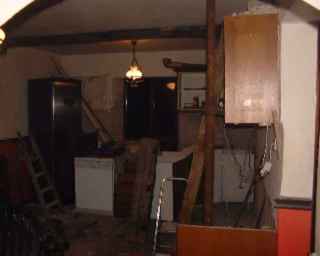 [/url][url="http://www.oneguyfrombarlick.co.uk/images/kitchen/dscf0175.jpg"] [/url][url="http://www.oneguyfrombarlick.co.uk/images/kitchen/dscf0175.jpg"]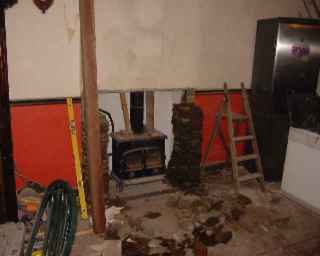 [/url] [/url]
[url="http://www.oneguyfrombarlick.co.uk/images/kitchen/dscf0176.jpg"]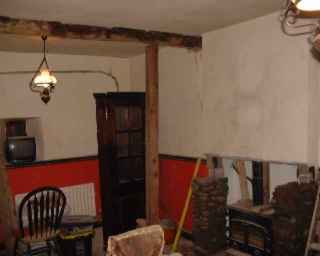 [/url][url="http://www.oneguyfrombarlick.co.uk/images/kitchen/dscf0177.jpg"] [/url][url="http://www.oneguyfrombarlick.co.uk/images/kitchen/dscf0177.jpg"]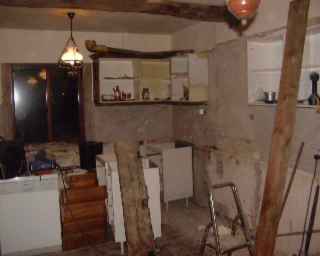 [/url] [/url]
After some remedial plaster work and routing the new larger gas pipe, along with a bit of rewiring for new sockets, it was time to bring back in the old base units in readiness to align them along with the newly delivered cooker.
[url="http://www.oneguyfrombarlick.co.uk/images/kitchen/dscf0178.jpg"]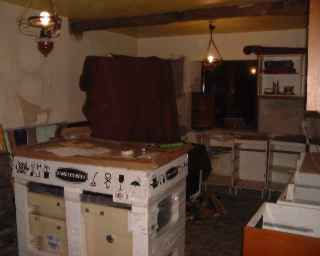 [/url][url="http://www.oneguyfrombarlick.co.uk/images/kitchen/dscf0179.jpg"] [/url][url="http://www.oneguyfrombarlick.co.uk/images/kitchen/dscf0179.jpg"]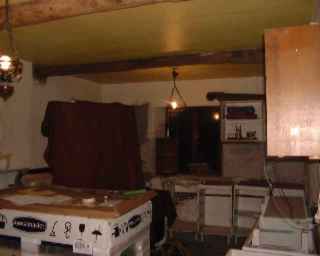 [/url] [/url]
Once the units were aligned and fixed into place I then fitted the new worktops and began putting up the wall tiles along with a splash back over where the new cooker will sit (Tip - To avoid future breakages don't lay the new tiles directly on the worktop, lay them about 5mm above it).
[url="http://www.oneguyfrombarlick.co.uk/images/kitchen/dscf0180.jpg"]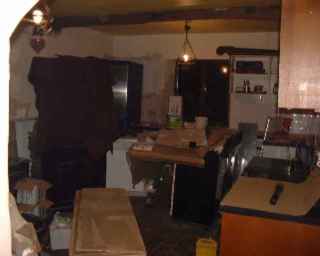 [/url][url="http://www.oneguyfrombarlick.co.uk/images/kitchen/dscf0181.jpg"] [/url][url="http://www.oneguyfrombarlick.co.uk/images/kitchen/dscf0181.jpg"]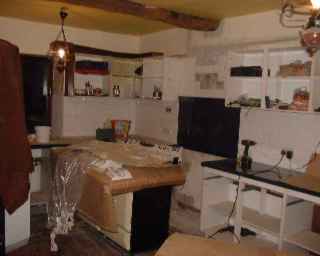 [/url] [/url]
Once all the wall tiles, splash back and plaster work was complete, together with the finishing of the new fireplace, it was time to paint the walls a nice warm terracotta to go with the cream colour that will be used for the lower wall, cupboards and drawers.
[url="http://www.oneguyfrombarlick.co.uk/images/kitchen/dscf0182.jpg"]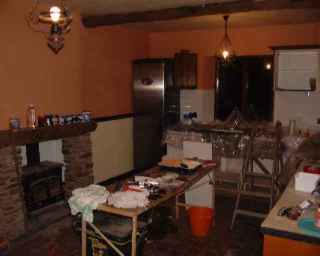 [/url][url="http://www.oneguyfrombarlick.co.uk/images/kitchen/dscf0183.jpg"] [/url][url="http://www.oneguyfrombarlick.co.uk/images/kitchen/dscf0183.jpg"]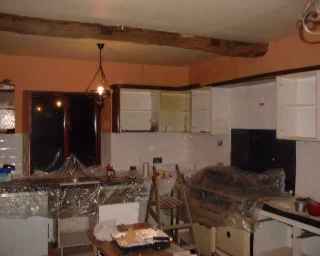 [/url] [/url]
[url="http://www.oneguyfrombarlick.co.uk/images/kitchen/dscf0184.jpg"]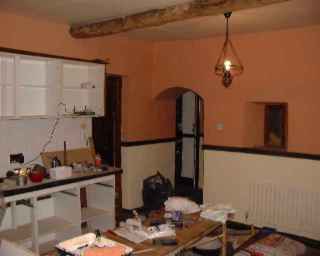 [/url][url="http://www.oneguyfrombarlick.co.uk/images/kitchen/dscf0185.jpg"] [/url][url="http://www.oneguyfrombarlick.co.uk/images/kitchen/dscf0185.jpg"]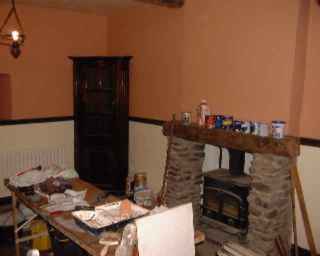 [/url] [/url]
Once the walls had been completed I then painted all the cupboard doors and drawers with two coats of primer then two coats of cream eggshell. Once they were re-fitted back onto the units the room started to take shape, I then fitted new chrome wall sockets for the power, the extractor hood for the cooker and brought in an old display cabinet that was on its last legs but would look nice painted up.
[url="http://www.oneguyfrombarlick.co.uk/images/kitchen/dscf0186.jpg"]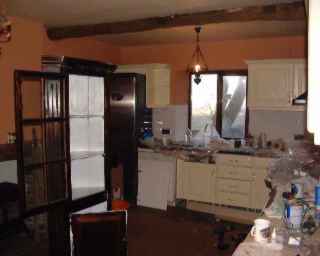 [/url][url="http://www.oneguyfrombarlick.co.uk/images/kitchen/dscf0187.jpg"] [/url][url="http://www.oneguyfrombarlick.co.uk/images/kitchen/dscf0187.jpg"]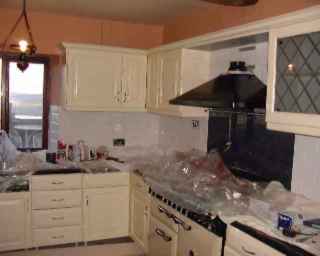 [/url] [/url]
After finishing all the painting, I revamped the old kitchen table to match. Then the big clean-up operation commenced and then it was the time to start dressing the room out using some pictures and ornaments we have, bringing back in all the kitchen stuff, packing it all away.
At last the project was coming to an end.
[url="http://www.oneguyfrombarlick.co.uk/images/kitchen/dscf0188.jpg"]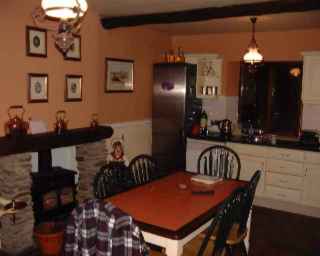 [/url][url="http://www.oneguyfrombarlick.co.uk/images/kitchen/dscf0189.jpg"] [/url][url="http://www.oneguyfrombarlick.co.uk/images/kitchen/dscf0189.jpg"]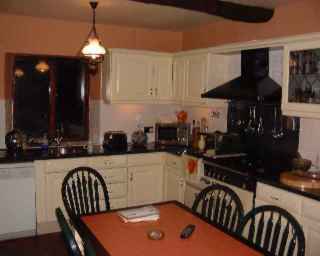 [/url] [/url]
[url="http://www.oneguyfrombarlick.co.uk/images/kitchen/dscf0190.jpg"]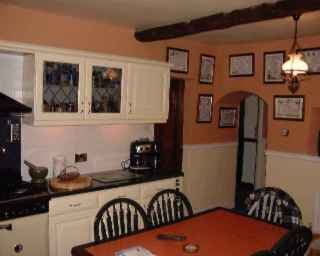 [/url][url="http://www.oneguyfrombarlick.co.uk/images/kitchen/dscf0191.jpg"] [/url][url="http://www.oneguyfrombarlick.co.uk/images/kitchen/dscf0191.jpg"]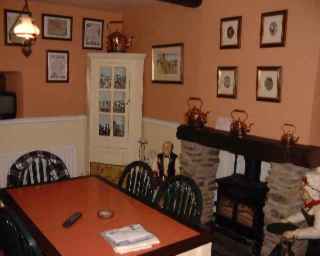 [/url] [/url]
The kitchen is now 99.9% complete and fully operational again. I just have the kitchen chairs to paint (When I have the time) and a few more frilly bits to add which I am sure my other half will complete with relish.
The sad thing is, since it got to this stage I have been working down in London during the last few weeks and I have had very little time to enjoy it so far.
I think I did a good job even though I do say so myself, The finished result is more than we originally anticipated or planned for however, because I did all the work myself apart from having the gas connection and the electrics checked out, I can happily say that we actually came in on budget.
£1,800 - Cooker, Hood & Splash Back - Independent Gas Company Nelson
£ 180 - Oak Beams - Reclamation yard in Salterforth
£ 300 - Plumbing, Sink, Taps & Handles- B&Q Nelson
£ 150 - Worktops - Red Rose Plastics Burnley
£ 175 - Wall Tiles - The Tile Shop Nelson
£ 150 - Paints - B&Q Nelson
£ 200 - Electrics - City Electrical Factors Nelson
£ 50 - Building Materials, Plaster Cement etc - Timber Centre Earby
Grand Total of £3,005
Time taken to complete 15 Working Days
|
|
| Replies |
| Author |
|
|
Stanley
Local Historian & Old Fart

36804 Posts

|
|
Posted - 13/03/2005 : 18:47
I'll have you know I'm the site's gardening correspondent! That's why there is nothing on about it.
Stevie, I have asked Doc to inform Coats and Hats that if it's rotten weather and he's away they have to give me a call and I'll go up and run them down to the bus. As my old mate used to say 'A bit of help's worth a lot of pity!'
Stanley Challenger Graham

Barlick View
stanley at barnoldswick.freeserve.co.uk  |
marilyn
|
Posted - 14/03/2005 : 01:04
Thank you for posting those pics Stanley. If you look on the wall above the cot, you will see I have painted the moon and above that there is a shape of the cow that jumped over the moon. The great thing is...and this is an absolute fluke...when I open the door of the room at night to check on the baby the passage light shows up on the wall as a shaft of light coming down from the moon. This was neither planned or expected, and I am in constant awe that I have managed to put the moon just where I did.
The balloons painted above the other wall behind the cot were for a particular little inhabitant who had a thing for balloons at the time.
Of course, this is all just cosmetic compared to what Doc has done, and I didn't have to rip a single thing out before I started!!
I also made the curtains, and the cow on the floor, that kiddies lounge around on while watching TV.
I have attacked other rooms in the house too, and have become a bit of a dab hand with stone-wash and suede paint finishes.
Of course....it all gets shelved from time to time as I get busy....but my mind is always planning the next project.
Please people....show us things you have done!
get your people to phone my people and we will do lunch...MAZ |
Stanley
Local Historian & Old Fart
36804 Posts
|
|
Posted - 14/03/2005 : 06:13
I'm on the verge of casing in the pipes under the new boiler with a shelf unit. I have the timber and the paint, just waiting for the mood to come upon me......
Stanley Challenger Graham
Barlick View
stanley at barnoldswick.freeserve.co.uk |
melteaser
|
Posted - 14/03/2005 : 07:23
Shame on you Doc!
We should be rid of builders this week (pleeeeeeaaasssee)
And then the real fun will begin. If any of you get bored over Easter you could take a trip to Stoke and pick up a paintbrish (or hammer..screwdriver etc)
Stanley, let the gardening tips begin...we will need to get straight outside as well as in. I have a corner which will be quite dark as it is going to be sheltered by a wall..any suggestions what to put there? (I'm not a fan of climbing plants)
On the other side of the wall, it will be reasonably light but open to the weather...can you suggest something hardy that will provide plenty of colour? I want to brighten up the driveway as it will be seen from my spare room and the road.
Edited by - melteaser on 14 Mar 2005 07:26:22
Mel
http://www.briercliffesociety.co.uk |
Stanley
Local Historian & Old Fart
36804 Posts
|
|
Posted - 14/03/2005 : 17:31
The difference between a tidy garden and an untidy garden is 7 tons of ready mix concrete. End of gardening tips.....
Stanley Challenger Graham
Barlick View
stanley at barnoldswick.freeserve.co.uk |
marilyn
|
Posted - 15/03/2005 : 06:08
Yes...I guess it would make a difference!
Like all things, when it comes to gardening you have to be bothered. If you can't be bothered, just accept you will never have a lovely garden. Good intentions grows nothing but weeds I am afraid!!!
get your people to phone my people and we will do lunch...MAZ |
WolfSG
|
Posted - 15/03/2005 : 09:03
quote:
...but my mind is always planning the next project.
Poor old Mr February!!!!!
Wolfie - always on the prowl |
Cathy
|
Posted - 15/03/2005 : 09:16
I understand your referral to poor old Mr Feb (re: the weeds), but thanks to Mrs Feb's ideas (and both their blood, sweat and tears -  ), and their limited access to the back garden, Mr Feb has a beautiful garden to relax in. Maybe Mrs Feb will post some pics. ), and their limited access to the back garden, Mr Feb has a beautiful garden to relax in. Maybe Mrs Feb will post some pics.  
All thru the fields and meadows gay .... Enjoy
Take Care...Cathy |
Stanley
Local Historian & Old Fart
36804 Posts
|
|
Posted - 15/03/2005 : 11:45
Parson is walking down village street and sees one of his flock, an old man, in the garden. He leans over the fence and passes the time of day with him. Says "Isn't it wonderful what God can do in a garden;. Old bloke says "I'm not too sure about that. You should have seen what a mess it was before I stepped in and helped him!"
Stanley Challenger Graham
Barlick View
stanley at barnoldswick.freeserve.co.uk |
Marcia
|
Posted - 15/03/2005 : 16:12
Mel - I found a couple of useful articles online about shady spots in gardens: http://www.pfaf.org/leaflets/ProbPlac.php
http://www.tmac.clara.co.uk/urgring/faqshade.htm
Hellebores are pretty hardy and can survive almost anywhere. Same goes for ivy, and some potentillas.
- Marcia Allass
(http://www.sequentialtart.com) |
melteaser
|
Posted - 15/03/2005 : 17:32
Thanks Marcia, I'll sit and read this later.
Hellebores sounds interesting..they are quite pretty aren't they.
Not a fan of Ivy though.
I'm looking forward to tending the garden this year. We've left it be before now because we knew we'd be in a mess when we got round to the building work.
Mel
http://www.briercliffesociety.co.uk |
Stevie
Mad Woman of Thornton


834 Posts
|
|
Posted - 16/03/2005 : 00:31
Mel, have you had a play with the Garden design download located on the left hand side of the front page?
It's quite handy as you can plan your garden and even experiment with different sized plants to see what should go where!  |
melteaser
|
Posted - 16/03/2005 : 08:04
I haven't Stevie but it's been a bit full on around here. imindoors is moaning at me for looking at the next project before this one is complete. (So I'm impatient!)
Mind you, until the builders and the mess is gone, we can't really get anything done outside.
Mel
http://www.briercliffesociety.co.uk |
marilyn
|
Posted - 16/03/2005 : 10:19
Don't know if it grows over there, but if you have a sunny wall it looks very classy to grow a Star Jasmine (which is very easy to grow and of tidy habit) ESPLANIER style. Simply make a diamond grid of wire attatched to the wall at crucial points and away you go.
You have to wind a bit occasionally, and trim a bit (really just a little bit) every few months...but the end result is very swanky. With the tiny yellow flowers in Spring, WOW!!!
I did one on our back wall after seeing it on a Home Show Competition...I turned to Mr. Feb and said "We can do that!" Took about half hour to set it all up. And it will never get out of hand like Ivy.
get your people to phone my people and we will do lunch...MAZ |
Stanley
Local Historian & Old Fart
36804 Posts
|
|
Posted - 16/03/2005 : 17:43
Paint the concrete green and put yellow dots on it. Maintenance is just a wash down every month.
Stanley Challenger Graham
Barlick View
stanley at barnoldswick.freeserve.co.uk |