| Author |
 Topic Topic  |
|
Stanley
Local Historian & Old Fart


36804 Posts

|
|
 Posted -
25/11/2004
:
14:20 Posted -
25/11/2004
:
14:20
|
I've always been fascinated by the things people do in their spare time when they can do exactly what they want to do. Men and sheds are a particularly fertile field. Women tend to do their thing in the comfort of the house.
I was delighted to see Andy's picture of the clock movement he has made.
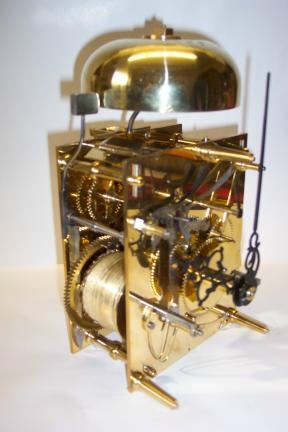
It struck me that we could perhaps start a new topic devoted to spare time skill. So Andy starts it off and my contribution is this:
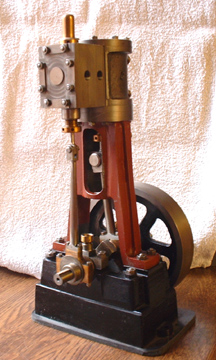
It's a small steam engine made from scratch and is based on the Stuart 5A but a longer stroke. One of these will drive a 14 foot boat with steam at 250psi. By the way, we don't like to call them models, it's exactly the same construction and materials as a full size engine, just smaller. So come on out there, let's hear about what you make in your spare time. I reckon we could be in for some surprises!
Stanley Challenger Graham

Barlick View
stanley at barnoldswick.freeserve.co.uk
|
|
| Replies |
| Author |
|
|
marilyn
|
Posted - 26/06/2007 : 23:04
I could quite happily hang about in Stanley's shed Belle! It has real atmosphere.
I shall be hanging about a bit in my own today, which is a very poor substitute. I just have to move the jogging machine, some packing crates and about 6 large paint tins and then I shall be able to stand at the bench. Might have to back the car out to make a bit of elbow room, but then I should have no trouble locating the WD40 and the fine steel wool I need for my job. (I hate handling steel wool....one of those things I can only manage with rubber gloves on...as it sets the teeth on edge).
get your people to phone my people and we will do lunch...MAZ  |
Stanley
Local Historian & Old Fart
36804 Posts
|
|
Posted - 27/06/2007 : 05:48
Good idea to use gloves Maz, saves infection from tiny cuts.
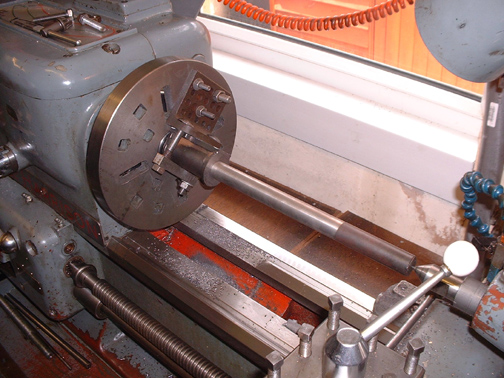
Checking centre and alignment before boring the cylinder.
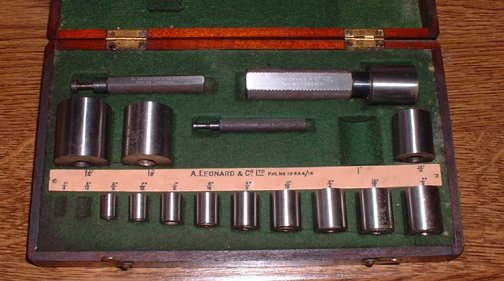
A set of plug standards comes in handy for setting calipers and gauging bores, in this case one inch.
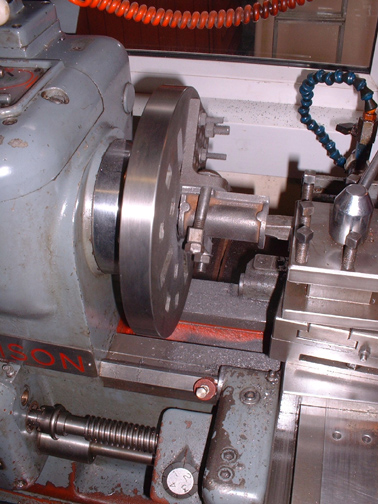
Boring the cylinder, light cuts give the best finish. The pot magnet on the bed is just a tell-tale so I know where I am in the cut.
The cylinder bored and mated with the mouthpiece.
Stanley Challenger Graham
Barlick View
stanley at barnoldswick.freeserve.co.uk |
softsuvner
|
Posted - 27/06/2007 : 06:33
Hi
I've been unavoidably away from my computer and this site for over a week, so I couldn't give Panbiker the benefit of my dubious experience. Nevertheless, here is my twopennorth' on screws and the attraction of different metals.
For over 40 years I have carried out an intense programme of tests on the integrity of fasteners: nuts, bolts, screws etc as applied to motorbikes. In that time I have subjected them to severe vibration tests ( 1000s of miles on British bikes), torsion tests (extended spanners, mole grips, Stillsons etc), and, alas, impact tests (from the road and my big 'ammer).
I can now reveal a few conclusions:
Easy-outs, left handed taps and other devices for extracting broken bolts and studs only work in your dreams, in adverts, or in the hands of a very experienced engineer!
Coppergrease (also known as Coppaslip) is good stuff but only for short term applications (I use it for spark plugs in alloy heads).
The man who can drill out a broken bolt with the component still on the bike, and drill it straight, is a better and braver man than me!
Bolts on modern bikes are not generally designed to be removed more than once .
Cross-head screws are an invention of the devil, and take their name from how you feel when you've butchered the head trying to get them out!
On a more practical note, the best thing to put on screw threads if you want them to stay free from corrosion is silicon gasket cement, (I use the blue stuff from Halfords). It won't stop a bolt from loosening off, and it is not a substitute for spring washers and good fitting threads, but, in fine threads , it will stop a nut or bolt from vibrating off completely. More importantly, it puts a layer between the metals of the bolt and nut and make it easy to remove them when you need to. I have used this dodge for years, especially with stainless fasteners (which are beggars for fusing together) and it works!
Cheers
Malcolm
|
marilyn
|
Posted - 27/06/2007 : 07:38
Gosh Malcolm....never realised there was so much to it. Next time Febby asks me to 'grab a small screw from the shed' I shall be gone for half the day.....
get your people to phone my people and we will do lunch...MAZ |
Stanley
Local Historian & Old Fart
36804 Posts
|
|
Posted - 27/06/2007 : 17:29
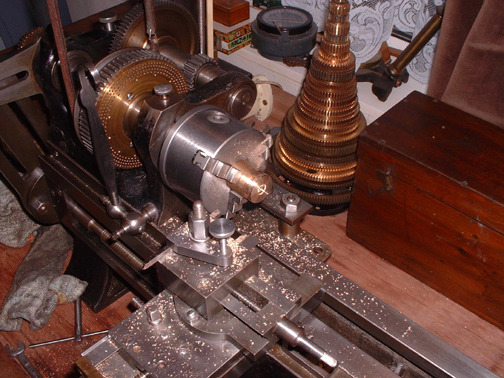
We started the day on Johnny's little lathe, making the piston out of a bit of scrap bronze. Stuart say to use mild steel but I like bronze better, it stands up to steam and water and lasts just as long on light duty like this.

If you're wondering about what's going on here..... I had to drill a three eigths hole through the piston and found that one thing I missed when doing the 1927 lathe up was to clean out the morse taper. I have a full set of Morse taper reamers which hardly ever see the light of day but when you need them, nothing else will do the job.
The piston is made and fitted.
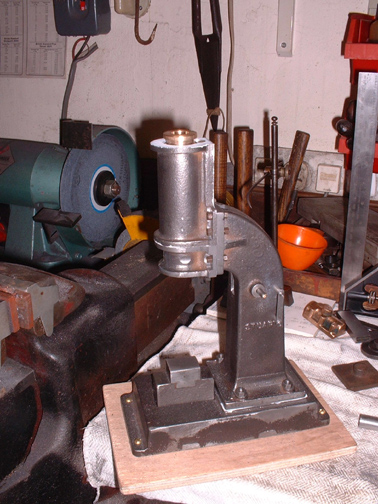
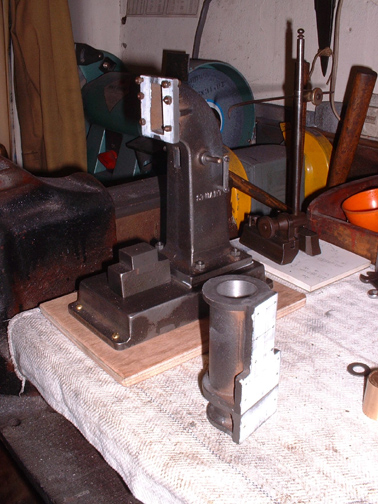
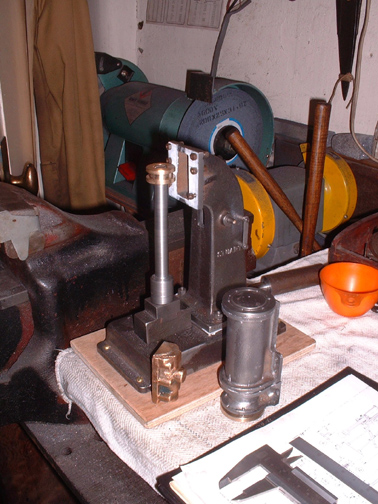
Next was the task of finishing all the drillings in the cylinder and mouthpiece apart from the flange holes. I wanted to make sure everything was square and that all the bolt holes mated with the standard. I also drilled the steam ports and tapped the stud holes for the valve block. Here's the cylinder mounted on its standard for the first time. It's beginning to look like a steam hammer now.

Back into yjr front room and clean up the cylinder cover. I shall use the dividing gear to drill the flange bolt holes tomorrow and use the cover as a template for drilling the cylinder top. Enough for one day.....
Stanley Challenger Graham
Barlick View
stanley at barnoldswick.freeserve.co.uk |
panbiker
|
Posted - 27/06/2007 : 21:25
Thanks for your post Malcolm, all advice, dubious or not is welcome, it seems that you and Stanley concur on the best course of action for removal. Im going to take the caliper off the bike. I have access to a pillar drill at school where I work so I might stand half a chance of getting the thing out, hopefully without too much damage.
I'll have to take the back axle out to get the caliper off with the bracket as there is'nt sufficient clearance to get the caliper off the bracket in situ. Might end up having to take the back wheel off which will involve taking the rear mudguard off as well. Funny how the smallest jobs turn into big ones. I only wanted to change the pads! A lot of bother for a 10mm grub screw!Anyway it will give an opportunity to clean the back end of the bike up a bit. I have a couple of weeks before the MOT's due.
Ian |
Invernahaille
|
Posted - 27/06/2007 : 22:34
Anodes, are also used internally in Marine engines. They, reduce internal errosion. They are usually made out of Zinc.
|
softsuvner
|
Posted - 28/06/2007 : 06:24
Maz
You be careful out there, most men don't even know what lurks at the back of their shed. Friend of mine had a pet spider the size of a beer mat under a bench!
Ian
I knwo what you mean about jobs increasing in size. My BMW doesn't give much trouble but, when I do have to sort it, the Haynes manual usually advises ...."first remove the tank and fairing". A job that would take 20 minutes on the Nortons seems to involve dismantling half the bike on the BM.
There is a "when all else fails" dodge that Dad taught me for dealing with broken studs and bolts but it is a bit marginal for a 10mm one. I'll give it to you anyway. Faced with a broken stud, provided it was not high tensile, he would drill a hole roughly half the diameter. Then he would take the handle of a file and use the tang - the sharp bit.
You insert it into the hole and the give a gentle tap on the end of the file, the tang edges being hardened cut into the stud and give you a purchase. Then he put a small adjustable on the flat of the file just below where the teeth start and applied a twist.
The magic was in using the right size of file and applying enough force to get the stud turning, not enough to round the hole or break the tang of the file. Needs a good quality file of course. Bit of a bodge but it has got me out of trouble a time or two.
Incidentally, have you noticed that while we are talking about removing one screw, Stanley has virtually built a steam hammer! As Granny would have said, if I had to earn my crust as an engineer, I'd starve!
Malcolm
|
Stanley
Local Historian & Old Fart
36804 Posts
|
|
Posted - 28/06/2007 : 07:21
You'll be OK with the pillar drill. Go mad and touch the drill up before you start and don't muck about with increasing sizes, use the biggest drill you can get in the hole and after getting it to mark the screw check to see if it has wandered into the thread, if so change to a smaller drill. It won't be central but don't worry, it will part where it is thinnest. Trick is to burst the thread away at the thinnest point, drive a point in to make room for snipe nosed pliers and get hold of the right hand edge if its a right handed thread. As you twist it's rolling the stud away from the thread and breaking the seal. If you mark the thread you can always run a tapdown it.
Stanley Challenger Graham
Barlick View
stanley at barnoldswick.freeserve.co.uk |
panbiker
|
Posted - 28/06/2007 : 11:14
Main problem is availability of time, I can only work on the bike in the evenings and at weekends. This weekend is stuffed as I have been voted stretched tranny driver for my daughters house move. Evenings are a bit short in the garage as It is a lock-up with no light or power. Pre-requisite of final house move for us will include attached garage with all the trimmings, life would be so much easier!
With regard to the reliability bit Malcolm, can't really fault the Pan on that one, it's fairly bullet proof with general maintenance, but like your BM it's a fully dressed bike and getting at the bits you need to play with is half the game.
Just as a short on-the-side, my first bike was a 1958 Royal Enfield 250 Crusader which I bought for £40. It had a slightly warped cylinder head and used to blow gaskets for fun. I used to cart a gallon of oil round on the back and could change the head gasket at the side of the road in about 20mins. I was only 16 at the time and could'nt afford to have the head skimmed on my apprentice wage. My mum used to go mad when it was washing day because the inside right leg of my jeans was always thick with oil! Kept you warm in winter though! ..... Happy days.
Rubber side down, shiny side up.....
Edited by - panbiker on 28 June 2007 11:16:34
Ian |
Stanley
Local Historian & Old Fart
36804 Posts
|
|
Posted - 28/06/2007 : 17:29
It doesn't look a lot for a full days work does it but I've been drilling and tapping 6BA all day. Everything has been erected and pulled back again to make sure we have a fit. Cylinder cover is finished and the joint between the cylinder and the mouthpiece drilled and tapped and mated up perfectly. I'be only broken the tip off one drill, a 2.3mm tapping size for the 6BA set screws. Easy to do when there is a 2hp motor driving it! I just let my attention wander for a fraction of a second while it was breaking through and there you go. No big problem as the drill is still long enough to use and the tip broke off in a hole that was open at the bottom and so I just tapped it out. There is a providence looks after drunken men and idiots..... Valve block, piston valve and gland nut tomorrow. Their design has 4 studs holding the gland not in, I am toying with the idea of threading it....... Much tidier and easier to pack.
Stanley Challenger Graham
Barlick View
stanley at barnoldswick.freeserve.co.uk |
softsuvner
|
Posted - 29/06/2007 : 06:26
Stanley
If I remember right, the Stuart kits come with some sort of string to act as gland packing. While you are having a rethink on the glands, have you considered O ring packings? They use them as piston rings on live steam locos up to gauge1 these days, so they must work. Just a thought.
Ian
You have my sympathy, I well remember the joys of lock-ups with no electric. My first bike, ( a 98cc Excelsior) came in boxes. Dad and I put it together in a wooden shed by the light of a "Tilley" lamp - a sort of pressurised paraffin-powered bomb - wonder what the Health and Safety mob would make of that these days? About 8 years ago I bought a bike lift - best money I've ever spent! Can't believe all those years I spent scratting about on cold concrete floors.
The Pan is a bit big for my taste (my current BM is the 650 single) but I remember when the Leicester Police changed from their BM Boxers to Honda Pans. One of their chaps told me that he felt like he'd died and gone to Heaven at the Public Expense - the professionals judgement!
|
panbiker
|
Posted - 29/06/2007 : 15:05
I feel a bit like that everytime I get on the bike Malcolm, it's a joy to ride and fantastic at what it's designed for, long distance touring, it has the torque right across the range and will outperform most of the cars on the road in one way or another. The one thing that I have found is the low speed handling when we're two up with all the touring luggage loaded. I've dropped it three times in this situation when traveling at virtually 0 mph. It does'nt half take some picking up as well, although nothing ever gets damaged due to the strategic placing of the engine crashguards. The bike weighs 298K dry, add to that a couple of average people and luggage for 2 weeks touring and I suppose it's not surprising that it's a bit light at the front. Once you get a few revs on and above 10mph your'e on the way to riding heaven.
As you say, much applauded and supported by the pro's, Police and Paramedic's, it's a pity that best part of 10 grands worth (when new) of bike can be brought to a complete standstill by a small grubscrew, but, such is life.
Ian |
Stanley
Local Historian & Old Fart
36804 Posts
|
|
Posted - 29/06/2007 : 18:03
Malcolm, I've never seen a Stuart kit but from what you say they were handing out graphited asbestos string. Installed properly it runs for ever and is good for the bores because they get coated with a thin layer of grahite rubbed into the metal. That's what I'll be using because this isn't a steam engine as such. For engines I always use the real thing, a CI piston with CI rings, you can't really beat them. I've seen these compo O rings used for pistons and glands and they don't last anything like as long as old-fashioned packing.
Stanley Challenger Graham
Barlick View
stanley at barnoldswick.freeserve.co.uk |
Stanley
Local Historian & Old Fart
36804 Posts
|
|
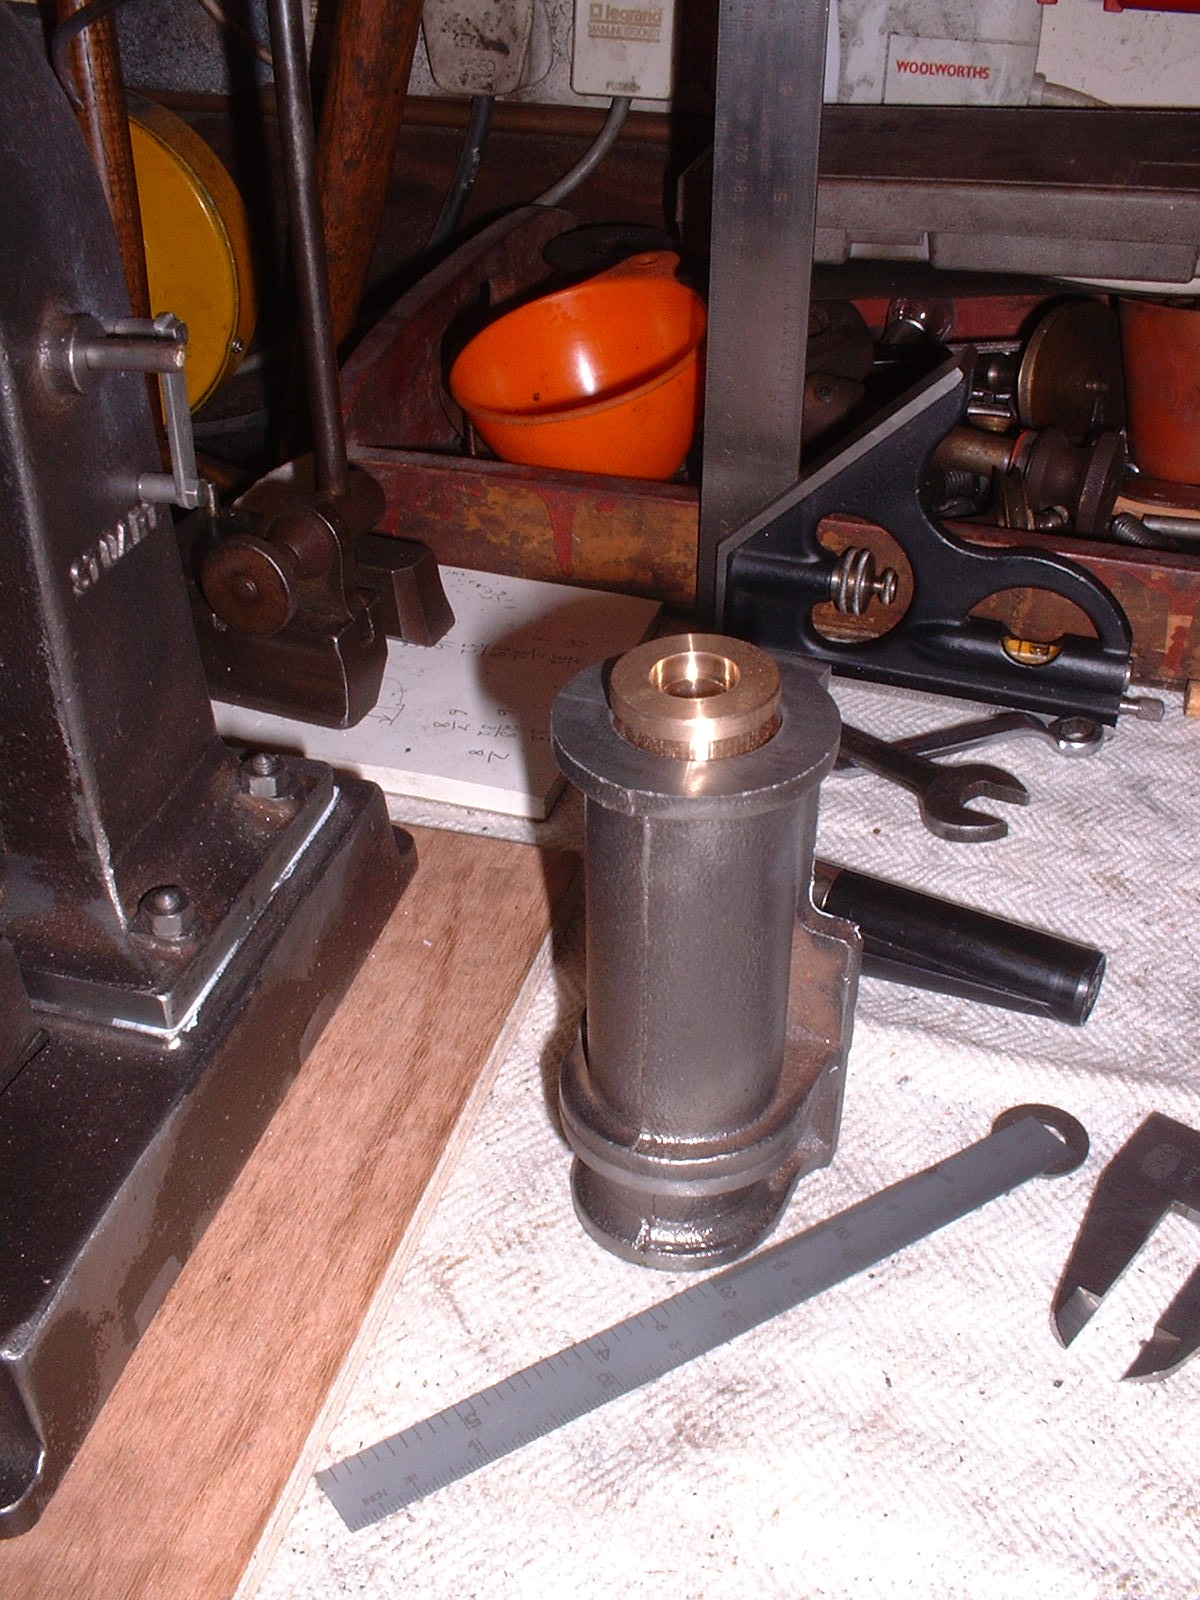
Posted - 29/06/2007 : 18:11
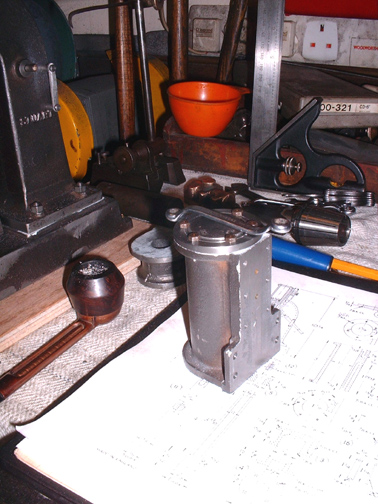
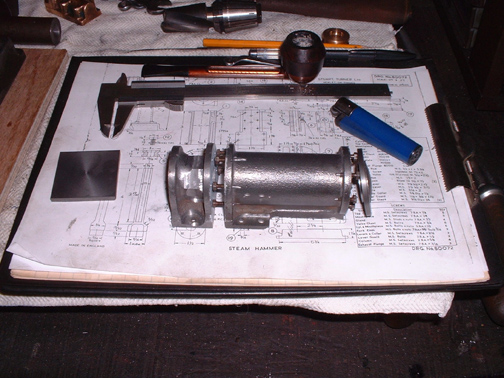
Here's where we are at today.... The gland is fitted to the bottom of the mouthpiece, I used 4BA setscrews in the end for it. The piston rod and tup are made and fitted, there may be some slight adjustment needed when the block and mouthpiece are bolted to the face of the standard but it will be minimal. Next job is the valve block (the little bronze casting sat on the baseboard). I've never made a piston valve before, it took me a while to work out how it functioned. I keep wanting to bang it all together but I want to do the valve first because I have an idea I'll need all the access I can get to fix the valve actuating arm on the cross shaft inside the standard. It's got to be locked onto it whilst in position and I haven't quite worked out how to do it. They show fiddly little setscrews inside the standard. I think I might be able to find a better way that does away with the complications.....
Stanley Challenger Graham
Barlick View
stanley at barnoldswick.freeserve.co.uk |