| Author |
 Topic Topic  |
|
Stanley
Local Historian & Old Fart


36804 Posts

|
|
 Posted -
25/11/2004
:
14:20 Posted -
25/11/2004
:
14:20
|
I've always been fascinated by the things people do in their spare time when they can do exactly what they want to do. Men and sheds are a particularly fertile field. Women tend to do their thing in the comfort of the house.
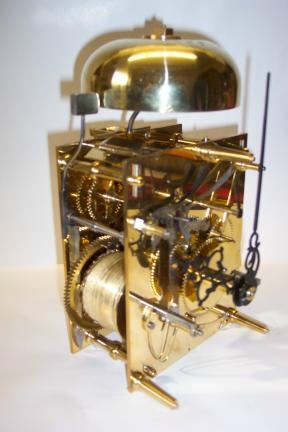
I was delighted to see Andy's picture of the clock movement he has made.
It struck me that we could perhaps start a new topic devoted to spare time skill. So Andy starts it off and my contribution is this:
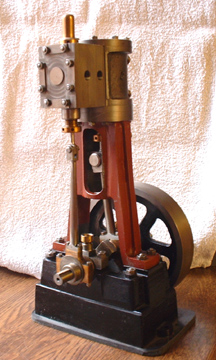
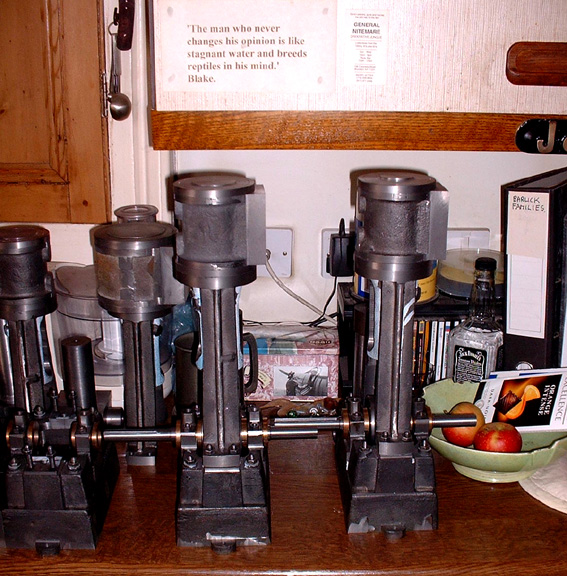
It's a small steam engine made from scratch and is based on the Stuart 5A but a longer stroke. One of these will drive a 14 foot boat with steam at 250psi. By the way, we don't like to call them models, it's exactly the same construction and materials as a full size engine, just smaller. So come on out there, let's hear about what you make in your spare time. I reckon we could be in for some surprises!
Stanley Challenger Graham

Barlick View
stanley at barnoldswick.freeserve.co.uk
|
|
| Replies |
| Author |
|
|
Stanley
Local Historian & Old Fart
36804 Posts
|
|
Posted - 22/08/2007 : 08:08
Pluggy, I always call it the big end of the con rod even though it is often smaller. I mentioned milling earlier as this was how Newton used to do them in later years. Still thinking about it and leaning towards it. Malcolm, I have a live centre and yes, theoretically they are better. However, the amount of heat cenerated by the cut expands the workpiece and you have to relieve the centre frequently as you cut, I find it's easy to gauge the pressure by just feeling the centre, if it's getting too hot I just let it off a bit. The drive to the cut is so stiff you could probably get away with no centre but I always use one, feels much safer and no nasty surprises.
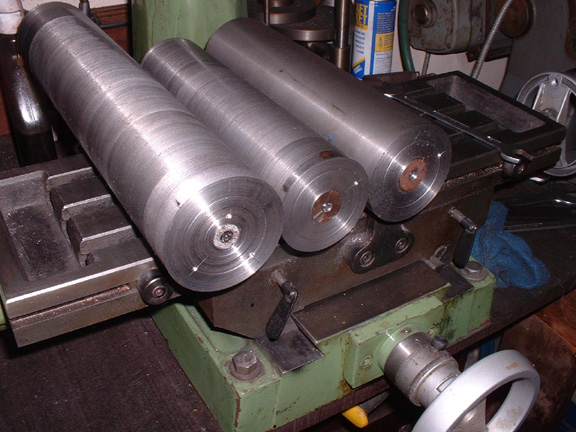
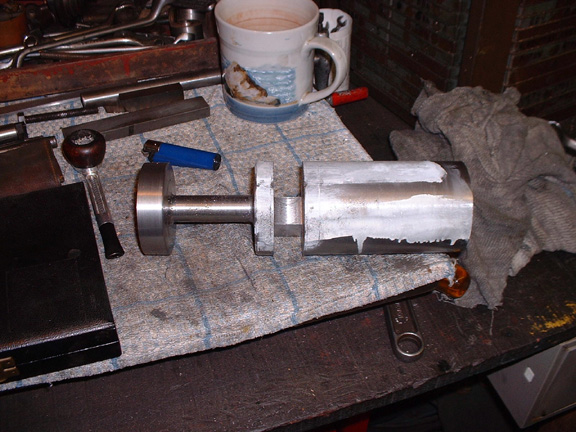
All the billets marked up and centre popped. I drilled the centre holes by hand in the vice.
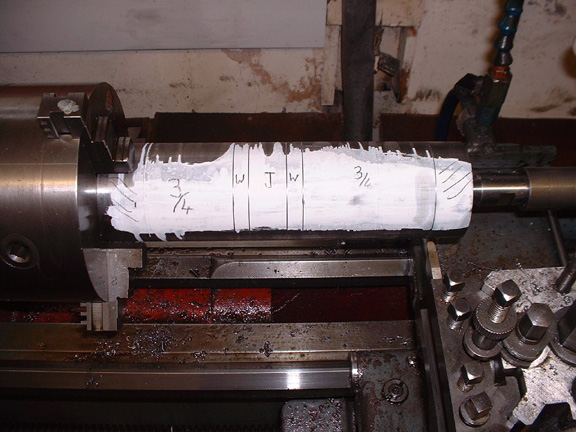
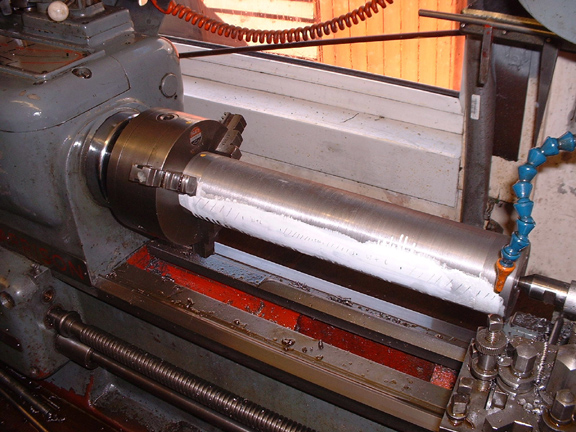
The first one mounted in the lathe. I've marked the cuts with a sharp tool and for the benefit of the onlookers have marked them so you can see the cuts to be taken out. The two ends shaded with pencil stay intact until the shaft is finished because they have the journal and eccentric centres on them. 3/4" is the shaft at each side. W is the webs which stay in to make the counterbalance weights and J is the journal for the con-rod.
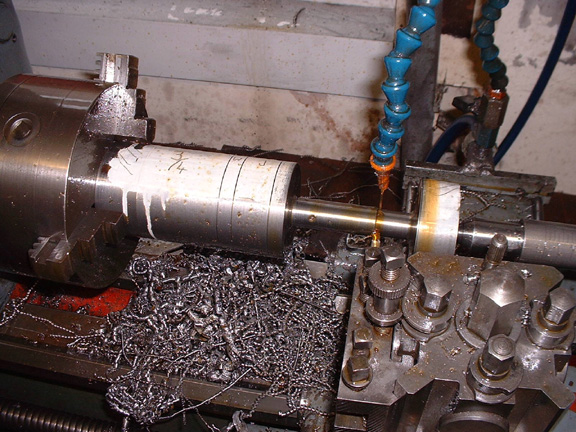
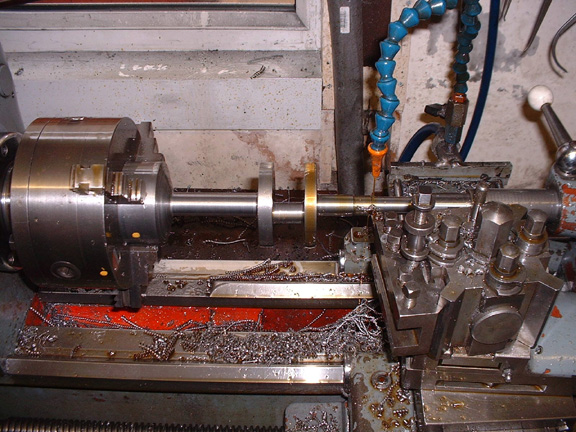
About 4pm after a full day.... The final cut coming off the first section of shaft. It's slow work. If you put the speed up the swarf is coming off red hot and the shed is full of smoke. I had to drop the speed to 119rpm. I was taking 40 thou a cut, any more and it was blue swarf again. If you think about it, on a six foot swing lathe with a big workpiece this is about 3/8" cut which would be fairly heavy so no wonder they took as long as well.
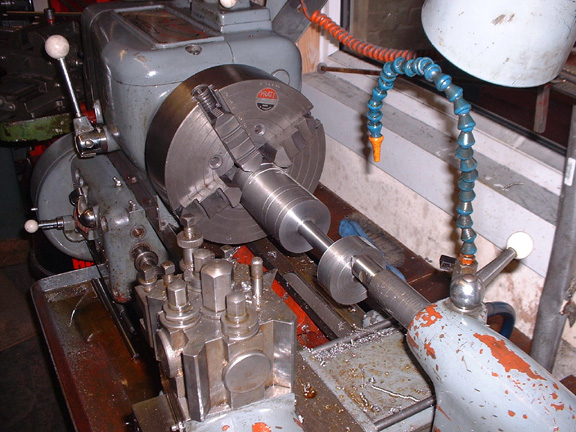
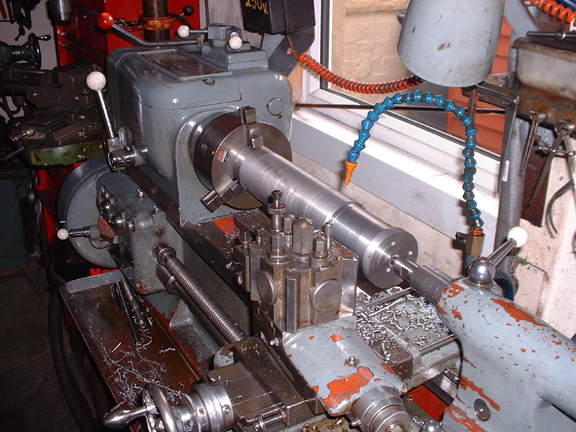
5pm and the shaft is mounted ready for the Journal. You can see the depth of cut needed and it's interrupted of course until the last inch. Newton went over to milling a big lump out in the latter days and I am going to follow his example. The problem isn't the interrupted cut so much as the length of the tool you have to have stuck it and it's only a thick parting tool. Very dodgy and you can't go to sleep while you are doing it. The setup stays the same and all I have to do is slacken two nuts off on the four jaw to get it out and replace it accurately. Perfectionists will say I am doing this wrong because the recommended way is to have the shaft mounted between centres and use a driving dog. In theory this is right but if you have the big end caught in the four jaw you know you are getting a positive drive, no backlash on the dog as the cut grabs hold. Each to his own, all I'm interested in is the fastest and safest way of getting a shaft. So, first thing is to get on the milling machine with a sharp cutter and cut a big gutter out. In case anyone was wondering, I've often thought about setting a suds pump up but never got round to it. The used oil collects in the sump and I drain it out when necessary and return it to the oil tank above by hand.
Stanley Challenger Graham
Barlick View
stanley at barnoldswick.freeserve.co.uk  |
pluggy
|
Posted - 22/08/2007 : 12:03
Wouldn't water soluble oil cutting fluid be a better bet ? Water is a far better cooler than oil and it wouldn't smoke. The smell is something of an aquired 'taste' but whatever..... 
Need computer work ?
"http://www.stsr.co.uk" 
Pluggy's Household Monitor |
pluggy
|
Posted - 22/08/2007 : 12:06
Probably splashes around more too.... 
Need computer work ?
"http://www.stsr.co.uk"
Pluggy's Household Monitor |
Stanley
Local Historian & Old Fart
36804 Posts
|
|
Posted - 23/08/2007 : 07:02
I use oil so infrequently that a full water based cooling system with pump would be too much of a hassle. The advantage with oil when used occasionally is that you don't get problems with it drying out in places you can't get at. I'll stick to me oil. If the swarf is that hot I'm going at it too hard anyway. I'm in the gane for pleasure, not production and so I'll stick to oil.

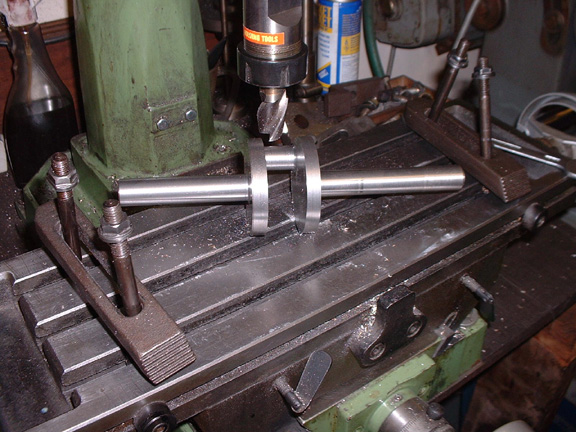
Newton's later way of milling the webs out is much faster and avoids all that uncomfortable turning. It took me an hour to mill the muck out and get the shaft back in the lathe. So that was two hours work in the morning.
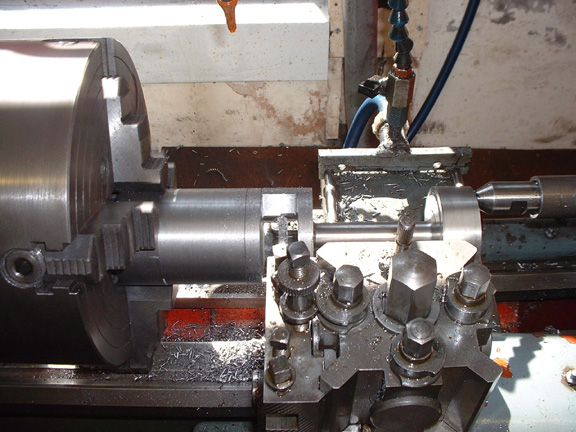
I was back in the shed at 2pm and here we are after 5 hours solid turning..... I knew there was a shaft in there somewhere! This morning I'll fit it and finish the shaft ends off to size.
Stanley Challenger Graham
Barlick View
stanley at barnoldswick.freeserve.co.uk |
Stanley
Local Historian & Old Fart
36804 Posts
|
|
Posted - 23/08/2007 : 12:03
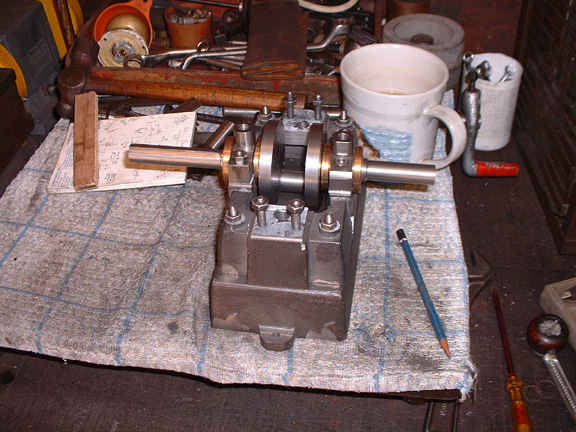
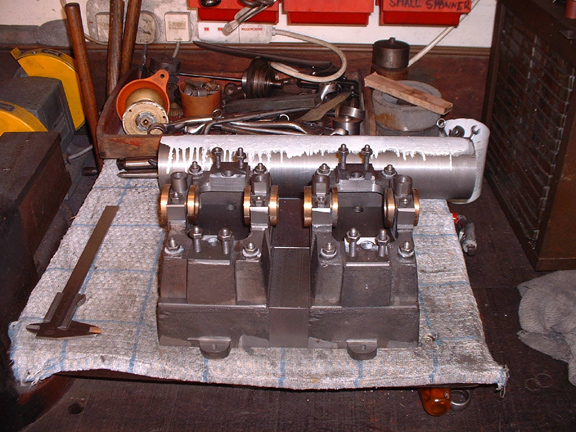
Nice quiet morning finishing the shaft and fitting it. The RH journal in this pic needed adjusting a touch but otherwise, a nice fit and perfectly acceptable. It struck me that a bit of a word on fitting bronze bearings for steam engines might be useful. In the bearing itself, one of the biggest sins is to fit too tight. Ideally, there must be enough clearance (slack) in the fit to allow the oil to build up a wedge. If you don't do this you can't get full film lubrication because the bearing clears the oil out and you get boundary lubrication which equals accellerated wear. The old fitters knew this and always allowed for the wedge to form. They also cut gutters in the bearings to make sure the oil was distributed evenly. On a small bearing like this one there is no need for gutters, we aren't driving 300 looms! Another common mistake is to omit side float on the shaft. Watch any large steam engine running and you'll see that the flyshaft is floating gently from side to side. On a big rngine like Ellenroad it was about half an inch. The reason for this is that no engine is so perfect that it rotates dead even and perfect and the side float allows the discrepancies to be soaked up in side float. There is another advantage in that this means that bearings wear more evenly and have less tendency to become roped. I have always suspected that this float aids the migration of grit out of the bearings as well. Last but not least, make sure there is plenty of clearance between the radius at the end of the journal and the rounded shoulder of the bearing brass. On large bearings you will often find that they start running hot in old age which can be a puzzle because there is plenty of clearance in the radial fit. This almost always down to the brasses spreading slightly over the years and the point of contact is between the shoulder of the journal and the edge of the bearing. This will happen over the years and if there is an adequate amout of side float it will be much longer before this happens. I don't know why people are afraid of side float because the shaft isn't going to go anywhere, once it settles in the dynamic balance of the recprocating parts will hold the shaft in its natural centre and it will never be restrained by the bearing. The same applies to the bearings, pedestal bearing never knock with a small amount of play. If ever they do, it's more likely to be a fault in the valve set up, too much compression or something similar. If you watch any large engine running you will see that the bearins are breathing slightly, again, this is the dynamic balance finding the right centre. If you get all the fits perfect and restrain the bearing rigidly you will be stopped with a stinking hot bearing inside ten minutes. Far better to hear them than smell them!
Stanley Challenger Graham
Barlick View
stanley at barnoldswick.freeserve.co.uk |
pluggy
|
Posted - 23/08/2007 : 19:39
Is the second half turned with the same end in the chuck ? I cant see it been driven through the 3/4 shaft and off centre journal. But the workpiece doesn't look long enough top contain any length of waste.
Need computer work ?
"http://www.stsr.co.uk"
Pluggy's Household Monitor |
Stanley
Local Historian & Old Fart
36804 Posts
|
|
Posted - 24/08/2007 : 06:40
Pluggy I took the meat out with the same set up you can see in the shot where the journal is being turned and with the same thick parting tool with a round end. Then I changed over to a LH side cutting knife tool with a slightly rounded point to give some finish and with the same set up cut the tailstock bobbin off and ran the shaft end down to finished bearing size (3/4"). Put a good face and a slightly deeper cut into the journal on the outer side of the RH web and then turned the whole lot round and did the same at the other end. I was taking 40 thou on each cut and the crank pin drove this quite adequately. Edgar Westbury once said that many amateurs spoiled a couple of crankshafts before they made a good one. This applied to the partially shaped castings/forgings supplied with kit engines. I've also seen instructions that recommend cutting the crank journal first. My principle is to keep the tool sharp, don't be too ambitious with the cuts. It takes longer for the cut but saves time because you don't have to start again. Once the shaft was rough turned I fitted it to the bearings, no problem putting it back in the set-up for any adjustments. When I was sure the fit was right, back into the lathe to reduce the shafts outboard of the journals down to 5/8" (I was going to leave them 3/4" but they looked a bit stubby.) and the last job was to cut the 3/16" keyway. S&T favour cutting the webs to get the meat out on one side of the crank webs to form a counterweight but I have never been convinced that this does much good in a slow speed engine like this so I have left them alone. The more machine finish, the more professional the result looks. Hand cutting and filing can never compete with a good tool finish. The only time the old lads used hand-finish was when there was no other alternative. I did nothing yesterday afternoon, I reckoned I deserved a rest! Why a bloke like me spends 5 hours solid standing at a lathe beats me...... Must be mad. It's worth remembering as well that this cshaft came out of a piece of old shafting out of the mill and was slightly undersize to start with, only 2 3/4" instead of 3" but as you can see, I just managed to get the crank pin out of it at 2" centre to match the stroke. The next one is the right size and I'll start on that today. So, oil and swarf coming up! One last thing I've missed. The original workpiece is lightly longer than S&T specify but you can't have too much shaft poking out. Handy if you want to fit a drive pulley or whatever. It's a lot easier to cut some off than stick some on if you want to put in a drive coupling for a prop shaft or similar so I've left them longer than S&T drwaings, in other words, no waste on the bar.
Stanley Challenger Graham
Barlick View
stanley at barnoldswick.freeserve.co.uk |
Stanley
Local Historian & Old Fart
36804 Posts
|
|
Posted - 24/08/2007 : 10:29
Right, 10:30, the washing is done, the shops have been shopped, the bread is baked and Jack is asleep in the tard in the shade full of meat pie..... Into the shed.... Now which shaft shall I do next? A repeat of the last one I think, we'll save the big one until last!
Stanley Challenger Graham
Barlick View
stanley at barnoldswick.freeserve.co.uk |
Stanley
Local Historian & Old Fart
36804 Posts
|
|
Posted - 24/08/2007 : 17:27
5pm and here's the state of the wicket. 5 hours machining and we're ready to do the crank pin. I'm faster now I've done one, I know just how much cut I can stick on. Another advantage is that this was a piece of bright bar and machines a lot better than the last one which was a bit of old shafting. Nice progress, I have some articles to write this weekend but even so, I expect to have this finished and fitted well before Monday.
Stanley Challenger Graham
Barlick View
stanley at barnoldswick.freeserve.co.uk |
Stanley
Local Historian & Old Fart
36804 Posts
|
|
Posted - 25/08/2007 : 17:12
5PM Saturday and the last cut is going on the RH side. That's enough for today, an easy day tomorrow reversing the shaft, finishing it off and fitting it to the second single engine. I wrote an article for BET as well so a good productive day...... (smug b*****d)
Stanley Challenger Graham
Barlick View
stanley at barnoldswick.freeserve.co.uk |
Stanley
Local Historian & Old Fart
36804 Posts
|
|
Posted - 26/08/2007 : 16:23
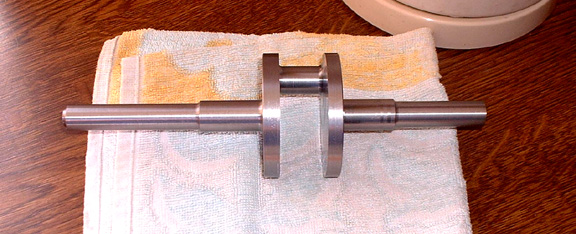
I suppose I'm a bit peculiar but to me, this crankshaft chopped out of a solid billet is a thing of considerable beauty.
It looked even better at 4pm this afternoon after a bit of light fitting and installation in the second small engine. (I wrote another article this morning as well.....) So, now for the biggy, first time I have ever made a crank with two throws.....
Stanley Challenger Graham
Barlick View
stanley at barnoldswick.freeserve.co.uk |
pluggy
|
Posted - 26/08/2007 : 23:52
Guess I'm peculiar as well, it is a thing of beauty......
I suspect its an awful lot lighter than when you started as well.
Need computer work ?
"http://www.stsr.co.uk"
Pluggy's Household Monitor |
softsuvner
|
Posted - 27/08/2007 : 00:26
Stanley
Is that the same bottle of Jack Daniels that you've had since you did the foundation rings a month ago?
|
Stanley
Local Historian & Old Fart
36804 Posts
|
|
Posted - 27/08/2007 : 05:11
Glad you are as mad as I am. Yes, it's a lot lighter. I weighed the billet for the two throw and it was 35lbs, I'll weigh it again when I've finished. Well spotted Malcolm, I always have a bottle of whisky for ready-use ammunition. I have a swig of codliver oil and a sip of whisky (or in this case whiskey) every morning just before the first dog walk. Keeps me lubricated. The JD is almost empty, Highland Park next I think. Looking forward to the two throw...... Three days?
Stanley Challenger Graham
Barlick View
stanley at barnoldswick.freeserve.co.uk |
Stanley
Local Historian & Old Fart
36804 Posts
|
|
Posted - 27/08/2007 : 17:19
Lots of measuring up and check measuring. Measure twice and cut once!
All ready for the off. Tools sharpened and heights checked.
By dinnertime I had started and decided I had done enough for the day. Lazy sod...... Notice the ymatching yellow dots on the chuck and the billet. This chuck is old and worn and if you don't re-chuck in exactly the same position you get inaccuracy. The yellow dots cure that. Newton and I used to spend many hours working out why you can't true a self-centering croll chuck. We even tried some of them on an old chuck but the bottom line is that once a scroll chuck gets worn or strained forget it. The only way out is the yellow dot. The only truly accurate chuck you have is the independent four jaw and a good clock. I keep thinking I will get a small four jaw for the Harrison......
Stanley Challenger Graham
Barlick View
stanley at barnoldswick.freeserve.co.uk |


