| Author |
 Topic Topic  |
|
Stanley
Local Historian & Old Fart


36804 Posts

|
|
 Posted -
25/11/2004
:
14:20 Posted -
25/11/2004
:
14:20
|
I've always been fascinated by the things people do in their spare time when they can do exactly what they want to do. Men and sheds are a particularly fertile field. Women tend to do their thing in the comfort of the house.
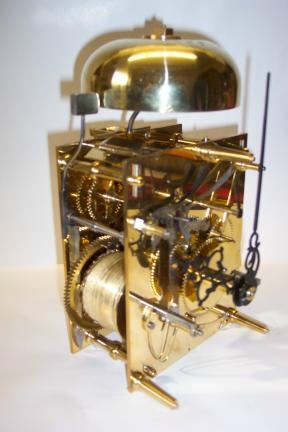
I was delighted to see Andy's picture of the clock movement he has made.
It struck me that we could perhaps start a new topic devoted to spare time skill. So Andy starts it off and my contribution is this:
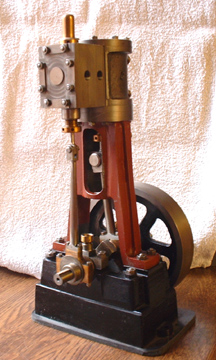
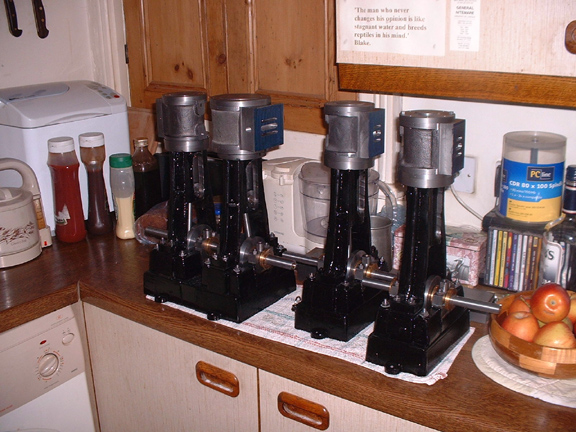
It's a small steam engine made from scratch and is based on the Stuart 5A but a longer stroke. One of these will drive a 14 foot boat with steam at 250psi. By the way, we don't like to call them models, it's exactly the same construction and materials as a full size engine, just smaller. So come on out there, let's hear about what you make in your spare time. I reckon we could be in for some surprises!
Stanley Challenger Graham

Barlick View
stanley at barnoldswick.freeserve.co.uk
|
|
| Replies |
| Author |
|
|
softsuvner
|
Posted - 08/10/2007 : 20:39
Stanley
Will you be making a ring drilling jig for the singles?
........And how come you are getting letters from the bank, no junk mail, or any mail here today, bliss!
Malcolm
 |
Stanley
Local Historian & Old Fart
36804 Posts
|
|
Posted - 09/10/2007 : 05:35
Our posties are still working, normal service. Not sure what you mean Malcolm by a ring drilling jig. If you mean a jig for the stud holes on cylinders and standards, I shall drill the cylinder covers first and use them as Jigs for the top end and make a throw away plate with a register for drilling the standards and cylinder bottoms becsue they aren't symmetric due to having to miss the pillar section. Same with the steam chests, drill the lids first and use them as jigs for the steam chest and valve face. As for the piston rings..... Not made up my mind yet but as the engines aren't intended for serious use I might just use graphite packing in the ring grooves or even 'O' rings! Actually, they'd run without any rings, the fit is good enough. On a comparative scale there is less gap between piston and cylinder walls than on many engines I have run commercially! Thanks to careful machining they run very close to parallel, very pleased with them actually. I'll let all that stand while I get on with the studding.......
Stanley Challenger Graham
Barlick View
stanley at barnoldswick.freeserve.co.uk |
Stanley
Local Historian & Old Fart
36804 Posts
|
|
Posted - 09/10/2007 : 17:42
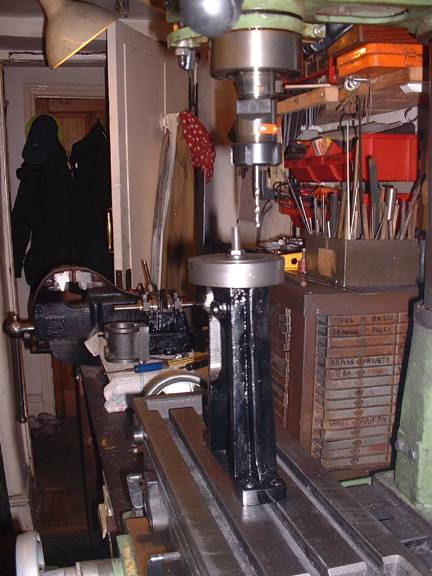
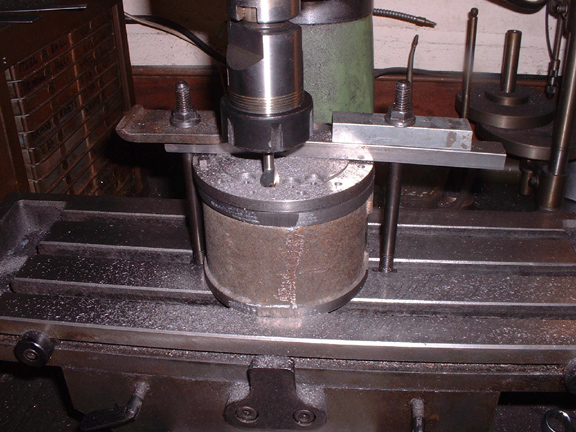
Got this one out of focus. Drilling the clearance holes in the cylinder base and the standard ready for the studs. These are asymetric as you have to avoid the pillars so four 2BA studs on each side.
Turn the foundation ring over and use it as a template to drill the tapping holes in the cylinder. I made two studs and they are nice and straight and centred. Then I drilled the top cover and the tapping holes in the cylinder.
The nearest engine has the cylinder bolted down and the lid is fastened on. All that is left is the drilling and tapping for the steam chest and cover. I'll leave that for now and work my way down the line getting them all to this stage. Nice thing is that even with the cylinder bolted down, the single engine runs free, it hasn't pulled anything out of shape. This shows that all the surfaces were square and the crosshead/piston rod dead central, very satisfactory. I spent an hour on the big engine this morning chasing the tightness in the big cylinder. I decided in the end it was the piston that was too good a fit. I skimmed a couple of thou off it and all is well, the engine turns easily by hand. Of course, if I haven't got everything squared properly it might tighten up again when I bolt the cylinder down. Sufficient unto the day is the evil thereof!
Stanley Challenger Graham
Barlick View
stanley at barnoldswick.freeserve.co.uk |
softsuvner
|
Posted - 09/10/2007 : 17:42
Stanley
Lucky you, no postal deliveries until tomorrow (first since Friday) so there will be tons to sort and I've treated myself to some cheap DVDs which should have come (do you remember the John Rohmer programmes on Byzantium and the 7 wonders of the World?).
I meant a circular drilling jig, as per LBSC, your production plans are obviously well advanced! Of course you could always try a selection of different solutions, graphite and nitrile O rings. I have got a pre-war Stuart vertical that will still run on air, and the graphite packing rings have been in for 30 years to my knowledge.
Malcolm
|
Stanley
Local Historian & Old Fart
36804 Posts
|
|
Posted - 10/10/2007 : 06:00
I've got plenty of old-fashioned and totally illegal graphited asbestos packing and have no qualms at all about using it. In my opinion the H&S went completely over the top with their ban. The whole point about the danger of asbestos is the ingestion of free-floating fibre. No problems with asbestos roof sheeting, plenty still about. How come asbestos soaked in graphite grease is seen as a danger? Especially when imprisoned in a stuffing box. I maight make the rings for the big piston just for the crack but I'll leave those decisions until later. As for running off compressed air. These engines would do that with the bare piston. Nice to hear the air whistling through the ports even with no studs or packings!
Stanley Challenger Graham
Barlick View
stanley at barnoldswick.freeserve.co.uk |
Stanley
Local Historian & Old Fart
36804 Posts
|
|
Posted - 10/10/2007 : 18:18
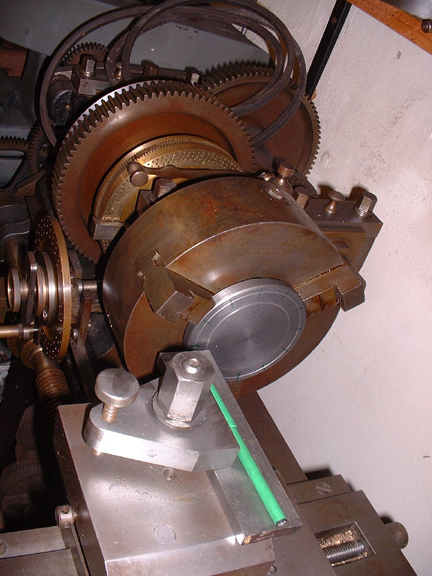
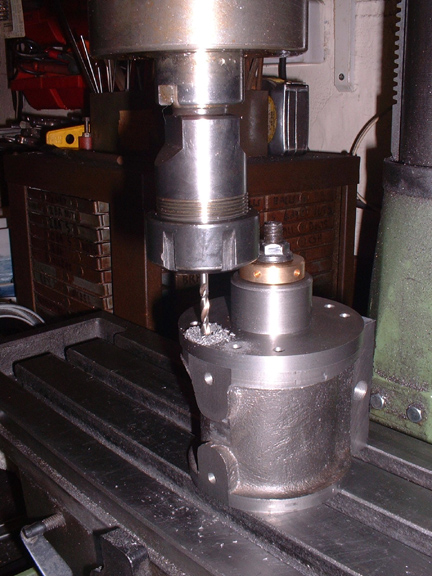
Something different.... I finished drilling and tapping for the lids on the three small cylinders and wanted to divide the lid of the big cylinder for 12 holes. I remembered that Johnny's big lathe had a 12 division on the tangent wheel in the head so I banged a chuck on, put a plate in the tool post for a ruler and marked the 12 divisions with felt tip. This is accurate enough because the lid acts as the template for both the top and bottom covers.
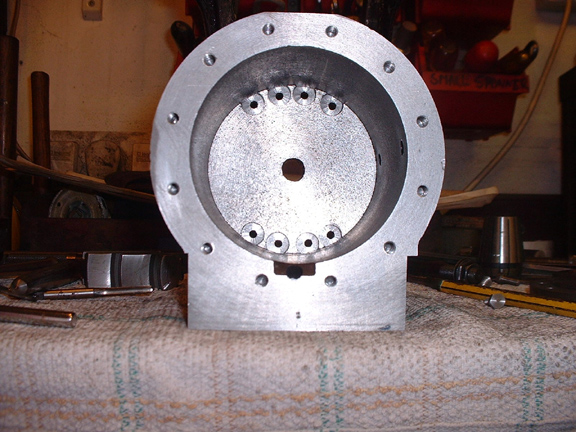
I decided to do the standard as well because this cylinder is a bit more complicated than the singles as there are two rows of tappings in the foundation plate.
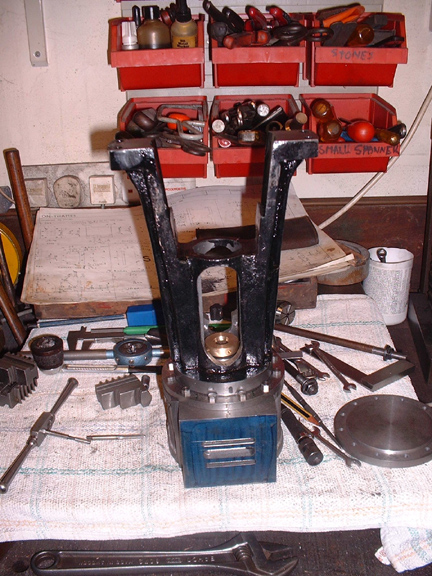
You can see the problem here. The outside row of set screws holds the cylinder on to the foundation ring and here I am set up to mark the 8 asymetric holes on the plate so I can use it as a template for the holes in the standard. Not as easy as it looks because the orientation of the cylinder is important as well. I stopped here, I'll finish this tomaorrow and then do the standards on the two small cylinders that haven't been done yet. Delicate work but it's all falling into place nicely so far.....
One word about orienting the holes on flanges and cylinders. Apart from considerations like not drilling into steam ways, Flange holes should always be drilled in what Newton called 'Template way'. I never really understood where he got the description but what it means is that you always have two studs at the top of the flange level with each other so that a straight edge laid across the two is dead level. The funny thing is that this looks better than a single bolt at top and bottom and if you are erecting pipework above your head it's easier to get at the top two flange bolts. So always orient your flange holes template way!
Stanley Challenger Graham
Barlick View
stanley at barnoldswick.freeserve.co.uk |
Stanley
Local Historian & Old Fart
36804 Posts
|
|
Posted - 11/10/2007 : 18:01
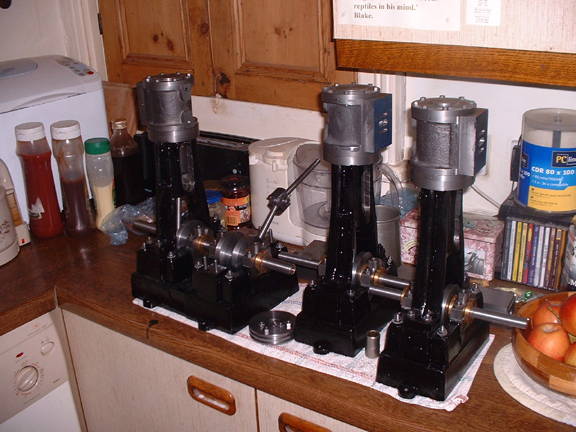
I've been slacking today. I finished the big cylinder (apart from the steam chest etc) and then had a read..... I have to admit I have been cheating. In amongst me treasures was a large number of beautifully made 2BA set screws with full size machined heads so I have been using them for fixing lids on. The big cylinder was going to be different anyway because the 8 asymmetric fixings to the standard are inside the steam space of the cylinder. I decided that I could use the set screws into the standard if I counterbored the holes to get a socket in. Sealing them is no problem, when I finally do the erection I'll bed the heads in Manganesite.

After a bit of measuring and marking I got brave and poked the tapping drill through. (Used that so that when I use the cylinder bottom to drill the tapping holes in the standard I have an accurate centre)
Would you believe I had no 7/16 mill or slot drill? So I vandalised a counterbore and got brave again. I'm only using the cylinder as a workholder, the lid is the other way up in real life.
I told you they were tight!
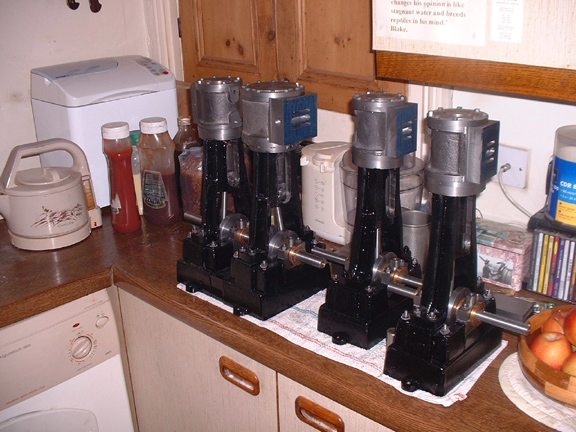
State of play at dinnertime. All the lids on and 1 small and one large cylinder fastened to their standards. The ring of 12 set screws on the periphery of the cylinder foundation are a bit too close to the standard. When I get it stripped down again for final assembly I shall ease them by either milling recesses or turning a whisker off the standard. By the way, the big cylinder still runs free even though it's bolted down so once again, the centres must have been somewhere near. I remember when I made my first engine 20 years ago I was nowhere near as accurate and I had to do such a lot of adjusting and fitting at this stage. The more care you take in getting accuracy in the early stages and the less hassle at this point.
Stanley Challenger Graham
Barlick View
stanley at barnoldswick.freeserve.co.uk |
softsuvner
|
Posted - 11/10/2007 : 18:11
Stanley
I think we can forgive you for using commercial set screws. The old engine and locomotive builders would have got their apprentices to make and thread all the studs and bolts, the disadvantage of being a one-man band is that you get both the interesting and the boring jobs!
What is Magnasite by the way, not a term that I've met before?
Malcolm
|
Ringo
Site Administrator

3793 Posts

|
|
Posted - 11/10/2007 : 18:16
Magnesite is magnesium carbonate, MgCO3. Iron (as Fe2+) substitutes for Mg with a complete solution series with siderite, FeCO3.!!!!!!!!!!!
|
softsuvner
|
Posted - 11/10/2007 : 18:22
Thanks Ringo
But..... will my tool merchant or motor factor know it as that! Is there a trade name?
Malcolm
|
panbiker
|
Posted - 11/10/2007 : 22:44
I have just realised that Stanley has almost completed four steam engines in the time it has taken me to finish my Penny Spitfire. I soldered the smallest safety pin I could find on the underside last night and then filed the excess off then polished it up a bit. It's the Pickering 1940's do this weekend, I promised Sally her sweetheart badge for this date so I thought I had better finish it. I have weakened the safety pin a bit with the heat when soldering but it should be OK. It's not perfect but has been a lot of fun in the making.
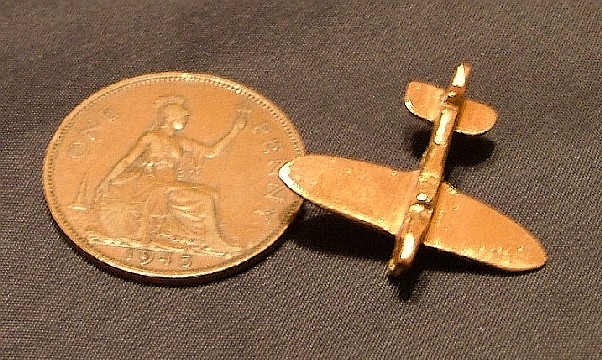
Photo's not very good but it's quite small and shiny at the moment, used macro settings on the camera but did'nt have access to my tripod. What's the verdict Steve?
Ian |
Stanley
Local Historian & Old Fart
36804 Posts
|
|
Posted - 12/10/2007 : 08:17
I think it's great! Can I have one? The big difference between the engines and the Spit is that the latter is all hand work, very creditable. My fingers are itching...... Not too sure about nearly finished engines.... There is a lot to do yet in the steam chests and valves and then there are the tiddly bits; 16 brass lubricators, 3 cylinder lubricators 3 stop valves, all the pipework........ One thing is certain, I'm not going to attempt to lag the cylinders, I think it spoils them and isn't thick enough to make any appreciable difference to the performance. As LBSC used to say; 'You can't scale nature'. I'm glad I'v got away with the clearances in fixing the big cylinder, it was tight! The set screws are lovely, far better than anything I could have made, not pressed but turned in an automatic repetition lathe. Nice deep heads. Main thing I have learned doing these engines is that I'm a lot better turner than I was twenty years ago, very satisfying when they go together with so little fitting. More accurate in the bore and centres and freer running than my first engine.
Stanley Challenger Graham
Barlick View
stanley at barnoldswick.freeserve.co.uk |
Stanley
Local Historian & Old Fart
36804 Posts
|
|
Posted - 12/10/2007 : 08:20
That reminds me.... I must get on to my mate John at REW and put the arm on him for three old 1/2" brass globe valves which can be the basis for some tiddly little stop valves.
Stanley Challenger Graham
Barlick View
stanley at barnoldswick.freeserve.co.uk |
Stanley
Local Historian & Old Fart
36804 Posts
|
|
Posted - 12/10/2007 : 11:34
There won't be any activity today, time to get some articles knocked out for the paper. A rest will do me good and I shall be in there like a giant refreshed tomorrow morning.....
Stanley Challenger Graham
Barlick View
stanley at barnoldswick.freeserve.co.uk |
Ringo
Site Administrator
3793 Posts
|
|
Posted - 12/10/2007 : 18:50
quote:
panbiker wrote:
I have just realised that Stanley has almost completed four steam engines in the time it has taken me to finish my Penny Spitfire. I soldered the smallest safety pin I could find on the underside last night and then filed the excess off then polished it up a bit. It's the Pickering 1940's do this weekend, I promised Sally her sweetheart badge for this date so I thought I had better finish it. I have weakened the safety pin a bit with the heat when soldering but it should be OK. It's not perfect but has been a lot of fun in the making.
Photo's not very good but it's quite small and shiny at the moment, used macro settings on the camera but did'nt have access to my tripod. What's the verdict Steve?
I love it, where did you start?
|


