| Author |
 Topic Topic  |
|
Stanley
Local Historian & Old Fart


36804 Posts

|
|
 Posted -
29/07/2011
:
06:27 Posted -
29/07/2011
:
06:27
|
New start as old topic was getting too big. Here's the LINK for the original topic.
Sheds are centres of honest endeavour and sanity, rare things these days. Please join in and tell us what you are doing in your shed. All are welcome!
[By the way, if I occasionally seem to be stating the bleeding obvious, it's because I'm aware of the fact that not everybody has the same experience so please forgive me.]
Stanley Challenger Graham

Barlick View
stanley at barnoldswick.freeserve.co.uk
|
|
| Replies |
| Author |
|
|
Invernahaille
|
Posted - 10/08/2011 : 03:24
Stanley,
I am impressed.
 |
Stanley
Local Historian & Old Fart
36804 Posts
|
|
Posted - 10/08/2011 : 07:06
Don't get carried away, I'm only a bum fitter!
I was thinking about what your instructors say about watching the tool all the time. I would fail the course! I even go and have a sit and a read or do some tifying up. Yesterday I rescued the cutter I buggered the day before, all done while the ato-feed was looking after the cylinder bore. Newton would have failed as well, if he was doing an all-nighter boring a big cylinder he used to get the cut going and then go home to bed! Set the alarm, get up, shave and have breakfast and then back to the shop to finish the cut. He talks about this in the LTP. Mind you, he did it once and when he came back the cut was alright but because the cylinder was so big as it reached the end of the traverse it started pushing the CI pillar out that was holding the upper floor. Jaohnny took one look, told him to leave the borere running and they shoved a girder up under the beam and let the CI column get knocked out. Johnny said it was a good do, the pillar had always been a nuisance!
Both LP bores finished, drawings say 2 1/4" bore but whan I got a clean bore at two and three sixteenths I left it at that and bored the other the same diameter. I've reached a clean bore on the first HP. I shall take it to the book figure of 1 1/2" for both of them. I should have them finished today. Leaving the LP undersize is just what the old fitters would have done with a full size engine. The thinking was that the more meat left in the walls, the more re-bores they could get out of the cylinder. After all, the piston has to made to suit the bore.
So, off for a walk in the rain and then sharpen the tool, check the setup and on with the dance. I'm pleased with the progress, there is life in the old dog yet!
Stanley Challenger Graham
Barlick View
stanley at barnoldswick.freeserve.co.uk |
Steel N Wood
New Member

4 Posts
|
|
Posted - 10/08/2011 : 09:21
Stanley  Yes I bow down to a master of machining I signed up for this site due to your other loooooooong thread and the restorations of the OT lathes. You see I am editor of the Ornamental Turners group of Australia http://www.otga.org.au/ Yes I bow down to a master of machining I signed up for this site due to your other loooooooong thread and the restorations of the OT lathes. You see I am editor of the Ornamental Turners group of Australia http://www.otga.org.au/
I was doing a search for things OT and found the amazing fellow doing a WiP restoration. I am hooked, but annoyed  not one bit of OT work can I see in the thread produced. Sooooooo where is it. LOL not one bit of OT work can I see in the thread produced. Sooooooo where is it. LOL
Now I will admit that after 4 years in the OTGA I still am yet to make my own Rose Engine.
Edited by - Steel N Wood on 10/08/2011 09:23:48
|
James Powell
New Member

22 Posts

|
|
Posted - 10/08/2011 : 14:31
If you hadn't said you were going to run them on air, I'd be after you for changing the ratio between LP and HP. Usually, someone, somewhere, has done some math on that, and come up with a volume figure to then work for a pressure figure, so both sides do even (ish) work.
No matter, you said they are going to be for air operation, really, rather than into a launch. The gentleman who finished my Britannia, Harry Boneham, ( http://www.tsme.ca/gallery/historical/Harry-Boneham/harryboneham.html ) built a triple expansion engine, fitted out for air because he wasn't building a launch to go with it. There's no photo of it there though- I just looked. Nor are there any of the Brit, which is a bit of a shame. I know the marine engine was not the ST triple, but rather bigger, more along the size you are working on now, Stanley
The petrol engines in the link above were all Harry's work, my Britannia had been started by his brother in law sometime in the 50's, I understand, and he inherited it to finsh. I have 2 of his steam engines, a copy of a Reeves Monarch (7/8 by 7/8, vertical) with a 3" vertical coal fired boiler, and the Britannia. The condition of ownership with the Brit is that other people get to drive it, particularly, the younger members of our club. Some of them are a little taken when you say that they are to have a go !
James
|
Invernahaille
|
Posted - 11/08/2011 : 02:15
If you increase the bore of the second cylinder and transfer the exhausted steam (air) from the first cylinder into the second cylinder you have the makings of a pretty efficient engine, add another cylinder and you have triple expansion.
Have you got a plan of the completed engine Stanley? Or is it posted earlier on your thread?
|
The Artful Bodger
|
Posted - 11/08/2011 : 04:10
First sight of my new concrete machine bench...
Gently on to the ground....
So we can all stand around and take pictures of it!
Concrete bench for my lathe, a very small Adept shaper, a small bandsaw and maybe a cold saw.
Edited by - The Artful Bodger on 11/08/2011 04:13:37 AM
Edited by - The Artful Bodger on 11/08/2011 04:16:33 AM
|
Stanley
Local Historian & Old Fart
36804 Posts
|
|
Posted - 11/08/2011 : 09:13
You can't beat getting them solid! Mine is hevy mahogany from Newton's old bench which he was throwing out when he moved into a smaller shed.
Jamie, ignore the maths for HP/LP as regards this engine. 1/16" isn't going to bother anyone! Ellenroad tandem still ran on the two LPs installed for when it was triple expansion. Theoretically much too small for the new big HP cylinders but they just ran them at higher pressure and the engine served for sixty years like that. Mind you, that was a bit extreme and they were pushing them! At one point they were taking over 1500hp out of one side with a 26" HP and an undersized LP. I reckon the LP would be on something approaching 50psi.

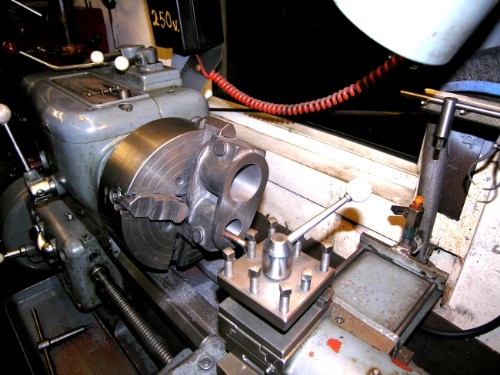
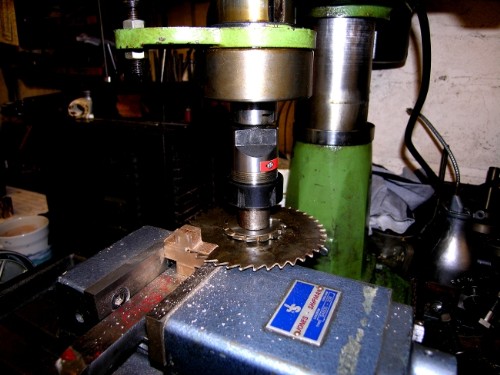
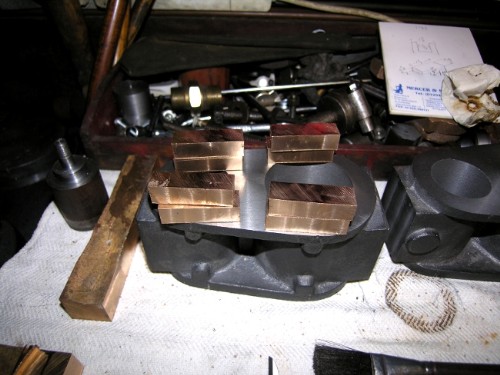
I was multi-tasking again yesterday, Jamie's instructors would not have been happy. While the HP was on auto-feed I went upstairs and had a root in the treasure chest. I had decided that the bearing shells for the crankshaft were looming up on the schedule. When I was buying big castings for the engines I was doing up I used to get Dick Bonser at Rochdale to make big risers and pour the excess in the ladle into block moulds and then bought them off him at current new metal prices. Alays handy to have some lumps of cast bronze about! This is one such slab under the sltting saw on the HM being cut into 1" X 3/4" bars for the shells.
The HM is the supreme tool for a job like this, the 1/16" slitting saw on auto saves a lot of hacksaw work! And dead easy to cut parallel blocks.
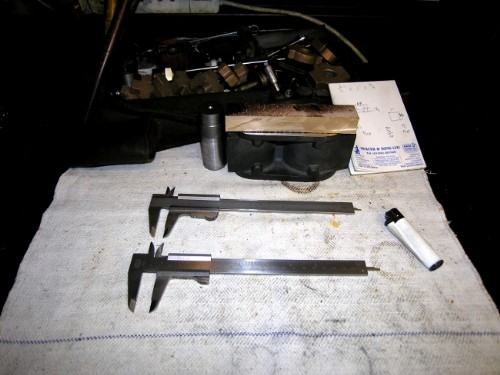
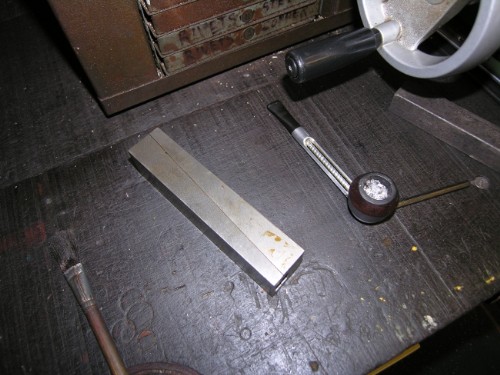
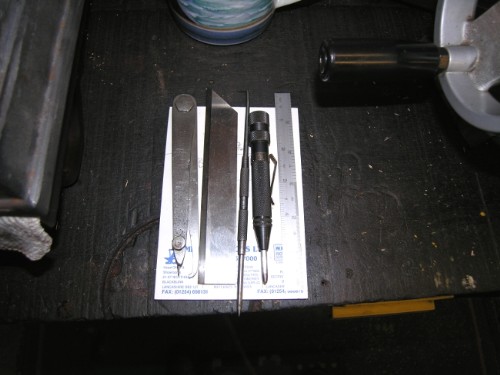
You might wonder why this boring pic of the bench. It illusrates a point I've raised before, keep your eyes open for what's on offer. The furthest vernier is a bog standard mm/thou Vernier. Obviously useful but I prefer the nearest one for everyday work, it was made by Mauser, belonged to a bloke called A Fransen (his name is engraved on it) and it measures in fractions, the vernier is calibrated for 128ths. The only fractional vernier I have ever seen though I suppose at one time there were lots of them.
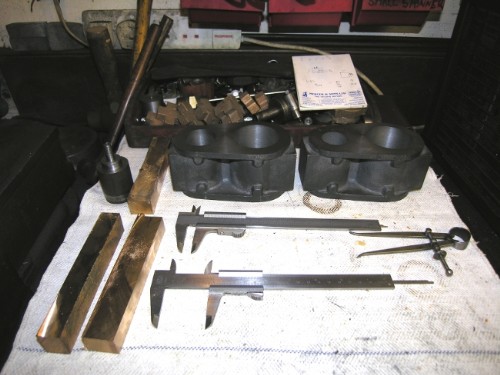
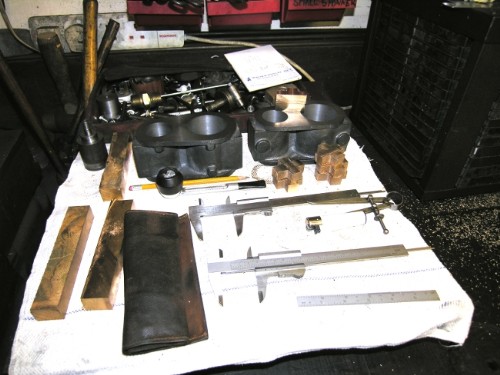
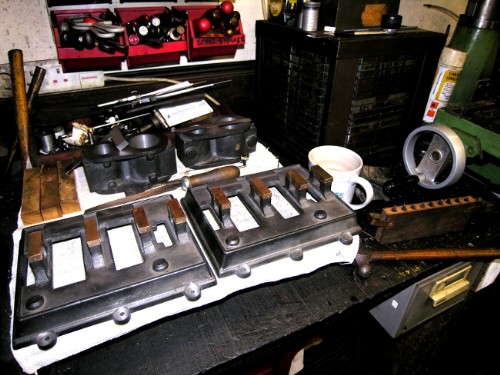
Close of play at lunchtime, I am old after all and there is no push, I'm not on piecework! The right hand block is ready for boring the HP. The left hand one is bored and when I checked the centres of the bores they are dead on 2 3/4", I've been lucky again! Two blocks of cast brass cut to size, if you look carefully you will see the rough face of the casting including a big depression in one of them. No matter, there is enough in the three bars to get eight shells. I shall sharpen the boring bar, set up carefully and then get boring again after daughter Susan visits in about ten minutes. It's all go!
Stanley Challenger Graham
Barlick View
stanley at barnoldswick.freeserve.co.uk |
Stanley
Local Historian & Old Fart
36804 Posts
|
|
Posted - 12/08/2011 : 07:31
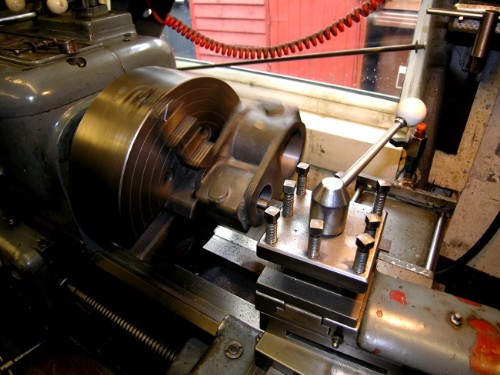
I was late starting yesterday due to my daughter's welcome visit. So it was after lunch when the last HP bore was set up and started. It was finished to 1 1/2" during the afternoon, a gnat's hair smaller than the other one but this is no problem. One thing I forgot to mention is that after the last cut has broken through it's a good thing to put another thou on the cut and reverse the feed, this gives a better finish and takes out the metal left because of spring in the tool. Good practice if you have the time. The old model makers spent hours lapping bores to a mirror finish, I don't bother, a good clean cut soon polishes up when you run the engine, in fact some authorities say that this self-induced finish is better than lapped. The old engine makers certainly didn't do it.
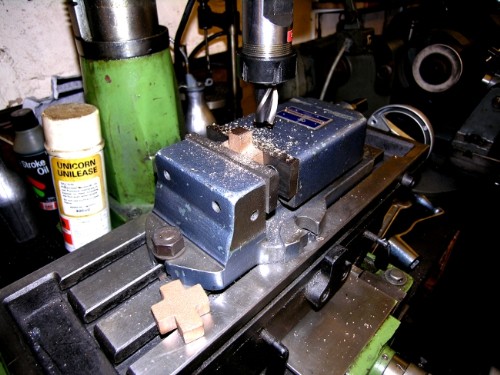
Meanwhile.... While the bore was on auto feed I started reducing the cruciform castings I have (God knows what they were for!) to make bearing caps for the bed. Might as well use these and have shiny caps. Never used in commercial proctice of course but with a small engine, plenty rigid enough. First job was to get two faces on each one.
When I was cutting the gears for the change wheels on Johnny's 1927 lathe I made an arbor for the VM. Here it is with a thin slitting saw mounted on it. In case you're wondering why the gear cutter is still on it, the saw has no keyway, it relies on friction to hold it so it made sense to use the keyed gear cutter as the backing for the saw. Very sharp saw and it whistles through the brass. I did a few before I knocked off for the day. By the way, almost all my cutters were got out of scrap yards and secondhand machinery dealers. With the contraction of manufacturing industry it's amazing what was scrapped or came on the secondhand market. I saw a big (about 15 tons) Polish boring mill being scrapped at Dixons at Burnley at this time, no takers for it. Dixons cleared a Nu Swift factory and I bought about 2cwt of high speed steel for £25 one day. Newton asked me why I had done it and I pointed out the price of new Osborne HS stock, we had enough HS steel to last us for ever! If anyone is ever passing and wants a few pieces, call ijn, you're welcome!
Here's another case in point. This is a tool room grade adjustable packing. I got two at that wonderful Alladin's Cave just near the bridge on the Rochdale Road into Oldham. The place was a gold mine of rare ex-army stock, I spent many happy hours in there. I think the two cost £30 but dirt cheap at that and wonderfully useful items.
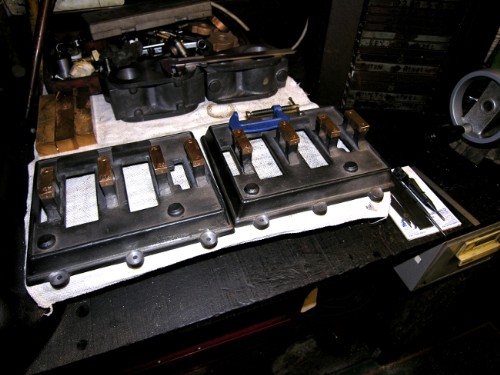
State of play at 16:00. Both blocks bored and accurate. Stock for bearings ready for shaving. Bearing caps getting closer. Machines cleaned up and ready for today.
Today I shall finish the rough cutting of the bearing caps and get the bearing stock to size ready for work on them. Once they are done I'll do some more work on the cylinder blocks, machining sides and radii at each end and getting the steam chest faces finished. Then I'll clean up the bearing caps, make a jig for boring the stud hales on the beds,Drill the bed ready for tapping and then enlarge the holes in the jig and use it to drill the holes in the bearing caps. Iwon't get that done today but nowt wrong with thinking ahead.
Another thing I have to do is see Terry Gissing down at Gissing and Lonsdale's and do a deal with him, my half bin full of clean brass scrap for two pieces of steel bar big enough to chop the crankshafts out. I like making crankshafts out of solid, lots of swarf and it tightens the bands on you! Newton always said that crankshafts and chuck backs were the best tests of a turner. Johnny said that if you think you are good, try making a gyroscope! Never tried that one yet. One of these days.......
Stanley Challenger Graham
Barlick View
stanley at barnoldswick.freeserve.co.uk |
Stanley
Local Historian & Old Fart
36804 Posts
|
|
Posted - 12/08/2011 : 07:53
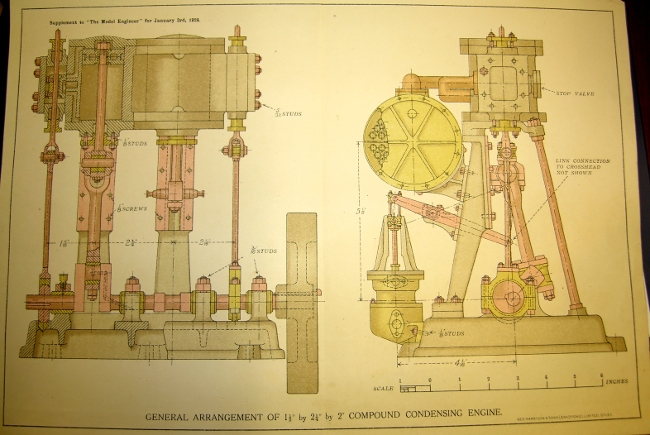
Robert. You asked if there was a drawing. Here's the supplement to the Model Engineer of April 1923 that triggered off my search and the realisation that I had the castings thanks to Johnny Pickles' foresight. I hope you can see the dimensions. By the way, I have a very well made condenser that I got when I bought a workshop and it's only slightlt larger than the one on the drawing. When I've finished the engines I shall think about mounting it on one of them and fitting the Edward's air pump as well.
Stanley Challenger Graham
Barlick View
stanley at barnoldswick.freeserve.co.uk |
Invernahaille
|
Posted - 12/08/2011 : 21:44
I like it Stanley. Keep up the good work.
|
Stanley
Local Historian & Old Fart
36804 Posts
|
|
Posted - 13/08/2011 : 07:13
I will do Robert. Don't forget to criticise if you see me going astray!
Close of play at noon yesterday. Friday is a busy morning with domestic matters so all I managed was to finish the blanks for the bearing caps. Big day Thursday and I was feeling a bit tired.
My thinking is that I shall shortly be at the point where I have to think about mounting the cylinder block on the standards and getting the centre line is going to be crucial. While my mind is working round that I shall have a bit of light entertainment in the non-ferocious department. Ideally I want the crankshaft made and finished before I mount the cylinders, I have a little wheeze in mind that makes getting the centres almost foolproof....
I shall make a jig for drilling the holes for the studs in the bearing caps, then machine them so they have projection into the bearing housing so I can use them as jigs for finding the centres for the studs in the beds. There is a trap here for the unwary. Don't make the assumption that the caps will all be identical. Now is the time to number the bearing housings and the caps so that they have a permanent relationship. They will need a bit of hand-fitting to make them a perfect fit and so will become mated. This is exactly what the old fitters did on the full sized engines. English Heritage used to bug me by insisting that every part should be numbered when pulling an engine down and it took me a long time to convince them that this was not needed, the old fitters had marked everything that needed identifying. So, out with the small number punches! One complication is that as I'm doing two engines at once I'll have to number both beds 1-8 so I don't get mixed up.
In case you're wondering why I don't finish the surfaces on the block first, no point taking the machine vice off the VM bed yet, I shall finish the caps before I do so I know the vice is set exactly how it was to make them. You never get the setting dead right so leave it alone until that phase is finished. The cylinder block will need either mounting directly on the bed or on the rotary table for the curves on the ends. This in turn needs some turned plugs for locating the block. I'll leave that for a while....
Stanley Challenger Graham
Barlick View
stanley at barnoldswick.freeserve.co.uk |
Stanley
Local Historian & Old Fart
36804 Posts
|
|
Posted - 14/08/2011 : 07:22

Normal service was resumed today. First job was to mill all the bearing caps to correct dimensions. I have left the section that actually puts pressure on the bearing inside the pedestals slightly proud at 1/8" and will adjust it to fit each individual bearing. If all goes well this will be the same for all of them and can be milled off four at a time but just to be safe I'll wait to see what happens with the shells. The caps will not be tight on the pedestals, leave a small gap for subsequent tightening.
Close of play at lunchtime. All the caps fitted and numbered 1-8. First job today is to decide on stud size, drill caps for clearance and pedestals for tapping size and perhaps make and fit the studs. I shall look at my threaded rod stocks to decide what thread to use, I'm not into making individual studs!
I've been thinking about the bearing shells. Always good to think ahead! I have a cunning plan.... The traditional method of making shells is to split the blanks and then solder them together so that when machined they bear on each other. Sometimes this is essential, as in eccentrics but in this case it doesn't matter if there is a gap so I shall make them and then slit them with a thin slitting saw. The wear points on a crank bearing are at top and bottom, a small gap is no problem as long as to put a small champher on them so the edge doesn't wipe the oil off. In practice, even if done the old fashioned way there is always a small gap and when wear occurs eventually you have to take the shell out to give them more gap. This way all it will need is a nip on the caps. My aim now is to get all the bearings fitted so that a piece of 1/2" ground silver steel stock turns easily in them with the fingers only when caps are tightened down. This will be slacker than in full size practice but we are not going to be working on 25psi and driving a heavy load. All right, it's made to full size standards but in the end it's only an interesting artefact.
Stanley Challenger Graham
Barlick View
stanley at barnoldswick.freeserve.co.uk |
Stanley
Local Historian & Old Fart
36804 Posts
|
|
Posted - 14/08/2011 : 07:25
PS. There are not going to be any fiddly little lubricatos on the caps. An oil hole in the cap and the bearing will do. I've made big single cylinder verticals that have been used for driving a 14ft boat and they never needed them even though working. Oil running down the rods from the crosshead slides was plenty for the main bearings.
Stanley Challenger Graham
Barlick View
stanley at barnoldswick.freeserve.co.uk |
Stanley
Local Historian & Old Fart
36804 Posts
|
|
Posted - 15/08/2011 : 07:34
Boring pic but this was the extent of the technology yesterday. I decided against a jig to bore the stud holes in the bearing caps. I did it the old fashioned way and then drilled them. First I had to decide on a size. I have plenty of 1BA threaded rod and some nice old machine made nuts that have some size about them. I hate the modern stamped outnut blanks, they do the job but have no finish. So a 3/16" diameter hole and 4.5mm for the tapping hole in the pedestals today.
Close of play. All the caps drilled and I shall use them as the guides for drilling the tapping holes in the pedestals. I shan't tap them yet but get on with making the bearing shells. I won't know the length of the studs until I have finished the shells. Doesn't look like a lot of progress but careful marking out is slow and desrves plenty of time and checking. Measure twice and drill once!
Stanley Challenger Graham
Barlick View
stanley at barnoldswick.freeserve.co.uk |
Another
Traycle Mine Overseer

6250 Posts

|
|
Posted - 15/08/2011 : 08:29
Reading this is like trying to follow a French novel with the limitations of O level French. Pics are very good though> Nolic
" I'm a self made man who worships his creator"  |