| Author |
 Topic Topic  |
|
Stanley
Local Historian & Old Fart


36804 Posts

|
|
 Posted -
25/11/2004
:
14:20 Posted -
25/11/2004
:
14:20
|
I've always been fascinated by the things people do in their spare time when they can do exactly what they want to do. Men and sheds are a particularly fertile field. Women tend to do their thing in the comfort of the house.
I was delighted to see Andy's picture of the clock movement he has made.
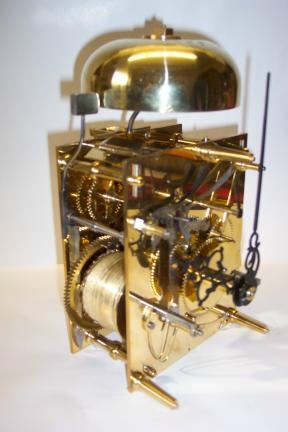
It struck me that we could perhaps start a new topic devoted to spare time skill. So Andy starts it off and my contribution is this:
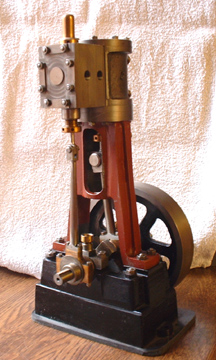
It's a small steam engine made from scratch and is based on the Stuart 5A but a longer stroke. One of these will drive a 14 foot boat with steam at 250psi. By the way, we don't like to call them models, it's exactly the same construction and materials as a full size engine, just smaller. So come on out there, let's hear about what you make in your spare time. I reckon we could be in for some surprises!
Stanley Challenger Graham

Barlick View
stanley at barnoldswick.freeserve.co.uk
|
|
| Replies |
| Author |
|
|
panbiker
|
Posted - 02/08/2007 : 23:47
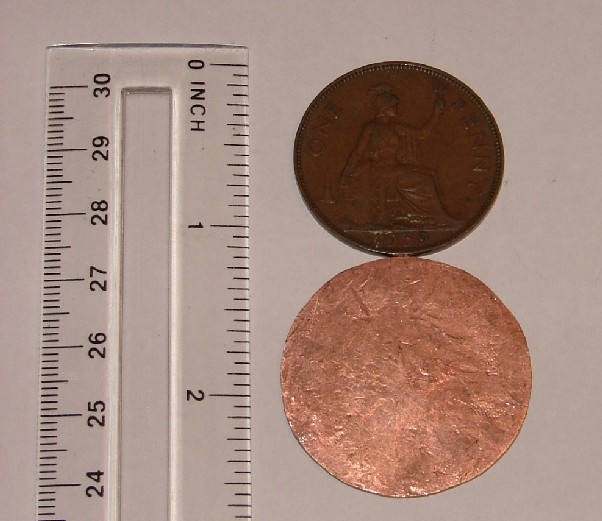
Right, here we go, bashed another Penny up to have a go at Spitfire MkII. Heated it up and plunged in cold water before the bashing. It's quite a bit bigger than my first effort.
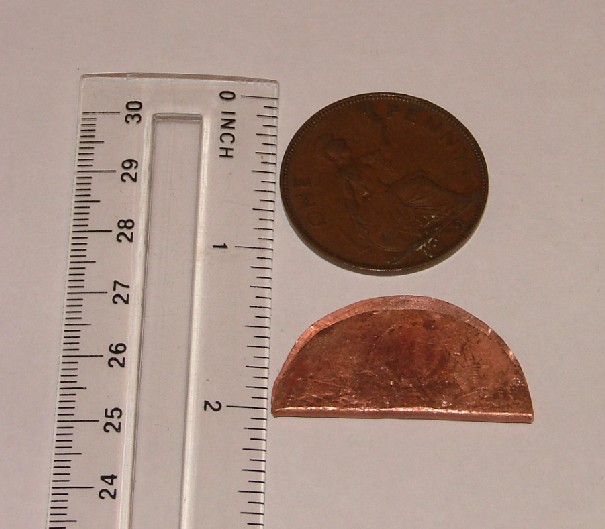
Here's the first bend, not quite in the middle, I marked it exactly but it's still quite hard to get it folded exactly on the diameter.
Opened up to form the wings, slightly tapered fuselage, I tempered it again before I opened it up and gave what will become the wings a bit more welly with the hammer. I'm trying to increase the size as I go along, I've lost a bit of width on the wings forming the fuselage.
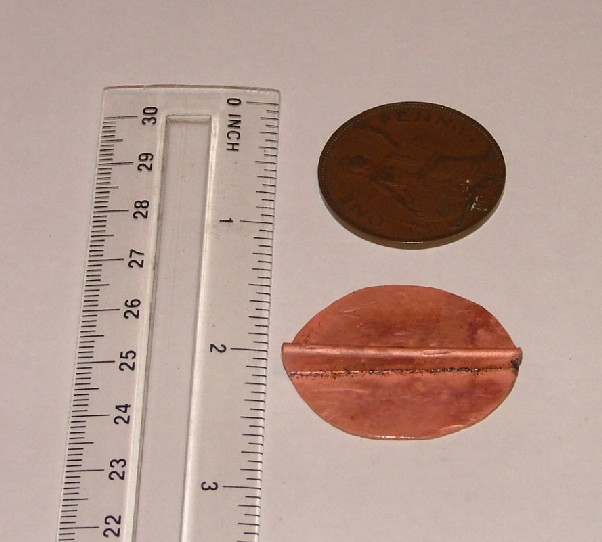
Heated and tempered again before cutting out the very basic shape of the plane, more hammering on the wings. Now that the metal is thinner I can manage to heat it up to cherry red using the back ring of the gas stove, I thought I would give this a try as my blowlamp ran out of gas, it seems to work OK.
Started to file up the wings, started at the leading edge of the wing to square them up with the fuselage, I'm using the diecast model now as a guide to try and get the classic eliptical wing shape of the Spitfire, if this is'nt right it will turn out to be a Hurricane. I have to make the cockpit shape yet and raise the tailplane to get the right incidence in relation to the main wings. The rudder will have to be formed out of the rear of the fuselage. If anything, this effort may be a bit long in the fuselage, the proportions will have to be right or it won't look right. A bit of camera shake on this pic.
It took me about 3 hours to get to this stage, Steve got to here in an hour, but he is a metal basher by trade. More filing to do on the wings before I decide whether it's too long in the fuselage if that's the case I'll start again with a MkIII. I've promised Sally a sweetheart brooch for our 40's re-enacting so I'm determined to get this right. It's got to look like a proper Spitfire or it won't do. Can't do any more at this for a day or two as wer'e of to my Niece's wedding at the weekend. So far, this effort has been considerably easier than my first go, I'm gaining more experience as I go along. It might be better to work the initial beating of the Penny to an elipse to create more width for the wings, time and a bit more filing wil tell.
Ian  |
Stanley
Local Historian & Old Fart
36804 Posts
|
|
Posted - 03/08/2007 : 06:28
Amazing how practice maketh perfect... or somwhere near. It's looking good Ian. I couldn't help thinking that as long as there are blokes ready to spend their spare time making pennies into Spitfires there is hope for the world.
Stanley Challenger Graham
Barlick View
stanley at barnoldswick.freeserve.co.uk |
Steve48
New Member

19 Posts
|
|
Posted - 03/08/2007 : 06:50
Hi all,
Hey Stanley, I like what I am seeing, those shells look good, must confess I am glad you bored the shells out, you never know one day a decendant of yours might have said very nice but why are the bearings so rough.
As to defacing coins of the realm, well any of you ever heard of a Penny washer, its a washer that is much larger than normal, but with a small hole, say a quarter inch washer but the OD measures an inch perhaps. You can still buy them and any decent ironmonger will understand the term. But how did that name come about, because people like us took a penny and drilled a hole through it and used it as a washer, cost one penny. I have used many over the years, there is a vintage Daimler out there somewhere that has them holding the wings on, when you were stuck it was cheaper and quicker to dig in your pocket than go and get some. Of course today the governement has let us down and we have steel coinage in use, so no good using those as non-ferous.
Oh and we used to put old pennies on the railway crossing, its amazing how big they get after a goods train has crawled through to the station, and no they didnt fall off after the first set of wheels went over. In those halycon days you had to nip in whilst the signalman was looking elsewhere, now its all automatic, and I expect you would end up inside for attempting to derail a train.
Ian your doing well on the Spit, like I said its a bugger when you dont get it folded in half, because you loose the error which is bad news. One other point, is that the tapered fuselage is higher for the tail, not the nose, and when you knock down the bit between the wings leaving the tail sticking up, the plane grows a bit longer. You can still encourage the tail upwards by knocking it in from the rear and the sides though.
As to getting knocked of your bike, I have had first hand expereince of that on my pushbike, this week and not for the first time. I have a fold up, so go off in the car and then go cycling and exploring different places, one guy this week tried to put the bonnet of his Audi under me, then stopped and waved me one, when I was three inches from the side of his car, I just gave him a look that said it all and let him go. Maybe everycar driver should be forced to be a cyclist motor or otherwise prior to getting behind the wheel because a high precentage of them dont seem to be able to see you for some reason.
Stanley re soldering, that was the first thing I remember my dear old Dad teaching me. Something along the lines of "Cleanliness is next to Godliness except when soldering, then its next to impossible without it". The reason most people fail soldering is dirt, or oxide, and the best solution to that is Bakers fluid, its an cleaner and deoxidant second to none, but its also very very nasty if you spill it on your tools, so be warned. But paint that on the surface and then tin it, wipe it off with anything whilst still molten and you will have a good tinned surface, and if not, repeat it again. One exception to the rule is "sintered bronze" this is the stuff thats porous and if its ever been used as a bearing its so contaminated with oil that its next to impossible to solder.
Incidentally as we have bikers here. If your nippples ever fall off (wait for the funny comments) the use of Bakers fluid is a must on cables, it gets inside the strands and allows the solder to penetrate properly. Put a small countersink in the nipple, poke the cable through, spread the end with a point apply fluid, solder, file off the excess and it will outlast the cable.
Steve
|
panbiker
|
Posted - 03/08/2007 : 10:11
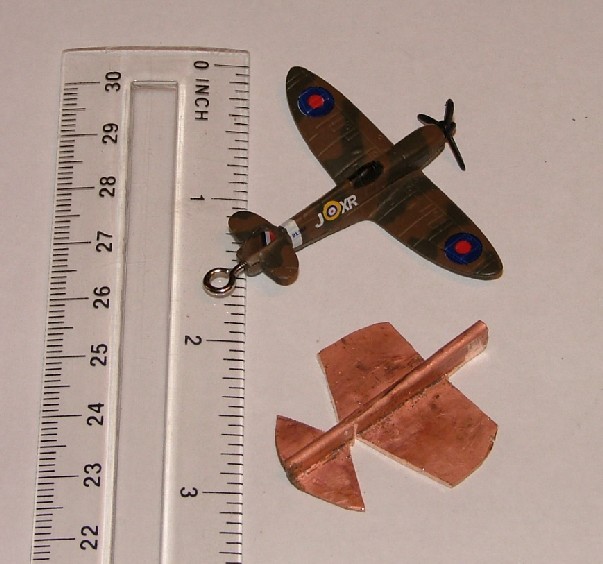
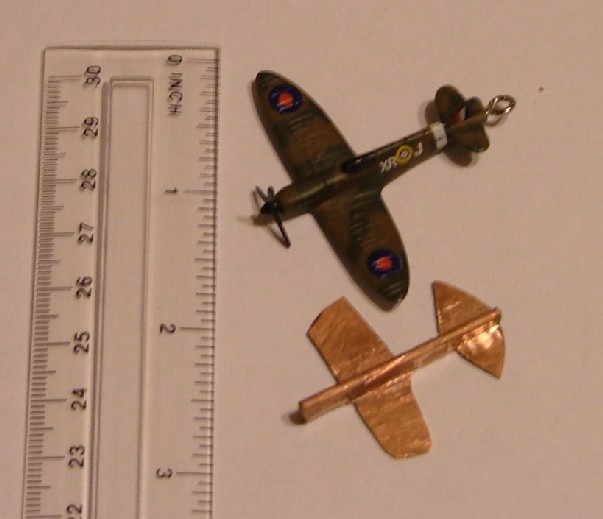
Oh bugger, it seemed fairly logical to me that it should taper from the front of the fuselage, forgot about the tail shuffle, widest bit at the back will give more leeway for the rudder, got some more softned Pennies in my pocket here at work so I'll go down to DT and do a bit of damage to them. I see a MkIII on the horizon.
I dont have any nipples to bother about on mine Steve, all the levers are hydraulic, whoops, forgot about the throttle.
Anyway with regards soldering, when I earned my crust from electronic servicing, I used to pride myself on my soldering. One bloke once asked me why I took so much care over it when you could'nt see the result as it was inside the equipment? I told him that there was a right and and a wrong way to do any job, the wrong way would have me going back to the job and he would probalbly have to pay for another service call. Doing it right first time even if it takes a bit longer ensures it's the last visit for a particular problem. I could see the him weighing up the financial implications of what I had just said, "Tek al't time tha want's lad, do you want a brew?"
Apart from that aspect, If you do it right YOU know it's right. Correct temperature before you apply the solder and cleanliness of the parts being soldered are the key to a good joint. It's like any other skill, practice makes perfect, once learnt properly it never leaves you.
Can't go and bash my Pennies until a bloke turns up to test our new 100MB broadband connection. All the kit went in yesterday but it has to have certification and data integrity tests run yet before I get to play with it.
Ian |
panbiker
|
Posted - 03/08/2007 : 11:44
Been down to DT and found a nice short length of 1.75" square bar and a much bigger hammer than I've got at home, DT is at the far end of the school so I've brought them up to my office while I wait for the cable testing guy. I've bashed the first of my pennies up with my new found kit and it's turned out a treat, slightly oval, uniformly thick (about half the original) and perfectly flat, bodes well I think for a MkIII. Took less than 5 minutes, right tools for the job and all that....Getting better at this, I'll persevere until I get it just right.
My school networks are running sweet, I've defragged all the raid arrays on all the servers and re-imaged all but 1 of the computer suites around school so I have a bit of leeway to do a bit of Sipt bashing. I have some more contractors coming in at some point through the holidays to install data and power for some plasma screens that are going up around the building, waiting for a phone call on that one to arrange access.
One problem I've noticed when doing the first fold, it's easy enough to get the penny bent to 90 degrees, when I then put it in the vice, one side always curves before the other, it never continues to fold along the diameter. Once one side has started to curve inwards, it's virtualy impossible to complete the fold on the diameter, it always ends up slightly out. I suppose this is because the 90 degree angle is stronger than the thin edge of the coin and it will always go first at the weakest point. Any tips for completing the fold so that it ends up more uniform?
Ian |
Steve48
New Member
19 Posts
|
|
Posted - 03/08/2007 : 14:50
Hi Ian,
Its cause and effect, when you put it in the vice and hammer it at 90 degress, the side you are beating merry hell out of work hardens, the bit in the vice however still has the same maleability, so that side is softer and curves up. Options, turn it round and beat the other side to even things up, or heat it up again and quench it.
Copper work hardens very quickly, it also age hardens just left alone.
Glad I dont do computers because I havent clue what your doing, sounds pretty serious stuff though.
Steve
|
panbiker
|
Posted - 03/08/2007 : 16:33
Thanks for that Steve, I'll give it a go on MkIII, off to the wedding now, more bashing about on Monday.
Ian |
Stanley
Local Historian & Old Fart
36804 Posts
|
|
Posted - 03/08/2007 : 16:56
I once had a Eutectic salesman come into the engine house to try to sell me some incredibly expensive flux for silver solder. He put two edges together with the flux on, warmed them up and then put a dab of silver solder on one end and it flashed through the joint by capillary attraction. I told him it was witchcraft.....
All the bearings numered and adjusted for width.
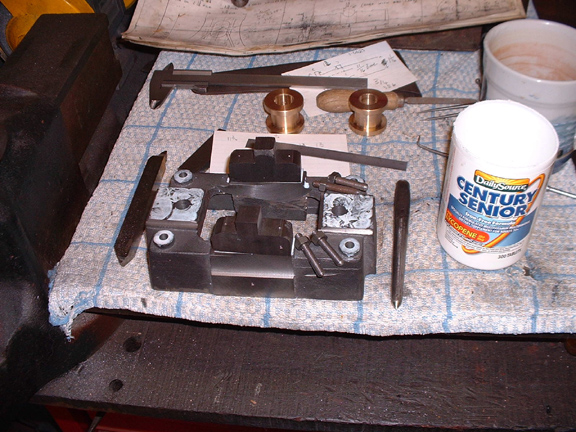
All the foundation plates have been on the miller and the pedestal beds milled inside and out to suit the bobbins. I'm going to do the beds one at a time so I can keep track of the match on the bearings and caps. Last job today was some marking out and making 16 0BA studs 1 1/2 " long with rounded ends..... I'm ready now for pedestal cap fitting..... I thought I had some small oil cups that would do nicely but when I went and looked in the old oak chest they are too big so I'll have to make some...... I shall think about that, not too sure whether they need them....... My mate Paul ran his boat without them, just had the oilcan handy and gave them a dose when he thought they needed it.
Stanley Challenger Graham
Barlick View
stanley at barnoldswick.freeserve.co.uk |
softsuvner
|
Posted - 04/08/2007 : 00:44
My first job (at a Government Research Lab) involved making thermocouples: different types of wires twisted together to measure heat through different electrical potential. Despite a dodgy thumb I can still make an even twist of locking wire with my fingers - just practise. Best part was silver soldering some wires to copper discs for surface temperature measurements. We used a torch with town gas and a small electrical blower. Always remember the name of the makers of the torch- Stone Chance, never heard of them for years. Something in my memory banks connected with soldering comes up with the term "killed" spirits" anyone know what that was?
Stanley - to me oil cups in those size are really only for appearance. Small bore oil cups can harbour muck and debris. Got a couple of films shot on steam fishing vessels in the 20's and 50's - fascinating to watch those engineer's technique for oiling cranks on the move and how their fluid movements of the can hit the right spot. If I was proposing to use a 5A for real hard work I might consider nipples and an oil gun like my little Myford.
Steve - I generally make up my own control cables and turn up my own cable nipples from brass stock with satisfactory results over the years.. Like many other things with old bikes, modern reproductions are rarely the right size. The proper old-time factory way however does use a small device to produce a sort of burr on the end of the cable, which the cable makers say takes the strain, the solder,they say, just fills the 'oles.
Day off today (Friday) - first decent weather on a Rest Day for weeks. Had a superb run out on the big Matchless, but the side roads seem to be getting rougher. Tail light was hanging off by the wires when I reached my favourite cafe on the Leicestershire Wolds. Float chamber came loose on the way home. Some fettlin' to do later, if there is enough meat on the float chamber nut I shall have to lock-wire it like a racer!
|
Steve48
New Member
19 Posts
|
|
Posted - 04/08/2007 : 07:18
Killed Spirits is Bakers Fluid, or the modern equivalent. It used to me made by disolving zinc in hydrochloric acid until no more would disolve, hence killed the acid, there was always a logic to names back in those days.
Oil caps are vital in my opinion, not as reservoirs, but to keep dust and muck out. I have to make a pair up for the headstock on my Lorch. But an oil cup shouldnt just be an open top funnel for rubbish to fill up, it should have a lid.
Softsuvner, do you have the same issues where you live - Down here the country roads are getting worse and worse, pot holes, the edges of the roads crumbling away or being grown over, yet the council consider it wise to spend countless thousands putting paviours round round abouts that lorries just chew up anyway. Then endless strips or raised tarmac in pretty colours that no one takes any notice of, but shake the teeth out of a cyclist. But, what really confuses me is how they can legally obstruct, fit chicanes and so called sleeping policemen into roads that "they" desingnated the speed limit on, but making those same roads dangerous to drive at that speed.
Steve
|
Stanley
Local Historian & Old Fart
36804 Posts
|
|
Posted - 04/08/2007 : 08:47
I'll worry about oiling later.... I've worked out how to drill the bores for the bobbins dead straight and level...... My brain was working on it while I was asleep. Wonderful how limited you are when you start to consider drills with Morse taper and a foot long........
Stanley Challenger Graham
Barlick View
stanley at barnoldswick.freeserve.co.uk |
Stanley
Local Historian & Old Fart
36804 Posts
|
|
Posted - 04/08/2007 : 10:36
I'm having a morning out of the shed.... articles to write, OG to catch up on and a bit of light cleaning to be done. Have you ever noticed how dirty vacuum cleaners get......?
Stanley Challenger Graham
Barlick View
stanley at barnoldswick.freeserve.co.uk |
softsuvner
|
Posted - 05/08/2007 : 01:09
Steve - thanks for that, "killed spirits" was such a strange term, must have read it in a pre-war manual.
Round here fancy "traffic calming" is confined to the estates where it belongs (sponsored by Quickfit I shouldn't wonder). What I have noticed, is that most of the country road works, be it Notts, Lincs or Leics, are concerned with small bridges and culverts. Lots of temporary road closures for this. I strongly suspect that this has nothing to do with drainage, but that "concrete cancer" is catching up with a lot of the shoddy work done in the 60' and 70s.
Stanley - My Dad has a huge collection of Morse-taper drills "liberated" during his working life. Some of them even date back to his wartime stint as a trainee-fitter at a certain maker of large wagons, based in my home town, and mentioned on another thread. I have pinched a few but, after all these years, I wonder how accurate they are. Could your next instalment involve a between-centres boring bar?
|
Stanley
Local Historian & Old Fart
36804 Posts
|
|
Posted - 05/08/2007 : 06:56
Boring on the lathe..... Easiest way of course is to grab whatever you want to bore in a chuck, centre it and use either a drill in the tailstock or a boring bar in the tool holder. However, you run into trouble when the workpiece is too big or awkward for the chuck. What you do then is convert the lathe into a horizontal boring machine, you reverse the process, instead of turning the workpiece on a stationary tool, you fix the workpiece to the bed and bore with a 'boring bar', the heaviest bar you can get in fitted with an adjustable cutting point. It can be fitted between centerers or used free-standing for blind bores. You mount the workpiece on the saddle after removing the tool holder and cross-slide. Many lathes have tee slots in the saddle especially for this purpose, the Myfords have them. Using this technique it's amazing what big jobs can be done on small lathes. This is exactly the process used by the old engineers to bore steam engine cylinders in situ. See Newton's tapes, 78/AG/8 and 9 in the LTP for Newton's explanation of boring, straight from the horse's mouth. They bored cylinders up to 6 feet diameter in situ. I favour quite acute angled cutting edges for boring. Newton always used cutters made of inch HSS bar with rounded edges, I still have some of them. They used very slow feed and heavy cuts, Newton would happily take a half inch cut on a big cylinder and the machine was geared low enough for him to go home and have a sleep while it was going! Over the years there has been a lot of discussion as to whether you get the most accurate bore by rotating the tool or the workpiece. I don't think it makes much difference, the accuracy depends on the rigidity of the set-up and I think the debate was influenced by the fact that if you're boring in situ, or with the workpiece stationary, it is more rigidly mounted. Notice when Newton was talking about boring he mentioned that the big problem with Uniflow engines was that they had to be bored barrel shaped to allow for the high working temperatures at each end of the bore, don't ask me how they did it!
Stanley Challenger Graham
Barlick View
stanley at barnoldswick.freeserve.co.uk |
Stanley
Local Historian & Old Fart
36804 Posts
|
|
Posted - 05/08/2007 : 07:00
Big Morse taper drills..... I used to have them up to 4" but when I got rid of my big lathe I gave the ones above 2" away. Drills do not make an accurate hole even if sharpened on a jig to perfect shape. However, they are the best thing out for muck-shifting before finishing by boring with a tool. A drill shifts more weight of metal per revolution than any other cutting edge. So, don't worry about accuracy, leave some in the hole to clean up with a boring tool.
Stanley Challenger Graham
Barlick View
stanley at barnoldswick.freeserve.co.uk |
|
|
|
|


