| Author |
 Topic Topic  |
|
Stanley
Local Historian & Old Fart


36804 Posts

|
|
 Posted -
25/11/2004
:
14:20 Posted -
25/11/2004
:
14:20
|
I've always been fascinated by the things people do in their spare time when they can do exactly what they want to do. Men and sheds are a particularly fertile field. Women tend to do their thing in the comfort of the house.
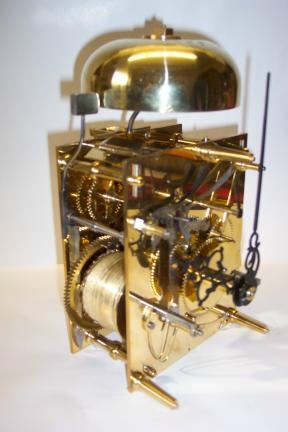
I was delighted to see Andy's picture of the clock movement he has made.
It struck me that we could perhaps start a new topic devoted to spare time skill. So Andy starts it off and my contribution is this:
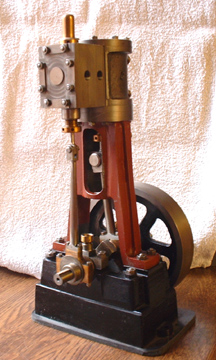
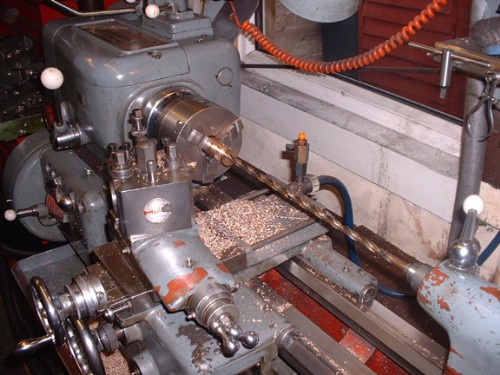
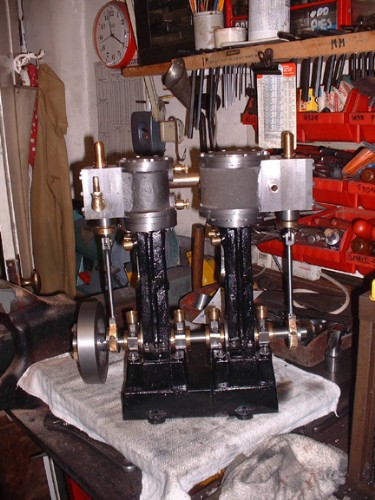
It's a small steam engine made from scratch and is based on the Stuart 5A but a longer stroke. One of these will drive a 14 foot boat with steam at 250psi. By the way, we don't like to call them models, it's exactly the same construction and materials as a full size engine, just smaller. So come on out there, let's hear about what you make in your spare time. I reckon we could be in for some surprises!
Stanley Challenger Graham

Barlick View
stanley at barnoldswick.freeserve.co.uk
|
|
| Replies |
| Author |
|
|
Stanley
Local Historian & Old Fart
36804 Posts
|
|
Posted - 24/12/2007 : 18:26
Susan picked her engine up today so that's one down and two to go. I ran it for her and Jess before they took it and sh's delighted with it. Just for a laugh I put the little compressor on the HP on the big engine and it nearly ran it even though it had all the friction load of the LP on it. It will run even on that tiny machine when the accumulator is fitted. So guess what I'll be doing tomorrow.......
Stanley Challenger Graham
Barlick View
stanley at barnoldswick.freeserve.co.uk  |
Ringo
Site Administrator

3793 Posts

|
|
Posted - 25/12/2007 : 09:36
Stanley looked busy in the shed as I passed this morning, I didnt want to disturb him as he looked like he was in his element enjoying Christmas Day in his own unique way
|
Stanley
Local Historian & Old Fart
36804 Posts
|
|
Posted - 25/12/2007 : 17:37
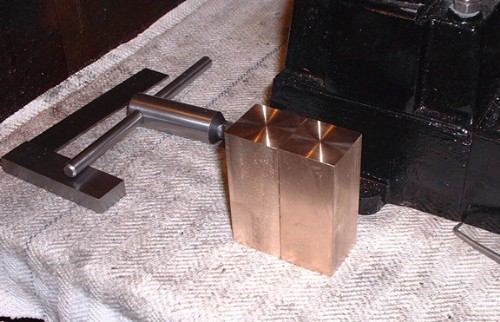
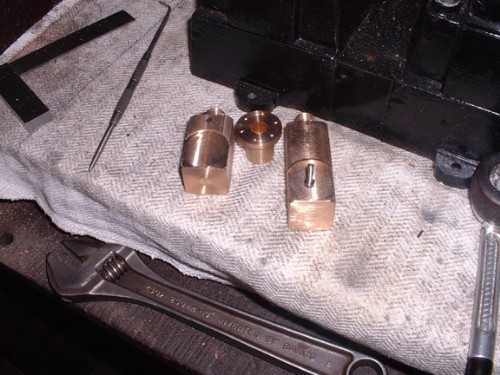
It took most of the morning to chop two blocks out square and to size.
Then a bit of precision turning, drill the passage out, turn to size and thread the end.
And then a moment of no thought and I wound the tool in and buggered over two hours work up. Ah well. Bit of primal scream therapy and take Jack out for an hour.
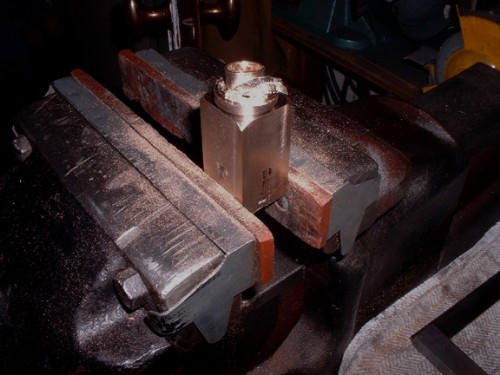
An hour later and the first manifold block is fitted on the LP and I went digging in the treasure chest for another lump of bronze. It was a good thing actually because if the first one had been a success I would have had to mount the block on the HP with a nipple to get the length. I decided that the new piece would be long enough to mount it direct so it matches the one on the LP.
Half past four and we have two manifolds mounted. The HP is over-length and will want cutting back to match the LP. The cylinders aren't quite square, it would have been a miracle if they had been. So tomorrow I'll do some careful measuring and marking to get the faces for the accumulator pipe parallel, then make a flanged pipe to fit between the two faces and fit a drain on the bottom. I shan't get that finished tomorrow, a lot of work in it but it'll look OK when it's done. So, an unusual Xmas Day I suppose but one I enjoyed......
Stanley Challenger Graham
Barlick View
stanley at barnoldswick.freeserve.co.uk |
Stanley
Local Historian & Old Fart
36804 Posts
|
|
Posted - 26/12/2007 : 07:01
One thing I forgot to mention was how much more free the compound is after the partial running on compressed air the day before yesterday. I'm convinced that the little compressor will run this engine, slow but it will run it. Can't wait to try...... I shall have to let Doc know and wait 'til he comes down thoughb or he'll never forgive me.
Stanley Challenger Graham
Barlick View
stanley at barnoldswick.freeserve.co.uk |
Stanley
Local Historian & Old Fart
36804 Posts
|
|
Posted - 26/12/2007 : 17:07
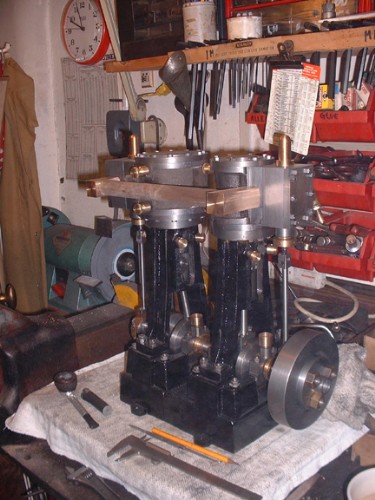
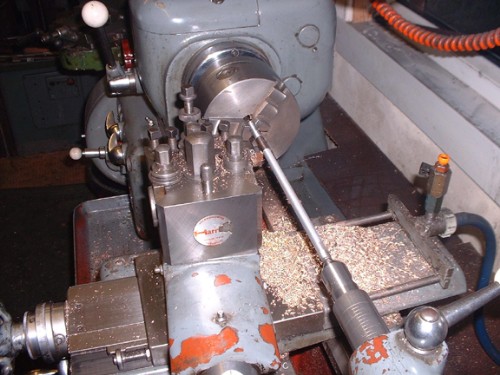
This was the first stage today; cut a piece of inch diameter broom handle and find a position where it looked all right. Problem is when you have to fit something straight between two non-oeiented positions you can measure centre lines etc and then fit it and it looks horrible because your eye is being deceived. This way, the position may not follow any rules but at least you know it's going to look right. Lots of careful measuring and marking and decisions and then whip the manifolds off and cut them to what you have decided. As it turned out, the one n the LP is square and the one on the HP will have to be adjusted to square with that one.
Cutting the manifolds to size threw up one little problem as I had already drilled out the steam passage yesterday and now I've cut into it. Classic LBSC solution, drill it out, tap it, fit a bronze plug and turn the face off. No problem.
Not a lot to show for a day's work you might think but I'm well satisfied. The two manifolds are faced and recessed slightly so that the flanges can be located accurately when marking out. The little item is the template for marking the 4BA stud holes in both the manifolds and the flanges on the accumulator pipe. Once these are done and the manifolds refitted I can measure for the length of the receiver pipe and make it out of solid bar. It will be 1 1/16" diameter and the flanges the same diameter. I'll turn it down to 9/16" at each end so I can get the flange bolts in and drill and tap it in the middle at the bottom for a drain valve matching the ones on the cylinders. I can adjust the length easily and accurately in the lathe and keep trying it 'til it's a perfect fit. Both ends are square so no problem there and theoretically it should slide nicely into place through a bed of jointing paste. That's the plan....... But all that is for tomorrow and perhaps even the next day. No rush. By the way, no cock-ups today.........
Stanley Challenger Graham
Barlick View
stanley at barnoldswick.freeserve.co.uk |
Stanley
Local Historian & Old Fart
36804 Posts
|
|
Posted - 27/12/2007 : 16:40
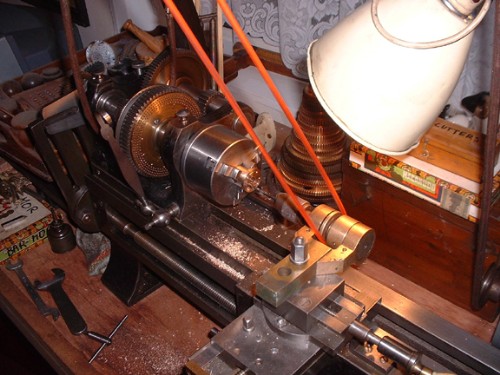
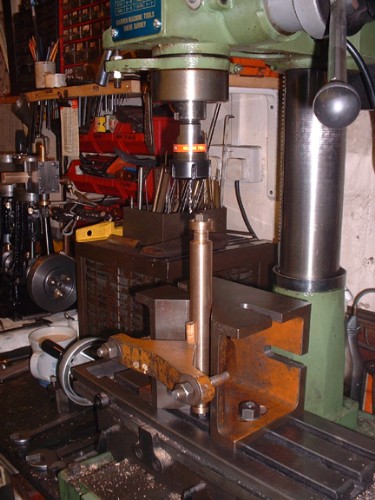
Johnny's 1927 lathe with the overhead is just the job for drilling flange holes on the same pitch circle so I used it to drill the bolt holes in the dummy flange. I used the outside face of the flange to mark the manifolds and drilled and tapped them 4BA. Then a dig in the treasure chest for one of Dick Bonser's risers that had the receiver buried inside it.
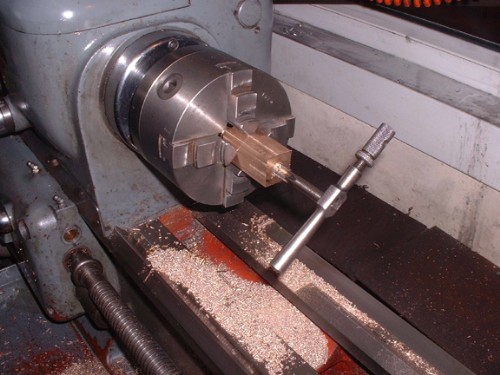
I found one that would just, and only just, give me the 1 1/16" bar I needed. It was a close run thing and as a matter of interest, as the outside of the casting was peeled off the bar bent slightly. I keep telling you, castings are funny little buggers! However, I decided it would do and cut the 10" I needed from the straightest end.
After some careful measuring and even more careful turning of the ends I think we have a fit. I did just right recessing each manifold. The bar is a push fit in the gap and is located by the recesses. It's perfectly firm and can be rotated easily by hand. In fact, if I just drilled it and then pushed it in with shaftlock on it it would be perfectly tight and never move again. The flanges and bolts will be just an add-on. That's just how it ought to be. Tomorrow I'll scribe the pitch circles on it, make the flanges at each end by cutting recesses in the bar, drill the bolt holes using the opposite face of the dummy flange and make and fit the drain valve. Last job will be to drill it 3/8. I'll bet when I do that it changes shape again but I'll worry about that when it happens.
Stanley Challenger Graham
Barlick View
stanley at barnoldswick.freeserve.co.uk |
Stanley
Local Historian & Old Fart
36804 Posts
|
|
Posted - 28/12/2007 : 08:45
I thought of a refinement last night just as I was dropping off to sleep. Nothing like a review of technique as you drift off to settle the mind. I need to make sure the dummy flange is accurately centered on the end of the pipe (and most important remember to use the opposite face to what was used to mark the manifols, it will not be dead accurate) I shall turn the existing stub off and make a 3/8" stub to insert so that it's sticking out on the side of the face I want to use. Only little problem I have now is how to hold the casting dead vertical while I drill it. It looks as though the big angle plate will have to have an outing.......
Stanley Challenger Graham
Barlick View
stanley at barnoldswick.freeserve.co.uk |
Stanley
Local Historian & Old Fart
36804 Posts
|
|
Posted - 29/12/2007 : 07:27
Nowt done yesterday, domestic matters like cleaning and cooking..... In there today watching the lousy weather.....
Stanley Challenger Graham
Barlick View
stanley at barnoldswick.freeserve.co.uk |
Stanley
Local Historian & Old Fart
36804 Posts
|
|
Posted - 29/12/2007 : 16:13
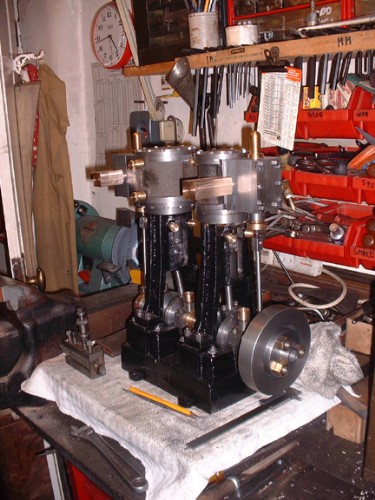
First job was to get the flanges cut and a recess so I could get the bolts in. The flange works out a bit thicker than I had planned but they will look OK.
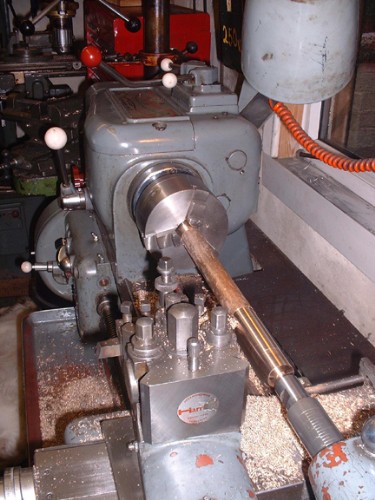
Of course we need a 3/8 hole through the receiver. I poked an ordinary 3/8 drill in for three inches at each end but of course this didn't cut it as the receiver is over 9 1/2" long. Normally this would mean finding a piece of silver steel and making a diamond point drill but it just so happened that in the drill drawer I had some long series drills I picked up somewhere along the line. It all goes to show, never walk past something thinking "I'll never use that". This drill has been sat there for about twenty years, just waiting......
By dinnertime we had the flanges made, the bore drilled and a flat cut on the bottom of the receiver to take the drain valve. I broke away from the receiver to make a drain valve ready to go on and tap the hole in the receiver.
Stanley Challenger Graham
Barlick View
stanley at barnoldswick.freeserve.co.uk |
Stanley
Local Historian & Old Fart
36804 Posts
|
|
Posted - 29/12/2007 : 16:20
Hit the wrong button there......
Next thing to adress was drilling the bolt holes in the flanges using the dummy flange for a template. I gave this s lot of thought last night and decided that there was a better way of clamping the flange to the end of the receiver for accurate drilling. My holding down kit is based on 3/8" draw bolts and one special I made for machining the standards was over 10" long. All it needed was skimming down so it would fit the bore.
Out came the big 'V' block and with a bit of wood for padding I soon had the receiver set up dead vertical and solid. Enough for today, it was almost 4pm and time for tea. I'll do the drilling tomorrow. We're getting near to running Doc.
Stanley Challenger Graham
Barlick View
stanley at barnoldswick.freeserve.co.uk |
Doc
Keeper of the Scrolls

2010 Posts
|
|
Posted - 29/12/2007 : 16:27
Just give me a shout and i'll bring the big compressor down
TTFN - Doc

Due to the current economic climate, the light at the end of the tunnel has now been switched off.
Click here to make a donation and help support this site and keep it advert free 
|
Stanley
Local Historian & Old Fart
36804 Posts
|
|
Posted - 30/12/2007 : 16:28
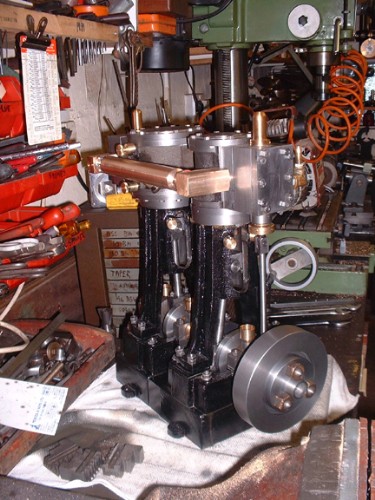
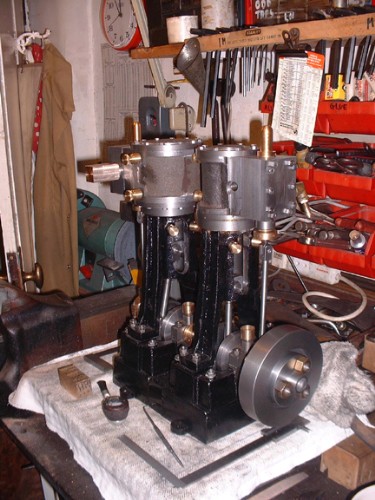
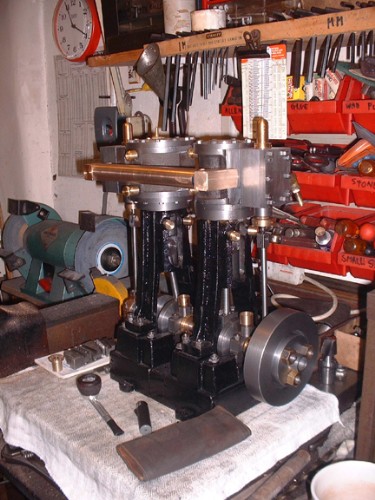
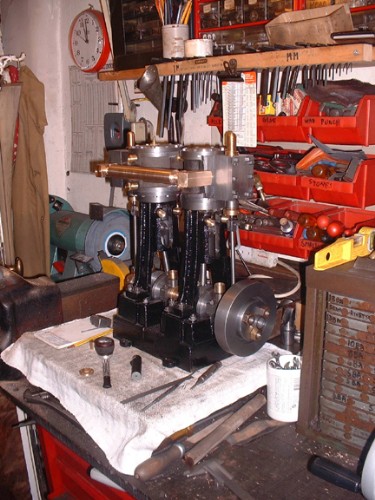
Well, I'm calling it finished. Lots more I could do to it but I had it running this afternoon on the little compressor which is a bit of a miracle. Doc is coming down tomorrow with the bigger compressor and we will be able to run it at some speed. It's not been the easiest day, I gave myself a fitter's nightmare with the 12 4BA setscrews in the flanges on the receiver. It all started very badly because I drilled the holes in the flanges and noticed that the centre dot I had put on to make sure I drilled everything template way (and which was correct on the manifolds) miraculously turned out to be 30 degrees out! Don't ask me how that happened. The only consequence was that the drain on the receiver isn't on the bottom but gaces in towards the centre of the engine, 30 degrees out of course. However, as it turned out, the drilling was accurate and after a lot of fiddling work I got the whole lot bolted in place by dinnertime. I've been running the engine since then on the little compressor with plenty of oil in the bores to free everything up and get a polish on the cylinder walls and the trunk slides. So that's it, I'm calling it finished. I started with some lumps of metal and made something that would drive a 20 foot hull. I'm not going to do any tittivating, Look forward to the next job. First thing after tomorrows running is to have a bloody good clean up!
Stanley Challenger Graham
Barlick View
stanley at barnoldswick.freeserve.co.uk |
softsuvner
|
Posted - 30/12/2007 : 21:32
Stanley
Well done, excellent looking machine. Not just "made from castings", but a genuine one-off, conceived, developed and made. Just for the benefit of anyone who hasn't been following this saga since the 7th of July last, roughly how many hours do you think you have enjoyed on this project, (hours "spent" doesn't do it justice!)?
malcolm
|
Stanley
Local Historian & Old Fart
36804 Posts
|
|
Posted - 31/12/2007 : 08:57
God knows..... 6 months at say an average of 6 hours a day...... about 1100 hours, half of them on this, 550 hours at £20 per hour....£11,000 plus £1000 for castings and materials...... I actually didn't spend a halfpenny, all out of the treasure chest. Not bad going actually, I surprised myself by keeping to my original estimate. 4 engines in six months....... Old Farts Rule! There will be a video.....
Stanley Challenger Graham
Barlick View
stanley at barnoldswick.freeserve.co.uk |
Stanley
Local Historian & Old Fart
36804 Posts
|
|
Posted - 31/12/2007 : 14:09
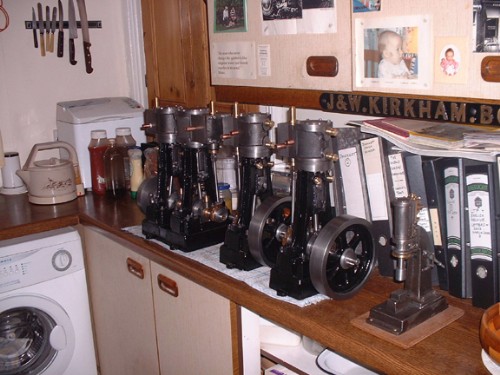
Here's the last engine pic. Doc came down this morning and we ran the compound on higher pressure. It was frightening enough at 80psi running light! There will be a video later of it running on about 50psi. Bit of a thump in the LP main bearing but I'm not taking it up. The engine is cleaned down and will sit here until I make a baseboard and shift it to the front room. So here we have the last eight onths work, four engines and a steam hammer, none of them perfect but all runners and tested on compressed air. Now then, what next...... Not a bad thing to have to think about on the last day of the Old Year. By the way Frank, the Balvenie bit the dust yesterday, we start 2008 on Lagavulin.
Stanley Challenger Graham
Barlick View
stanley at barnoldswick.freeserve.co.uk |


