| Author |
 Topic Topic  |
|
Stanley
Local Historian & Old Fart


36804 Posts

|
|
 Posted -
29/07/2011
:
06:27 Posted -
29/07/2011
:
06:27
|
New start as old topic was getting too big. Here's the LINK for the original topic.
Sheds are centres of honest endeavour and sanity, rare things these days. Please join in and tell us what you are doing in your shed. All are welcome!
[By the way, if I occasionally seem to be stating the bleeding obvious, it's because I'm aware of the fact that not everybody has the same experience so please forgive me.]
Stanley Challenger Graham

Barlick View
stanley at barnoldswick.freeserve.co.uk
|
|
| Replies |
| Author |
|
|
Stanley
Local Historian & Old Fart
36804 Posts
|
|
Posted - 05/08/2011 : 06:32
Arranging a new shed is always exciting! I do my welding in the yard on an iron bench. Spatter and lathe beds don't mix!
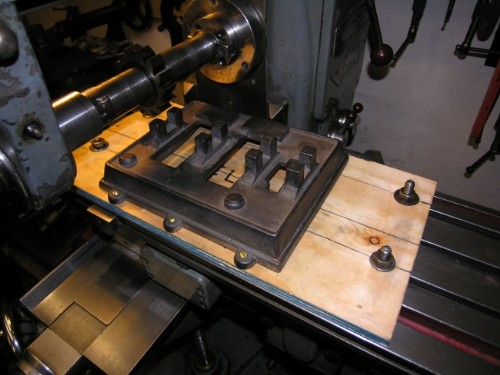
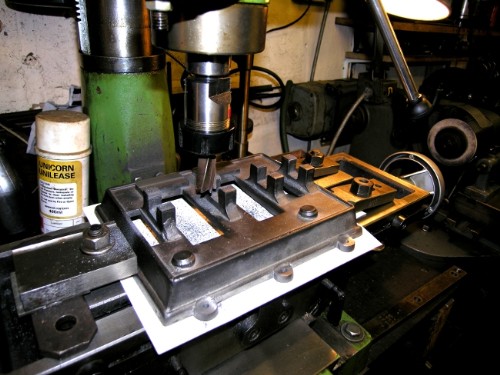
First job yesterday was to get set up for milling the bearing beds out. Holding down on small machines can be a bugger! The fixtures get in the way of the traverse because of lack of space. One way round is the above, bolt a piece of wood on the bed amd screw the bed down with its own feet.
Hard to see because the light only reflected off one bearing but by 4pm the beds were milled through and in line. Casting wasn't too bad for alignment but I was right to do this stage first because due to a misalignment of the casting there was only one setting that cleaned all the faces in one pass. No big problem, it's near enough on the CL. Had to stop at one point and resharpen the cutter. That's the nice thing about having a Clarkson tool and cutter grinder, cost me £600 I think but takes very little space and worth its weight in gold.
As old readers will know, I always admit to my mistakes. I had done about five passes through the beds and noticed a gap between the spacers on the sindle, I'd forgotten to tighten the nut on the end after sharpening the cutter! Luckily the cutter was a tight fit on the shaft and key and hadn't shifted. I tightened the nut and carried on but it was a slilly mistake and a lucky escapoe. We all have them, that's how we keep on learning.
Stanley Challenger Graham
Barlick View
stanley at barnoldswick.freeserve.co.uk  |
Stanley
Local Historian & Old Fart
36804 Posts
|
|
Posted - 05/08/2011 : 14:16
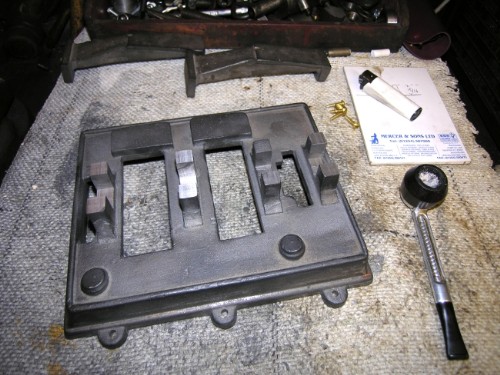
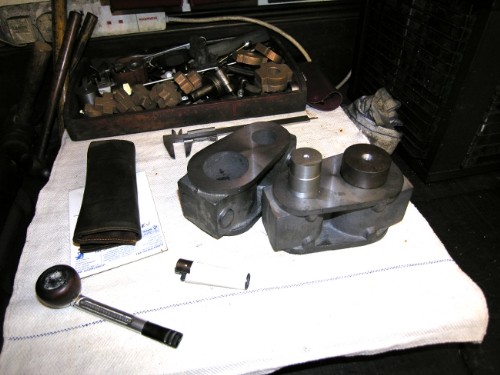
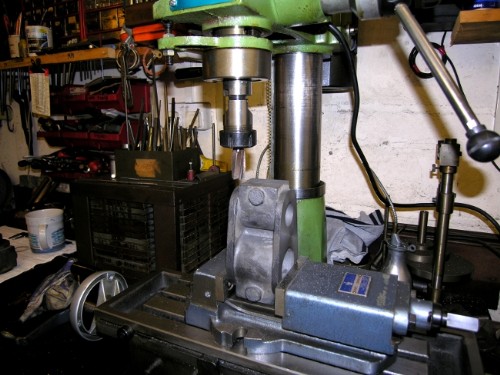
The centre of operations changed today to the vertical miller. Gang milling the bearings beds on the horizontal miller is fine but there are other areas that are much more easily accessed on the vertical miller. Notice that this is the bed that I milled yesterday. I levelled the pads for the standards, skimmed the heads of the pedestals so they were all the same height and then put the other bed on the mill without altering the setting and milled those pedestals to the same height. That's the beauty of doing two sets of castings at once.
Thats enough for today. Both beds finished except for the bearing beds on the left hand one. All the mounting feet milled so that there is room for the nuts. Idelly the faces of the pedestals should be milled but they are near enough and I can make the bearing shells to fit, they need to float a bit anyway.
Notice the four brass castings behind the beds. They are spare accentrics from the Stuart 5As I made a couple of years ago which were also 2" stroke so these will do for this engine. Nice day's work, the Old fart needs a rest now!
Stanley Challenger Graham
Barlick View
stanley at barnoldswick.freeserve.co.uk |
James Powell
New Member

22 Posts

|
|
Posted - 05/08/2011 : 17:28
Dad called up last night, he'd some contract work, and could I please figure out how long the sides were on the paralellagram that they had convenently failed to tell him about, please? So, it was out ruler, and calculator to figure out that it was a Rhombus, and that the flats they want on the corner are "nominal" 1mm long, but that they HAVE to be 12.2 and 14.1mm across them, as per the drawing...
It took me ~1.5 hours to figure out that it was a Rhombus, and how long the sides actually would be. (even though it was shown, the drawing was a bit vague in the important parts department!)
That`s today`s shop work for me!
James
|
Stanley
Local Historian & Old Fart
36804 Posts
|
|
Posted - 06/08/2011 : 06:37
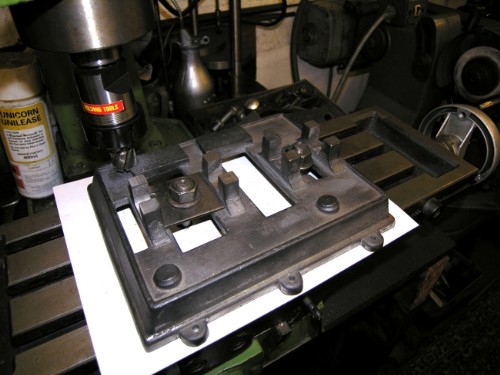
That would have lost me Jamie! By the way, in case anyone was wondering, the white card under the bed is a good thing for stability. Acts a bit like brake lining and helps the casting to grip the bed. Anything that helps stability under heavy cutting has got to be good!
I looked up a 3/4" cutter last night. I shall cut the remaing bearing beds on the VM. It runs quieter so I can listen to the wireless!
Stanley Challenger Graham
Barlick View
stanley at barnoldswick.freeserve.co.uk |
Stanley
Local Historian & Old Fart
36804 Posts
|
|
Posted - 06/08/2011 : 09:20
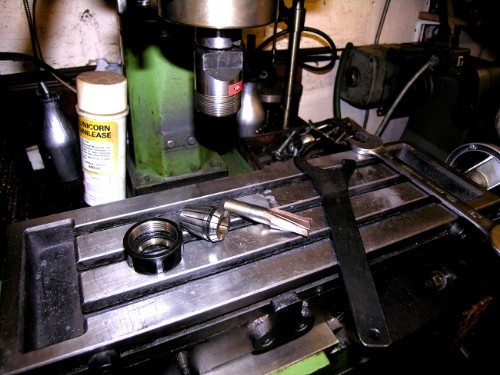
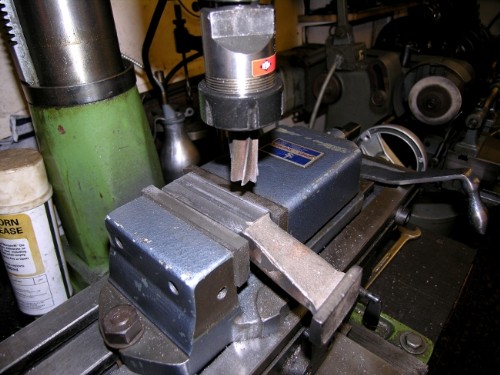
There are lots of ways you can do things on the cheap in a shed but tool holding in a vertical miller isn't one of them! I have a Clare's chuck and it's OK for most cutters with a tang on them (locks the cutter mechanically against turning in the chuck) but at a time when I happened to be able to afford it I found the ETM chuck system. (I think they are long gone now and could be ISCAR) Made in Israel I think and there was a stockist at Rawtenstall. I forget how much a set up to 25 32nds cost but it was considerable. I have never regretted buying them and use them for all my cutters, including Clare's. As long as the shak is in good nick and parallel the collets will grip them and I have never had one let go. So the message is, if you can afford it, go for the best!
Stanley Challenger Graham
Barlick View
stanley at barnoldswick.freeserve.co.uk |
Stanley
Local Historian & Old Fart
36804 Posts
|
|
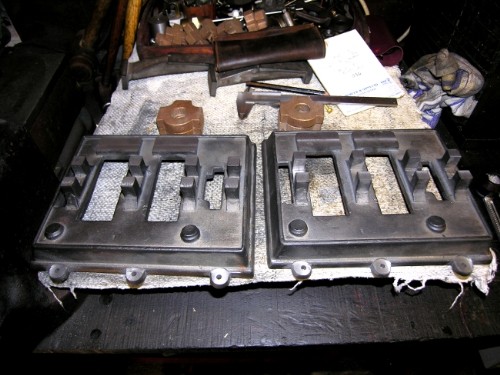
Posted - 06/08/2011 : 09:46
As I said I looked up a 3/4 cutter last night and set the bed up this morning for milling the pedestal beds out parallel. It was a breeze, less than 20 minutes and I put the other bed on and took the pedestal bases out clean to match this one. I have this silly affection for the Harrison H miller and yes it's very good for some things but in truth the VM is a much better tool. This one is one of the infamous Taiwan millers, much villified by the Shed Conservatives but very heavy, well made and functional. No finish but they do the job. I remember when I bought it Newton was very scathing but he went with me to pick it up in a tool shop at Todmorden and when he felt the weight as we lifted it into the pickup he started to change his mind. He ended up being quite a fan after using it but stuck to his old Senior after putting new bearings in it.
One of the nice things about doing stuff like this is the mental exercise of working out how to proceed. As I was quietly chobbling the bearing housings out my mind was roaming round getting the relationship between the bearing centres and the cylinder bores right, the drawings are no help of course because I'm using Johnny's castings and they will be slightly different from the official version. It struck me that I had better use the method I have used before, Make the bearings and install them, pop a piece of 1/2" ground silver steel stock through and get me con rod lengths from that datum. I've done it before and it works!
That got me to thinking about getting the cylinder centres right. Before I do anything about machining the faces on the standards I need to clean the cylinder casting up, get two faces 3" apart and bore them. Once I have the cylinder centres I can work out the faces for the steam chests and the overall lenth of the standards. The cylinder bottoms that carry the faces for mounting the assemble on the standards need to be machined as well.
So, next job is a change of scene. Put the big four jaw on the Harrison lathe (The most accurate chuck in your set, never forget that!) In Newton's words, grab the casting however you can, get a clean face on it, do some measuring and cut the opposite face and then start to think about centres before a bit of drilling and boring.
One thing that always strikes me when I start on a new casting is the number of holes I shall have to drill and tap eventually! No wonder making these bloody things takes so long! I must be mad......
Stanley Challenger Graham
Barlick View
stanley at barnoldswick.freeserve.co.uk |
The Artful Bodger
|
Posted - 06/08/2011 : 11:34
I spent my time in the shed today painting a board above the bench.
This is sheet of plywood that I attached over the drywall liner sheet so that I will have something I can screw tool racks etc to. I decided on a blue/gray colour and went down to the local hardware store, and, to cut a long story short I came back with a can of very nice navy blue! It does not look too bad either.
|
Stanley
Local Historian & Old Fart
36804 Posts
|
|
Posted - 06/08/2011 : 13:42
We all need somewhere to hang stuff! I wasn't thinking of coming back on today but during this mornings work a lightning bolt knocked the juice out so I thought I'd just reassure myself I stll had a working FMII!
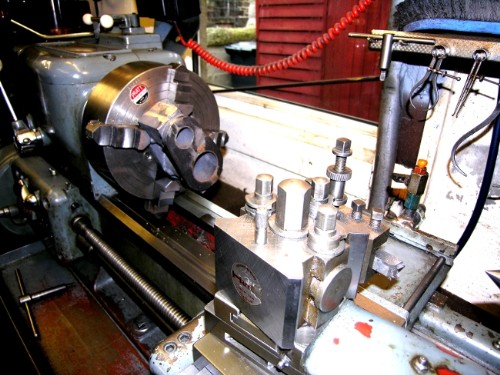
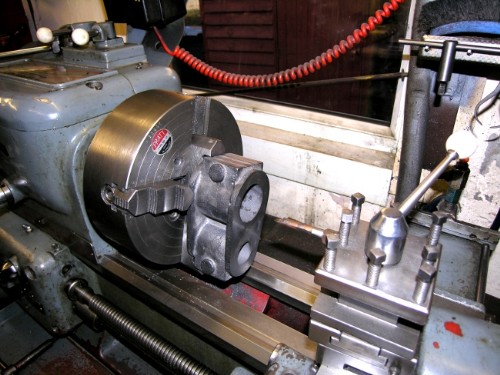
Cylinder in the four jaw, never mind a centre as long as it looks somewhere near. Notice the toolpost. I happened to see a set of toolholders and this post advertised for bugger all on the web so I bought them. Harrisons own quick-change toolpost made for this lathe. The toolhoders are adjustable so you can set them to centre and change toolss without having to do it again each time. However, this isn't what I want for this job.
What we want for this job is the biggest, most rigid carbide tipped tool in the box. Lock the saddle to the bed and start taking 25thou cuts off on auto-feed until you have a plane surface. No rush, it's an interrupted cut so we don't want any big shocks.
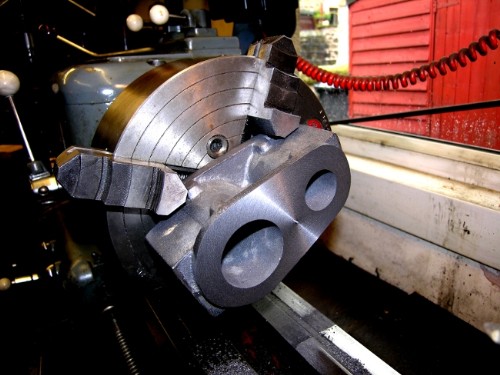
By half past twelve I had what I was looking for, a perfectly flat surface with a nice finish. It doesn't need anything else doing to it. The critics will notice the pip in the centre. You're right, the tool wants a shim under it but I'll do that tomorrow for the next cuts. This one will knock off, it's CI remember. That's enough for today, not bad, two beds finished and one flat face on the cylinder casting, only four to go!
By the way, standing at the bench for five hours is good for me but it doesn't make walking up to Letcliffe any easier! Just back from our walk. A couple of hour's sleep now I think, I've earned it!
Stanley Challenger Graham
Barlick View
stanley at barnoldswick.freeserve.co.uk |
Stanley
Local Historian & Old Fart
36804 Posts
|
|
Posted - 07/08/2011 : 05:17
It should have been three faces not four of course, that's todays target! One tip I should have mentioned. A big rubber hammer is your best friend round a lathe, good for a dead blow to seat the casting when it's been gripped lightly and also brilliant for removing chucks. Put the gearbox in lowest speed, put a bar through the jaws and hit it with a rubber hammer. Don't bend your chuck key like so many careless people do!
I shall touch the tool up on a green grit wheel and remember to pop a shim under it!
Stanley Challenger Graham
Barlick View
stanley at barnoldswick.freeserve.co.uk |
pluggy
|
Posted - 07/08/2011 : 12:59
My little home server didn't fare so well in the lightening induced blackout, its writing to disk a lot of the time, and a power failure tends to scribble rubbish on bits of the disk in the milliseconds of rabidly reducing voltage. If the scribbling corrupts something important, bad things tend to happen.........
Need computer work ?
"http://www.stsr.co.uk" 
Pluggy's Household Monitor |
Stanley
Local Historian & Old Fart
36804 Posts
|
|
Posted - 08/08/2011 : 06:06
Hard luck Plugs! I'm pulling the plug whan FMII is not in use during this weather. Lathe just kicked out and needed a restart. Would that computers were as robust as 2hp motors!
Stanley Challenger Graham
Barlick View
stanley at barnoldswick.freeserve.co.uk |
Stanley
Local Historian & Old Fart
36804 Posts
|
|
Posted - 08/08/2011 : 07:00
Good day yesterday!
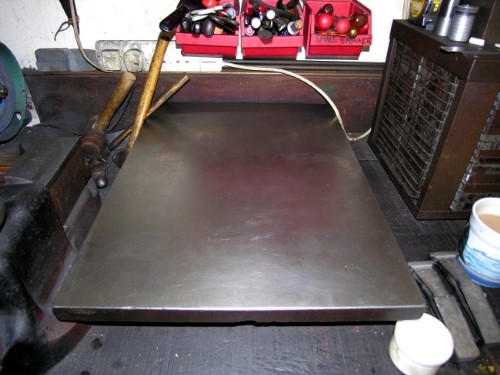
First task yesterday was a bit of housekeeping, I decided to put a clean tablecloth on the suface plate. I have a cloth on it to protect it from accidental dinges. While it was uncovered, a wipe-off and a coat of thin oil and I thought a pic of the plate would be a good thing. Not essential but we all need some sort of bench top to work on. A good CI surface plate is ideal but a new one is incredibly expensive. Keep your eyes and ears open and if you come across one snap it up, you'll never regret it. This one came out of Tommy Robinson's at Rochdale, makers of high class woodworking machinery, when they closed down in the 1980s. I got two and gave the smaller one to Newton, it came back to me with the 1926 Johnny Pickles' lathe so I have two again.
Being a greedy little bugger, while the Cylinder block was quietly facing away on auto feed I banged the standards in the VM and found a face on them. It will need cleaning up to a better finish but it's one job less.
By lunchtime I had the two blocks faced and had found two plugs near enough to the bores to face them on Johnny's big lathe (Nice to have two lathes running at once, Johnny Pickles once said that two lathes were essential, saved a lot of time being able to do an ancillary job without disturbing the main set up) Thes plugs will be used for setting the blocks up for boring.
Next job was to find a rough face on the steam chest surfaces. Not milled to exact dimensions, just faced parallel so that I can get a good grip on them in the four jaw chuck for boring. If the faces aren't flat tightening down on them throws the casting out of line and we want the bores parallel and in the same relationship to each other. This is a good example of the versatility of a good VM. Easy to open the throat out to get this height of cut. Only one thing, when you are working at this height light cuts are the order of the day. The cutter has enough leverage to dig in if you get greedy. Quietly does it!
Last job of the day, set the first bore up ready to start boring to finished size today. I checked the centres in relationship to each other and at two and three quarters of an inch they agree with the drawings so that's OK. Good castings as well, no blow holes and dimensions of the rough bores are very good. Johnny made a good job of the patterns and the founder made good castings. A productive day, looking forwards to boring today!
A day of worthy endeavour! Getting on well. I think I get faster as I get older, I suppose it's experience. Very comforting! I am serene and satisfied! (See Speaker's Corner'.....
Stanley Challenger Graham
Barlick View
stanley at barnoldswick.freeserve.co.uk |
James Powell
New Member
22 Posts
|
|
Posted - 08/08/2011 : 19:34
Stanley,
When I watch dad work, it's very smooth, not fast speed, but smooth. The key is as you say, to keep at it, and to be smooth at the whole lot. It's not taking 100 thou at a pass that matters, but having the machine(s) working away.
It is rather nice to manage 2 machines at once. I love having a shaper chunking away in the background while doing something else- that was my favorite trick, was to put something into the shaper and run that while I was working on the lathe. The shaper is so slow that if it overran, it was going to take into next week before it got anywhere harmful, so I found it very forgiving while doing something else. They teach us at work rather differently, that "you must have your eyes on the tool all the time" and I don't get it too much- if the lathe is running away in back gear at 30 RPM taking an interupted cut (like I guess you were), at 2 thou/rev, it is going to take...about 17 min to move an inch across the face. (used calcuator to figure that one out). On a 6" casting, that means you've got 45 minutes to work on something else each pass. And forget about stopping it if something goes wrong...if it goes wrong, and moves any decent amount, it will all be over but the crying, and that lathe isn't going to stop in the 2/3rds of a rev that it has on the go. I smashed a 1/4" toolbit once due to the crankshaft shifting in its jig. I saw it go, hit the off switch, and stepped smartly to the side for the crunch, as the crankshaft bent, and the toolbit broke. (Stuart #10 crank, so 3/4" throw, 3/8 offset).
Dad said that the design works for the widget that he had me doing math for- it's a jig used in robotic welding, to hold 2 body panels together, apparently, as the robots weld them. He's got an order for 6 of them, but I think there may be more than that required if he can make them. I'm guessing the rhombus has to do with the interference of the panels when they are pushed together, that they have to be as close as possible when they are pressed together, to the edges of the metal. The fun of working on something that you really don't quite know what it is for...
Your work looks lovely,
James
|
Stanley
Local Historian & Old Fart
36804 Posts
|
|
Posted - 09/08/2011 : 05:04
I'm greedy Jamie, I was running at 48rpm and 4 thou a rev. Once a cut is set up on ato feed I generally find something else to do. Last night after tea I went in the shed and bored an LP cylinder, 48rpm, 4thou a rev and 25 thou cut for the roughing cuts. Bit rough but shifts the muck! I decided to sharpen a milling cutter while this was going on but it bit me in the arse. Didn't give it enough thought and buggered a good cutter. I shall have to grind it flat and start all over again. More haste, less speed. Ah well, I have lots of cutters! Finished the first LP bore but had another small item to deal with. I've always fancied an Adept Shaper, Johnny swore by them. Is it too late to ditch the HM and replace with a shaper?
Stanley Challenger Graham
Barlick View
stanley at barnoldswick.freeserve.co.uk |
Stanley
Local Historian & Old Fart
36804 Posts
|
|
Posted - 09/08/2011 : 05:29
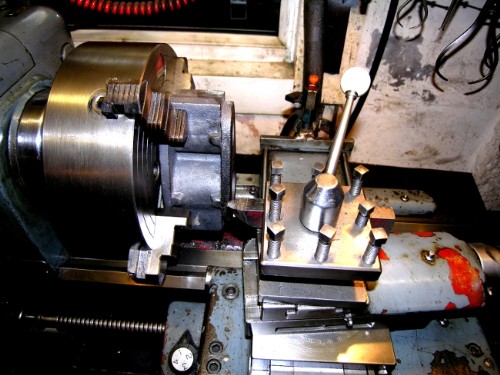
I went in the shed yesterday to spend a day boring cylinders but decided that the first thing to do was to make two plug gauges to the right size for measuring the bores so I went to Johnny's big lathe. Its got a Taylor chuck in, probably the best SC chuck ever made, Johnny bought good chucks! Skimming the HP plug was dead easy. Popped the bit of scrap in for the LP plug and pressed the green button on the starter. The lathe didn't start and the green button popped out like Zebeddee on its spring!
So I had to put me electrical engineer hat on and address the problem. Unplugged the controller and stripped it and the tiny plastic head on the other end of the button had broken off. Rang the distributor to see whether a replacement was readily available and he told me that Crompton Controls had 'discontinued' the 2000 series controllers and produced an entirely new one with no interchangeable parts so I was on my own!
Some 4BA brass rod, a nut and a few attemts to get the stroke right got me out of that one but in the process I found that the other part of the problem was that the terminal block was moving. I had to strip it out to get some folded card under it to firm it up. Consequence was that I spent all morning getting it working again but it's OK now. Turned the LP plug and than it was time for a walk, lunch and a two hour sleep! I went back in after tea and did the first LP bore.
One thing that strikes me every time I use the big OT lathe is how smooth the cut is on a belt driven lathe. The gearbox on the Harrison is good but nowhere near as smooth as the belt drive. Johnny not only made a big useful OT lathe but it's a turner's lathe as well. Big clear dials, everything falls to hand and a joy to use. Big heavy saddle and cross slide on a heavy bed means everything is firm and on top of the job.
Today is boring day.......
Stanley Challenger Graham
Barlick View
stanley at barnoldswick.freeserve.co.uk |
|
|
|
|