| Author |
 Topic Topic  |
|
Stanley
Local Historian & Old Fart


36804 Posts

|
|
 Posted -
29/07/2011
:
06:27 Posted -
29/07/2011
:
06:27
|
New start as old topic was getting too big. Here's the LINK for the original topic.
Sheds are centres of honest endeavour and sanity, rare things these days. Please join in and tell us what you are doing in your shed. All are welcome!
[By the way, if I occasionally seem to be stating the bleeding obvious, it's because I'm aware of the fact that not everybody has the same experience so please forgive me.]
Stanley Challenger Graham

Barlick View
stanley at barnoldswick.freeserve.co.uk
|
|
| Replies |
| Author |
|
|
Invernahaille
|
Posted - 14/09/2011 : 02:43
Are you going to use any copper and brass in your construction Stanley? When I was at sea I always thought the engines looked a little more cared for with a little polished brass and copper. I bet the poor beggars that cleaned it didnt think so. LOL.
 |
Stanley
Local Historian & Old Fart
36804 Posts
|
|
Posted - 14/09/2011 : 05:45
All the steam pipes will be copper Robert. I have lots of heavy walled copper pipe!
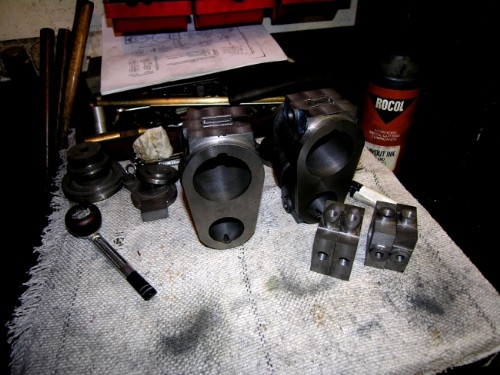
Close of play yesterday. All steam chests drilled and tapped for blind guides and gland nuts. I shall find some CI for the lids today and perhaps make some nice brass guides and gland nuts to keep Robert happy! Then sudding for lids etc. I never look forward to this bit. Must decide on number and position of studs. One point to note when that happens is that the basic error is positioning stud holes where they will break into steam passages! . Just as well to give it some thought because by now the castings are riddled with holes.
Stanley Challenger Graham
Barlick View
stanley at barnoldswick.freeserve.co.uk |
Stanley
Local Historian & Old Fart
36804 Posts
|
|
Posted - 15/09/2011 : 07:14
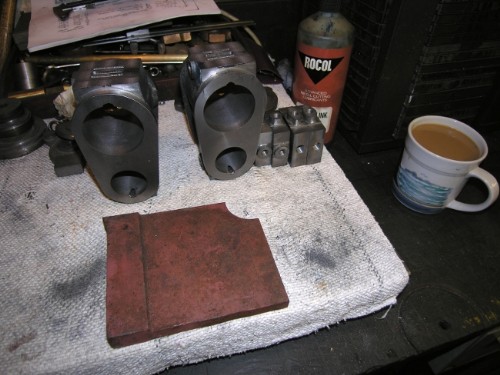
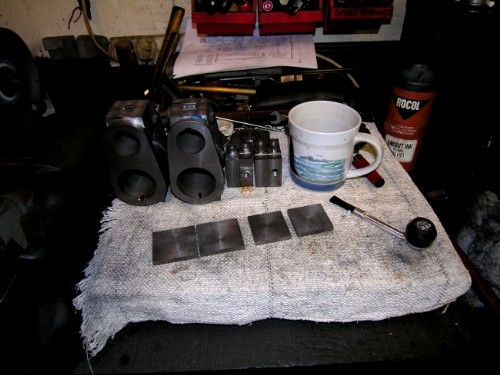
Not the best start to the day, this is a piece of scrap cast iron I picked up one day from an pld cistern that was being broken up in a scrap yard. Always keep your eyes open! It's very old and lovely iron, it had to be to cast a thin walled vessel like this.
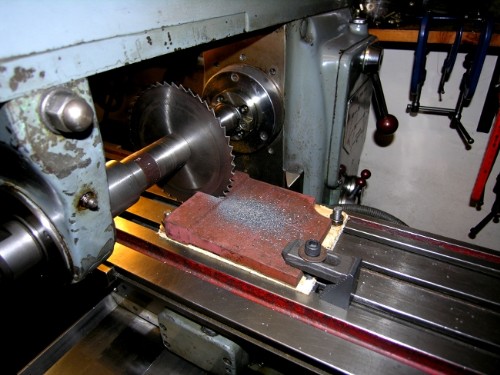
The HM with the saw blade in can't be beaten for this job, slice the CI up into approximately the right size.

Four rough blanks.
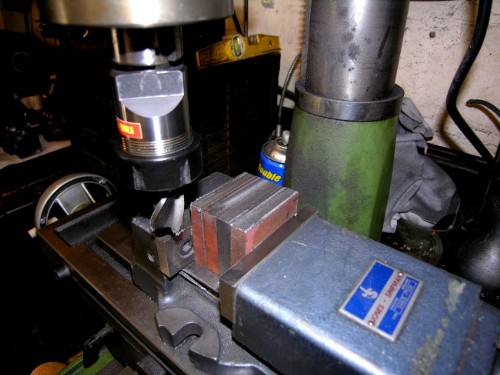
First job was to get them all square and the same size. The nachine vise has square jaws and base and so this was easy.
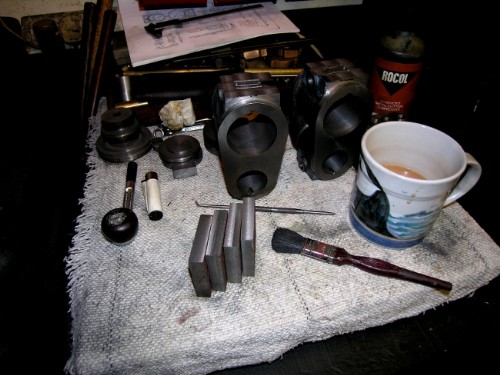
Close of play, four square blanks of good CI ready for facing and fitting to the individual steam chests. 1/4" scales up to 3" thick which is about right for this engine. I had a look at the cylinder lid studs while I was on this tack. An engine with an 18" HP and 27" LP on 150psi is about 600hp and so very close to Bancroft which I used to run. Bancroft had 16 studs in the HP and 24 in the LP so that's what I shall do for this engine. By the way, I shall put jacking screw holes in the top lids, a little item that is often missed out. First time I have done it actually but it was looking at Bancroft engine that reminded me of them. I'm thinking of making a horizontal donkey engine after these and so I shall have to remember the hole in the top edge of the lid for the ring bolt used to support the lid whan removing for maintenance!
Facing lids and sizing them for matching steam chests today. Then I need to write some articles for the BET! No rest for the wicked.
Stanley Challenger Graham
Barlick View
stanley at barnoldswick.freeserve.co.uk |
Stanley
Local Historian & Old Fart
36804 Posts
|
|
Posted - 16/09/2011 : 08:03
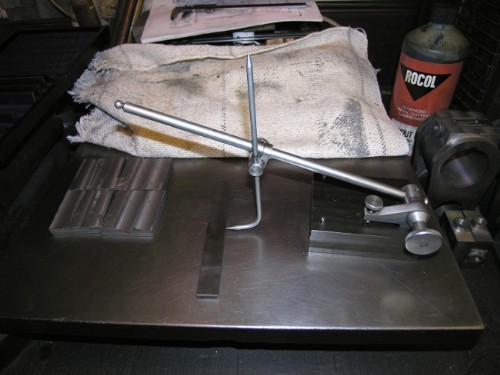
I've popped this pic in to show how useful a surface plate can be. The scriber is set to 1/4" against a standard parallel and then it's dead easy to scribe the lids to the correct thickness.
I then discarded the marks! The reason is that the obvious chuck for facing the lids to thickness was the scroll chuck on Johnny's big lathe and it just so happens that the depth of the inside jaw is 1/4" so I faced one side, reversed the lid and turned it down until I was just skimming the jaws. A touch over 1/4" but who cares! The lathe gave the best finish, the quickest stock removal and of course I love using Johhny's lathe and getting back an advantage from the work I put into resurrecting it. The belt drive gives a very good finish particularly when facing CI.
Close of play. Four steam chest lids faced and ready for finishing to the exact size to fit the chests. Two days work for four simple lids but I don't mind that, they are pure recycling, made out of scrap. Lovely!
Stanley Challenger Graham
Barlick View
stanley at barnoldswick.freeserve.co.uk |
Invernahaille
|
Posted - 16/09/2011 : 13:14
One mans waste is another mans treasure. Stanley.
|
Stanley
Local Historian & Old Fart
36804 Posts
|
|
Posted - 16/09/2011 : 15:44
Too right Robert. People laugh when they see my treasure chest! But a trip upstairs usually turns up what I need. One small point about the bits of the old cistern. It was 'as cast' and so still had the skin on, unlike modern castings it was very soft and clean. As you know well, some modern castings have a hide on them like a buffalo and it needs a heavy first cut to get under the skin. They had good iron in those days!
Nothing done in the shed today, I have been playing with my new camera.
Stanley Challenger Graham
Barlick View
stanley at barnoldswick.freeserve.co.uk |
Stanley
Local Historian & Old Fart
36804 Posts
|
|
Posted - 19/09/2011 : 06:31
I'm happy to report that by yesterday Nikon fever had sunsided and two articles had been written for the BET so back in the shed!
At close of play I had four steam chest lids sized to match the valve face, all numbered and ready for studding. Flat file finish, I'll give them a bit of extra polish on final assembly. I think I might make some shiny bits for Robert next......
Stanley Challenger Graham
Barlick View
stanley at barnoldswick.freeserve.co.uk |
Stanley
Local Historian & Old Fart
36804 Posts
|
|
Posted - 20/09/2011 : 05:49
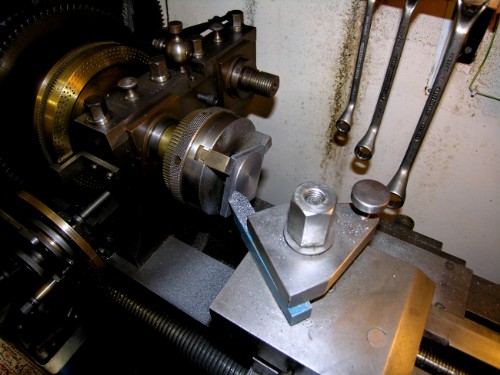
Sorry Robert, when I looked at the rabbit yesterday I realised that I had some cleaning up to do on the steam chests.
The best tool for tidying the chests up was Johnny's big OT lathe. The four jaw independent is an old Pratt 6", lovely tight jaws, absolutely no play whatsoever in them. I know I bore you but always remember that a properly set 4 jaw is the most accurate chuck you have. I resharpened the carbide tipped tools and gave it a slight radius on the point. Johnny had a habit of breaking the edges of his bosses with a small concave cut and I follow him. I don't know why but is always looks better than a plain champher. A few hours careful measuring and matching and ver careful cuts, we don't want any mistakes at this stage!
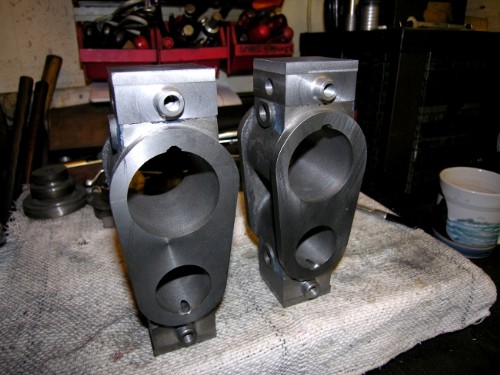
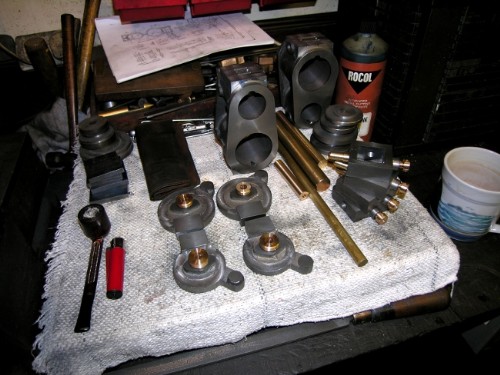
Close of play. All the chests and bosses tidied up. I think you can see the improvement. Now I can make some shiny bits! It will be a nice change from CI. Lovely material but mucky to work. Must have a root in the brass box for some 1/2" bar......
Stanley Challenger Graham
Barlick View
stanley at barnoldswick.freeserve.co.uk |
Stanley
Local Historian & Old Fart
36804 Posts
|
|
Posted - 21/09/2011 : 07:39
Bit of a change! Clean the lathe up so that the brass swarf can go straight into the clean brass scrap bin (shortly to be emptied so that I have somewhere to put the cranshaft swarf!). Some very old 1/2" brass rod that I got out of a bucket full of water in a garden when I bought a lathe in Gargrave and set two cutters up in the Harrison toolholder, one for the diameters and a form tool for the rounded end.
If you can afford it, get a tail stock die holder for threading. This way you know the thread is concentric, so easy for it to wander when cutting freehand with an ordinary die stock in the vice. They don't cost much and make the job easy and fast.

Close of play. Four blanks made, one drilled 3/16" for the valve rod and threaded, three still to do. The final job is to put four 1/8" tommy bar holes in the greatest diameter. Johnny liked tommy bar holes and they look very tidy. During the course of checking my measurements I noted that Bahrett used an incredibly old-fashioned method of attaching the valve driver to the valve rod using two set screws in the steam chest. This means that any adjustment can only be done by taking the lid off. Johnny had a far better way, the valve rod is threaded 26tpi through the driver, needs no locking nut and the valve can be djusted by simply taking the pin out of the eccentric rod/valve rod and turning the valve rod 1/2 a turn. This is of course a 1/52" alteration in the position of the valve, a fine enough adustment for anyone. Youll see it in action when I make the valves.
Stanley Challenger Graham
Barlick View
stanley at barnoldswick.freeserve.co.uk |
Stanley
Local Historian & Old Fart
36804 Posts
|
|
Posted - 22/09/2011 : 06:15
Only 2 hours in the shed yesterday, real life got in the way!
I wanted a tiddly little undercut between the thread and the flange and Johnny's 1927 lathe in the front room was just the ticket. Johnny wanted a Birch OT lathe just after he got married but couldn't afford one so he made his own! Can you wonder why I want to be his shadow when I grow up? For years this lathe was Newton's small lathe used in conjunction with the Lttle John he bought for the heavier stuff whan he moved into the small shed at Damside. Thanks to the generosity of a local family who knew how important it was I got it for a ridiculously low price because they wanted it to be refurbished, used and stay in the town. Youll see more of this lathe when we get to dividing for drilling holes.....
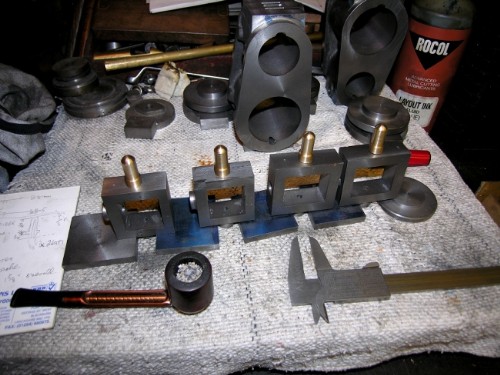
Almost close of play after a couple of hours. All four gides finished apart from the tommy bar holes. I got some more water-damaged brass bar out of the treasure chest and cleaned it up ready for the glands. I apologise for the lack of performance by the staff. The floggings will continue until morale improves!
Stanley Challenger Graham
Barlick View
stanley at barnoldswick.freeserve.co.uk |
Invernahaille
|
Posted - 22/09/2011 : 22:25
Wouldnt have happened in my day Stanley. LOL.
|
Stanley
Local Historian & Old Fart
36804 Posts
|
|
Posted - 23/09/2011 : 06:23
I think we were raised in the same school Robert. Funny how things come into your mind, I was milling the other day and wanted a very fine finishing cut. My VM is good but if it has a fault it's a very imprecise height adjustment, too much backlash in it. I remembered Arthur Entwistle once telling me that when he was toolroom grinding, if he needed a similar cut he clouted the bed of the grinder in one particular place. I tried it with the rubber hammer on the VM and it worked!
Another thing that occurred to me was that one of the things I admire most about Johnny's work is that his machine finish was so perfect it usually needed no finishing. One of the tricks he used was to touch the tip of the tool up in the lathe with a fine stone. It works and I do it whenever I remember.
By lunchtime I had a set of gland nuts for bothe the valve and piston rods ready for fitting, all they needed was the tommy bar holes in the periphery. At this point I had a rush of blood to the head.....
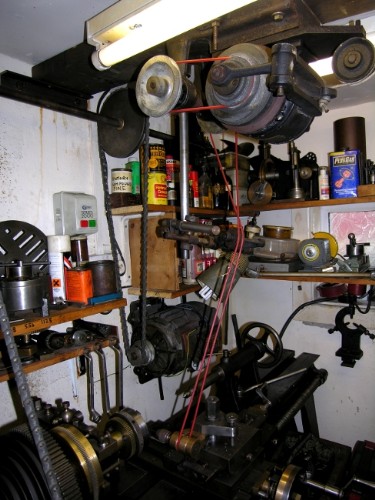
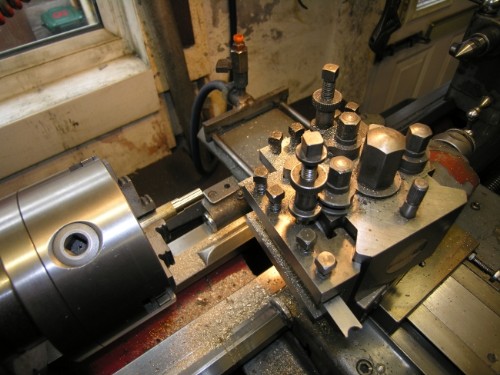
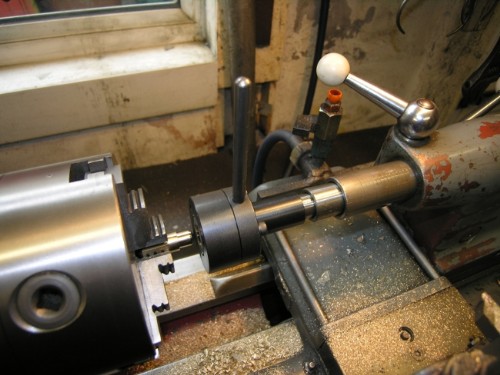
Many years ago I was offered a strange contraption with a built-in electric motor amd clutch. At the time I hadn't the faintest idea what it was but it was obviously a 'thing of purpose' and a fiver changed hands. Much later I realised that it was a self-contained overhead drive for an OT lathe. The drive is usually taken off the layshaft as on the 1927 lathe but this was independent. It's a 'Mardrive' made by the Marine Engineering Co of Stockport and when switched on the motir runs and there is a built-in clutch that you can operate by pulling down on a cord, as soon as you let go the drive stops and a brake is applied, a cunning little bit of kit. When I got Johnny's big lathe together I decided to use it instead of the layshaft drive but have never had it running. As I said, a rush of blood hit me and I think you can see the idea from the pic. There is a pulley driven chuck in the toolholder on the lathe and the idea is to use the built-in dividing gear in the headstock to drill four holes equidistant round the perphery of the gland nut. My task was to get the drive from the overhead gear to the chuck via a special plastic driving rope, in the old days they would have used thick string or thin leather round belt. Dead simple, accurate and a nice example of how the OT lathe has features that can be very useful for complicated tasks. Only one problem! I couldn't get the drive right and spent a frustrating two hours without getting anywhere!
Am I downhearted? Yes! But i'll be buggered if I'll let it beat me! One way or another this is going to work. The problem isn't with the tackle, it's with me, I haven't quite cracked the technology. So, after I've been to the butchers I'll attack it again. By hook or by crook I will teach myself and make it work! See you later......
Stanley Challenger Graham
Barlick View
stanley at barnoldswick.freeserve.co.uk |
Stanley
Local Historian & Old Fart
36804 Posts
|
|
Posted - 24/09/2011 : 07:44
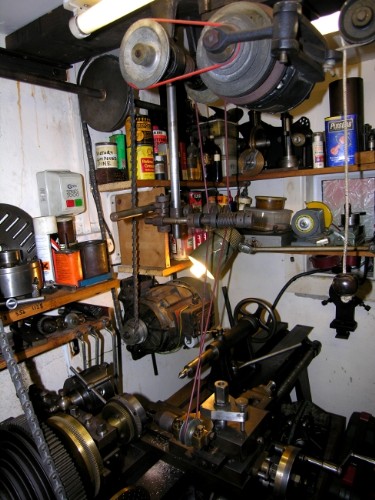
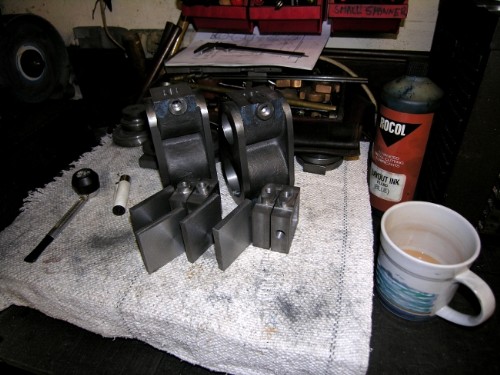
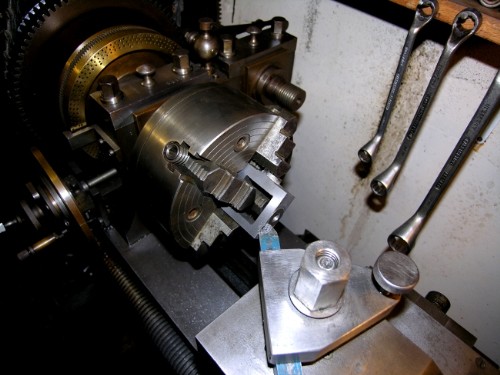
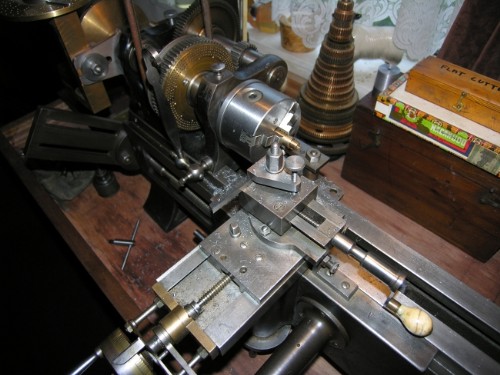
A new day, a rethink and a new setup of the drive to the drill spindle. I used another spindle with a wider pulley froove which guided the driving cord better. It worked.
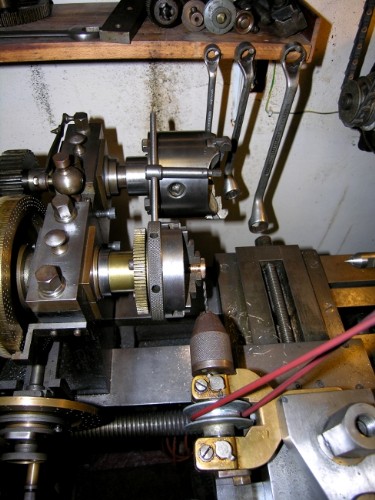
As you might expect, I cheated! All the gland nuts are easily accessible on this design so only three tommy bar holes were needed. The scroll chuck has six holes in the tightening ring so I popped a chuck on the back spindle and used the chuck key for a register. Worked perfectly. The overhead drive performed well, first time it has done any serious work. The motor ran cool and the clutch and brake performed perfectly. In case you're wondering, the ball on the end of the cord is an old lignum vitae carpet bowl, it was damaged and perfect for the job so no qualms about drilling a hole through it.
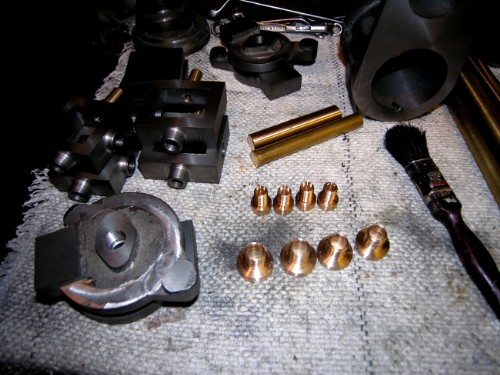
Close of play. Eight gland nuts finished and ready for erection. It's F1 practice at 2pm so I think a quiet morning making 4 tiddly little lubricators for the top cobers of the cylinders. These wouldn't be fitted in full size practice but will be handy for making sure that the cylinders are properly lubricated when running on compressed air. If anyone wants to convert to steam the holes will be easily plugged.
Stanley Challenger Graham
Barlick View
stanley at barnoldswick.freeserve.co.uk |
Invernahaille
|
Posted - 24/09/2011 : 20:10
Stanley,
On picture 1 in your lasr posting what is the motor set up in the upper background? It looks like a belt driven pulley for something, and I see another motot to its right. Hope I am not being nosey.
Edited by - Invernahaille on 24/09/2011 8:11:34 PM
|
Stanley
Local Historian & Old Fart
36804 Posts
|
|
Posted - 25/09/2011 : 06:53
Robert, not nosey at all. If you mean the new setup and rethink pic: The large motor on the wall in the background is Johnny's original 1hp single phase Horace Green motor that was rewound free for me by the firm in Nelson because they liked it so much. A Modern motor of that weight would be over 5hp. It's driving the layshaft that in turn carries the matching stepped pulley for the lathe headstock. Including using back gearing I can run at 16rpm to 1128rpm. The motor on the ceiling is the Mardrive independent overhead drive unit. Unlike the normal setup for overhead drives this means you can drive both the lathe and any accessory in the toolpost independently. Say for milling a spiral grove in a workpiece. It makes the lathe far more flxible than a standard CG lathe. Only useful for light work like the medallion machine but still a handy tool whenever you need the headstock to revolve and control another operation at the same time.
Stanley Challenger Graham
Barlick View
stanley at barnoldswick.freeserve.co.uk |