| Author |
 Topic Topic  |
|
Stanley
Local Historian & Old Fart


36804 Posts

|
|
 Posted -
25/11/2004
:
14:20 Posted -
25/11/2004
:
14:20
|
I've always been fascinated by the things people do in their spare time when they can do exactly what they want to do. Men and sheds are a particularly fertile field. Women tend to do their thing in the comfort of the house.
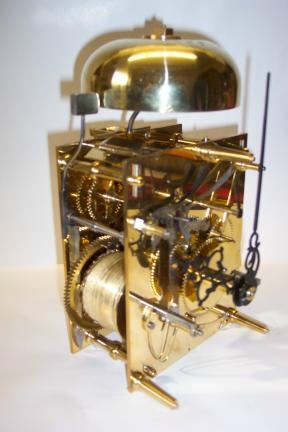
I was delighted to see Andy's picture of the clock movement he has made.
It struck me that we could perhaps start a new topic devoted to spare time skill. So Andy starts it off and my contribution is this:
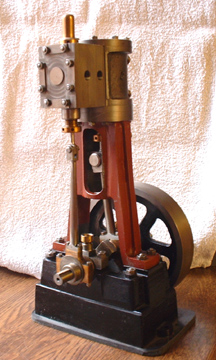
It's a small steam engine made from scratch and is based on the Stuart 5A but a longer stroke. One of these will drive a 14 foot boat with steam at 250psi. By the way, we don't like to call them models, it's exactly the same construction and materials as a full size engine, just smaller. So come on out there, let's hear about what you make in your spare time. I reckon we could be in for some surprises!
Stanley Challenger Graham

Barlick View
stanley at barnoldswick.freeserve.co.uk
|
|
| Replies |
| Author |
|
|
softsuvner
|
Posted - 30/06/2007 : 06:10
Ian
I know what you mean about heavyweights, I used to own a BM K100 and then an R100RS, big'uns both. Nowadays I have a restricted access at the side of the house, so I appreciate the Brits. Even my pre-war 1000cc V twin is no higher or wider than a modern 250, (length is another story!).
I've always remembered something I read about Japanese bike tests in the 1960's. The capacity limit for a "big bike" licence was something odd like 410cc. To get a big bike pass, at the end of the practical, the Tester produced an ex army full-dress wartime Harley, kept especially for the job, and threw the thing on its side. If you couldn't pick the Harley up on your own, you didn't get your big bike licence! Good Luck with the grub screw!
Malcolm
 |
softsuvner
|
Posted - 30/06/2007 : 06:21
Stanley
I 've seen a Stuart kit, in fact, if I moved some of the junk in my workshop I could see it again. This is one of the reasons why I have followed your steam 'ammer saga with fascination mixed with a tinge of guilt for the unsullied castings under the bench. As Dad used to say: "another job for my retirement".
Modern nitrile seals and O rings can be very useful things in the right place. Used a lot with old bikes for keeping oil off clutches etc. Early 2 strokes sometimes used composite compression-seals made up of bronze bushes capped with rings of leather. I once borrowed a little 1914 "Baby" Triumph for big road event. She had had the leather sealing rings replaced by nitrile ones. She went a lot faster than something so small and old had any right to - surprised a few people including the rider!
Malcolm
|
Stanley
Local Historian & Old Fart
36804 Posts
|
|
Posted - 30/06/2007 : 17:59
I've no objection to modern materials but I have a good stack of old-fashioned stuff and so it's cheaper to stick to that. I've been on with the valve today, I'll post the pics first thing tomorrow. What model is the Stuart Kit? Dig it out and let us know.....
Stanley Challenger Graham
Barlick View
stanley at barnoldswick.freeserve.co.uk |
Stanley
Local Historian & Old Fart
36804 Posts
|
|
Posted - 01/07/2007 : 06:27
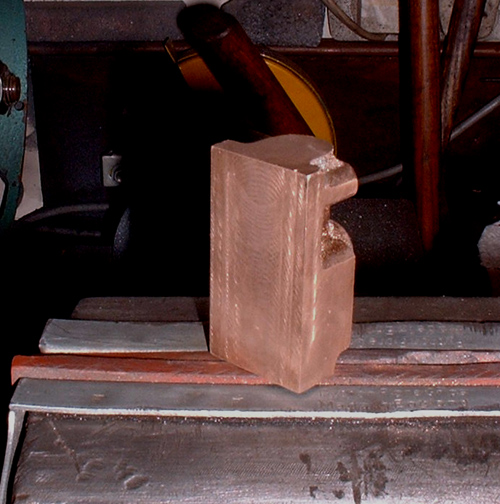
Valve matters.... First thing was to face all the surfaces on the valve block up on the vertical miller.

I temporarily fixed the cylinder to the standard to make sure I had the valve block the right size. Here it is whitened up for marking.
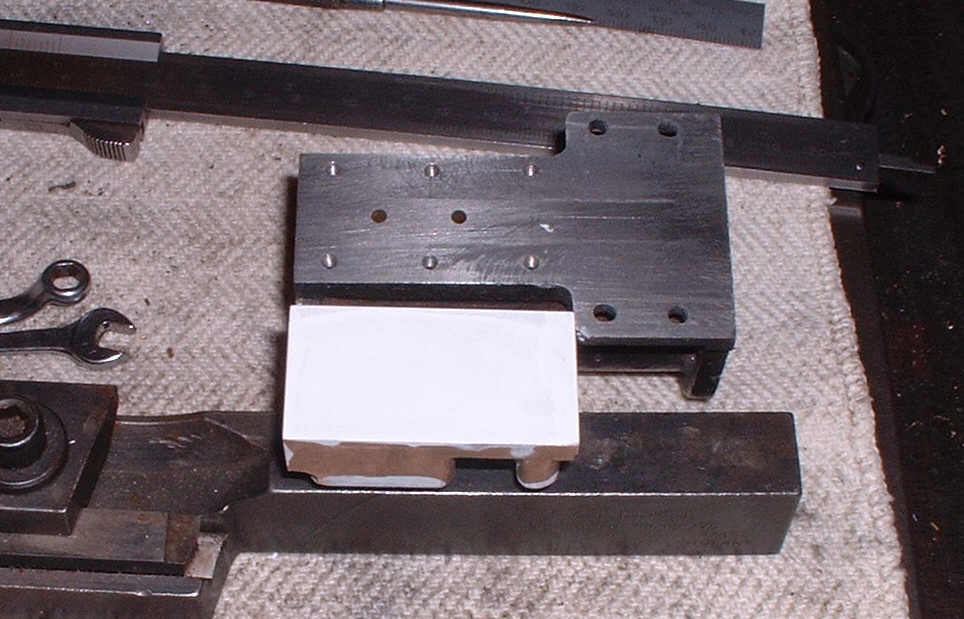
This face has to match the face on the cylinder so a bit of marking out on the surface plate is needed. It was very easy to do this as all the measurements are in sixteenths and I have a full set of parallels, you just find the right combination for the cylinder and transfer the marks to the valve with a sharp marker. About as accurate as you can get.
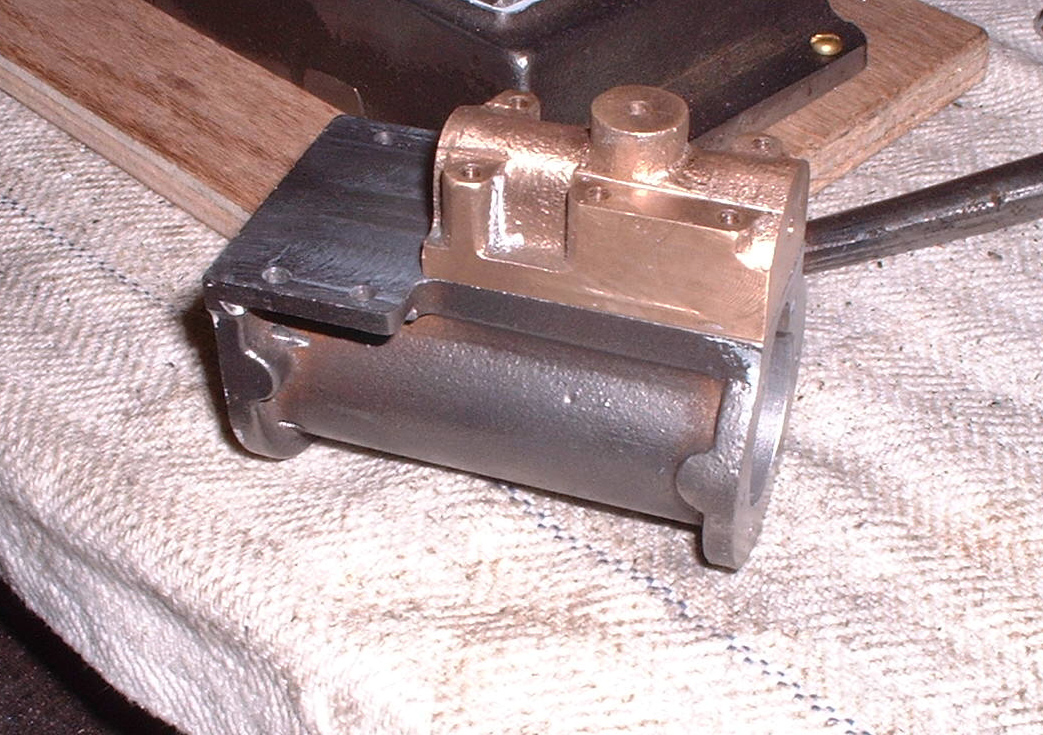
Marked, punched and drilled for the studs, just pilot holes for the bore and steam inlet at the moment.
Next step was to get a close fitting bore for the ground stock that the piston valve is to be made out of. I have left the steam inlet bore 'til last because a large hole half way doen the bore of the valve could have thrown my bore out of line. We're getting there......
Stanley Challenger Graham
Barlick View
stanley at barnoldswick.freeserve.co.uk |
softsuvner
|
Posted - 01/07/2007 : 16:46
Stanley
"it's cheaper", yes that would get my Dad's interest! Every year I take his shopping list to the Midlands ME Exhibition, when I deliver the goods at Xmas, I always pretend that I've lost the receipt to keep his blood pressure down!
I have penetrated the dark corners of the workshop, the mice haven't eaten the Stuart. It's an S 51 horizontal mill engine, with hindsight, probably too small and fiddly for a tyro (what with the cost of BA taps 'an all).
It has been attacked sometime in the past by a large mouse wielding a Myford and a vertical mill of fiendish Chinese-manufacture, so the castings are not entirely unblemished, no terminal damage yet though!
In the privacy of my own computer I have spent a lot of time on the problem of resizing - I hasten to add using Photoshop, not those patches that the spammers keep offering me. I think we may have cracked it so, bear with me, and I may have some Stuart images later in the week. Up my sleeve, so to speak, I do have a complete pre-war Stuart which has it's own slightly sad story attached. Of course, by then, you may be reaching for the oil can and the airline for some first test blows under power...........
Malcolm
|
Stanley
Local Historian & Old Fart
36804 Posts
|
|
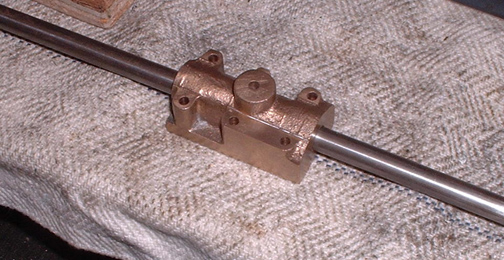
Posted - 01/07/2007 : 17:21
Daft as it looks it has taken all day to finish the valve block. Lots of fiddly marking out and drilling and making tiddly little bits. The piston for the valve had to be done slowly and carefully.... long bores down it and cross drilling for the exhaust port. Talk about measure twice and cut once..... All I need to do now is make six 6BA studs for the cylinder casting and I can fit the valve. I nearly started on that tonight but then realised I was getting obsessive about it! I've spend a lot of time looking at the drawings and trying to work out how they expect me to get at a grub screw on the back of the cross sheft inside the standard. The only thing I can think is that I eather drill an access hole in the standard or find a different way of attaching the trip lever. I wouldn't mind betting that a lot of these hammers have a 1/4" drilling in the standard.....
Stanley Challenger Graham
Barlick View
stanley at barnoldswick.freeserve.co.uk |
panbiker
|
Posted - 01/07/2007 : 22:32
The steam hammer looks to be coming on a treat Stanley. I thought I would just post my latest news about the dreaded pad pin plug on the bike.
SUCCESS!!!!!
I went for the direct approach Stanley, 8mm drill, I already had a 5mm hole fairly central in the grub screw, so I went for it, s... or bust! Once I had drilled the hole I could get a hex key on the allan screw head pad pin behind the remains of the screw, When I unscrewed this it brought the remains of the thread of the grub screw out with it. Inspection of the remains of the plug showed that I had been more or less bang on central with my drilling. (more luck than management!). There was about 1mm of thread left of the plug. It came out clean without any damage. I greased up the pad pin and ran it back in and out a few times to make sure. I've changed the pads and re-assembled everything finger-tight at the moment. I think I'll try Malcolms silicon gasket sealant on the threads before I torque everything back up. I just have to replenish with brake fluid and test and the jobs done. I can book my MOT now.
Incidentally Malcolm, I ended doing the job with the caliper still on the bike! I gave up on trying to get the caliper off, but that's another story, I think I used some of the providence assigned to "drunken men and idiots"
A good result with help from friends, thanks to both of you for all the advice.
Ian |
Stanley
Local Historian & Old Fart
36804 Posts
|
|
Posted - 02/07/2007 : 06:05
Nice one Ian. The thing about boring an obstruction out is that the only thing that is fighting against you is your own possible incompetence! Never mind luck... it's obvious you got the centre right, end of story. The other thing about drilling studs out is that you generate a lot of heat in the thin shell that's left and that thermal shock will often break the seal. For big studs I have drilled a hole in them before now and then shoved a red hot bar in the hloe and then flooded with Easit or similar. Best stuff for that is actually pure Wintergreen oil, it even makes the bottle it is in oily! On a bigger scale, Newton Pickles used to hit thei problem with old steam engines where the piston had rusted tight. He always took the cylinder off and bored the piston out, never even attempted to shift it because that's when you do the damage. I've just remembered, I once got a big stud out by generating heat down a hole in the stud by putting a plain rod in the hole and spinning it with an electric drill to get some friction heat. One last thing, a damaged thread isn't the end of the world, look up Helicoils on the web. Last resort but properly intalled they do the job, I've used them on cylinder head studs on big diesels.
http://www.emhart.com/products/helicoil.asp
Stanley Challenger Graham
Barlick View
stanley at barnoldswick.freeserve.co.uk |
Stanley
Local Historian & Old Fart
36804 Posts
|
|
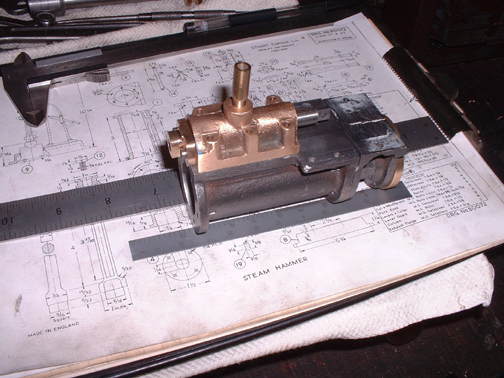
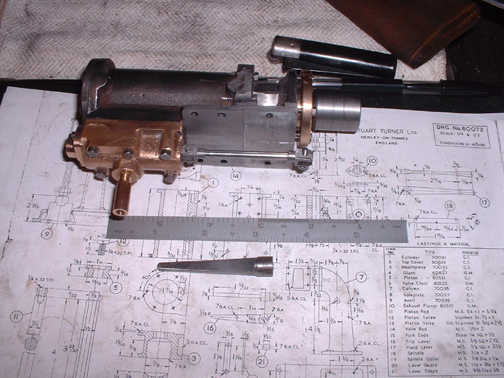
Posted - 02/07/2007 : 17:37
It all felt like big moves today.... The cylinder and piston assembly is built up and will not be stripped again! The piston and gland are fully packed and move freely apart from a certain amount of resistance from the packings which will soon settle in. As you can see the studs for the valve block are in and the valve assembled and fixed to the casting. The two small blocks are the clevis yolks for the valve linkage, they are finished apart from slitting them down the centre. If you look carefully there is one small discrepancy in the mating of the cylinder face and the mouthpiece face. I haven't tried to adjust them because it is down to the mating of the flanges. Seeing as how the piston is perfectly in line and running freely I'll do something about the face of the mouthpiece when I finally assemble it, perhaps a fitting strip. All tiddly little bits in the linkage now and the puzzle of the set screw inside the standard..... I'll call in at Briggs and Duxbury's tomorrow and beg an offcut off a coffin board, I think a nice piece of oak will do for the finished plinth. On a mercenary front, I was thinking about worth today..... Say £300 for the castings and materials, 100 hours at £15 an hour (I'm worth that and it includes establishment costs) and you get £1800 before VAT and profit. Makes you think doesn't it, I doubt if it would fetch that at auction. Not that it matters, it can go and live in the front room, more clutter to dust!
Stanley Challenger Graham
Barlick View
stanley at barnoldswick.freeserve.co.uk |
Stanley
Local Historian & Old Fart
36804 Posts
|
|
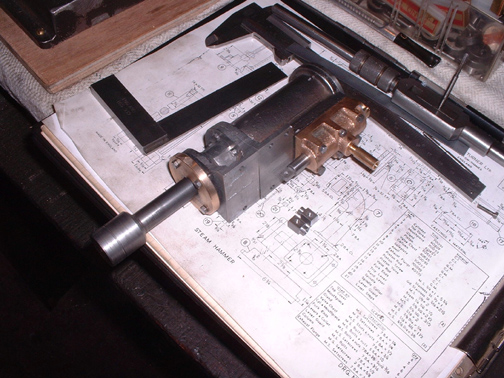
Posted - 04/07/2007 : 07:10
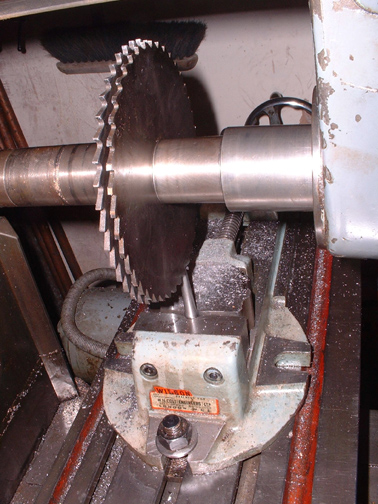
A fun-packed day! Here's a first for me. As I forecast, I have slowed down now I'm into the watchmaking bits..... I had to make a tapered trip lever exactly 1/8" thick and so I gang milled it. Never done this before and all I did was make a 1'8 washer for the miller spindle for a spacer between two fairly thick slitting saws. It worked like magic. OK, I still had to do a bit of filing but got a far better job.
Here's where I was at last night. The valve linkage is finished and fitted and the trip lever started. I have solved the problem of getting at the set screw in the standard. There is a very badly marked 3/8 hole on the back of the standard. I only noticed it yesterday morning when having a bit of a think about what I was doing. All I have to do now is finsih the trip lever, pop the cross shaft for the set screws and make the operating lever. I'll bet it takes two days! Then I shall put compressed air on it and see if it works! After that, strip down to major parts, look for flaws, a lick if paint on the castings and make a proper base......
Stanley Challenger Graham
Barlick View
stanley at barnoldswick.freeserve.co.uk |
belle
|
Posted - 04/07/2007 : 09:41
Those drawings look very interesting, where did they come from? All of this is completely over my head, but I am glad Ian got his screw sorted. Sometimes I marvel at how much work you get done with all these people in your shed...
Life is what you make it |
Stanley
Local Historian & Old Fart
36804 Posts
|
|
Posted - 04/07/2007 : 18:19
The drawings are exacly the same as a dress pattern Belle, just different materials....
A lot of fiddly work..... The trip lever design was too light for my liking so I made another, heavier one. The problem was not enough meat in the boss inside the standard so I upped the size from 3/8 to 1/2 inch stock. It has a quarter whit grubscrew now and has a proper hold on the cross shaft. Everything back together, all we need now is a hand lever so that will happen tomorrow. Then a bit of tidying up and the matter of a plinth.
Stanley Challenger Graham
Barlick View
stanley at barnoldswick.freeserve.co.uk |
Stanley
Local Historian & Old Fart
36804 Posts
|
|
Posted - 05/07/2007 : 06:41
I sat the hammer on the table and had a long critical look at it last night. The anvil is slightly out of line with the hammer and needs raising a fraction as the piston bottoms in the cylinder before striking the anvil face. No big problems there. I think a session on the 1927 lathe is indicated to make the hand lever....... It needs to be perfect.......
Stanley Challenger Graham
Barlick View
stanley at barnoldswick.freeserve.co.uk |
Stanley
Local Historian & Old Fart
36804 Posts
|
|
Posted - 05/07/2007 : 19:22
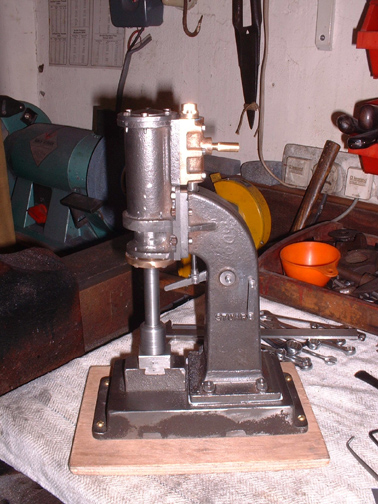
We're getting there. Everything fitted and in line and anvil raised. Bit of titivating needed now in a couple of areas..... I've decided to use the plywood base, gave it a coat of varnish this morning......
Stanley Challenger Graham
Barlick View
stanley at barnoldswick.freeserve.co.uk |
Stanley
Local Historian & Old Fart
36804 Posts
|
|
Posted - 06/07/2007 : 15:30
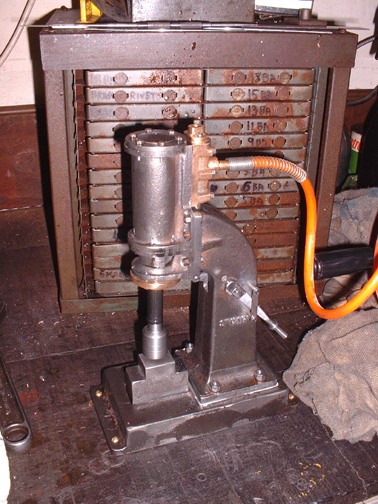
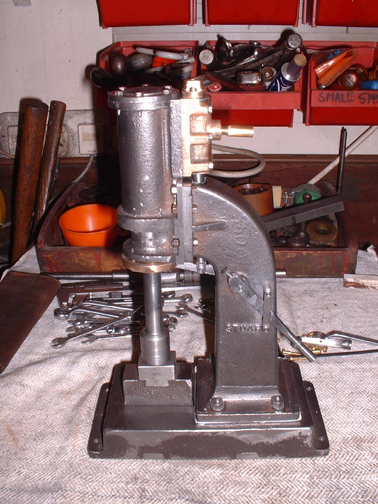
All the bits sorted out so I bolted it to the bench, connected the airline (100psi) and bugger me! It works! Bit of a soft blow because it is all tight and new, it would get better if run more. The black on the shaft is from the graphite packing in the gland.

If you read Henry Mudslays biography you'll find he used to try out smithing techniques using lead as he reckoned it hammered about the same as iron at white heat. I didn't have any lead wire and this solder is a bit harder but if you look carefully it has flattened the end of it. You wouldn't want your finger under it even in its present condition.

No paint to hide the mistakes...... Here it is on its base and I'm declaring it finished. I shall write a few Horace Thornton articles to get me in front of the paper and then start on the three engines for the kids. Based on the Stuart 5A but Newton and I didn't think the con-rod was long enough so we made some patterns to give us more height..... I've made one before, I'll post a pic.
Stanley Challenger Graham
Barlick View
stanley at barnoldswick.freeserve.co.uk |


